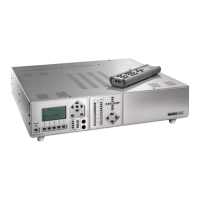
REMOTE CONTROL
The remote control is a common remote
control identical to the one delivered
with the Nagra MPA-RCMI and PL-L.
This means that in the case the Nagra
DAC is combined with an MPA or a
PL-L, the same remote control can be
used for both items.
Buttons 1 to 6
The buttons 1 to 6 permit to select up to
6 remote control ID’s (Identification
number). This permits to control several
Nagra products with a single remote
control. Each front panel on the Nagra
DAC has its own ID number. As the
Nagra DAC has in total 2 panels, 2
different ID’s are needed and the 4 ID’s
left can be used for other products like
the Nagra PL-L or Nagra MPA. To
modify the ID numbers on the DAC
side refer to the Dac menus chapter
“REMOTE CONTROL”.
Example: The main panel has the ID 1,
the front panel has the ID 2.
To change the MAIN volume with the
remote control, press the key 1 once and
adjust the volume using the up or down
arrow keys. To select another input
channel, press the left or right arrow
key.
To change the trim output level, press
the key 2 once and adjust the trim level
using the up or down arrow keys. To
adjust the balance, use the left or right
arrow key.
Buttons A to F
Are not used on the Nagra DAC.
Mute
Pressing once on the mute button, the
Nagra DAC output is muted and the led
above the power button turns red.
Pressing once again, the Nagra DAC
returns to normal condition and the led
turns green.
ON & OFF
When the OFF button is pressed, the
Nagra DAC switches to the standby
position. When the ON button is
pressed, the Nagra DAC switches back
ON.
Up & Down arrow keys
Adjusts the output level.
Left & Right arrow keys
Selects the inputs from A to F. Adjust
the balance and also scrolls through the
menus.
Center button
This button is used when scrolling
through the menus to change parameters.
Scrolling through the menus
All sub-menus can be reached via the
remote control. Select first the
corresponding ID for the main panel
and press the center key once.
By using the up or down arrow keys it
becomes possible to surf through all the
sub-menus and changing parameters. To
confirm any change, press the center key
once before leaving the sub-menu. To
return to the main display, press several
times the left arrow key until it appears.
Battery installation
Turn over the remote control and
remove the screw (screwdriver No 3).
Slide the housing from the front panel.
Install the 9V battery
Reinstall the housing and lock the screw.
 Loading...