Do you have a question about the Nakamichi 1000 and is the answer not in the manual?
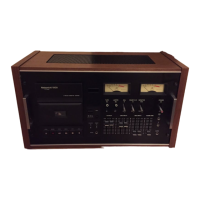
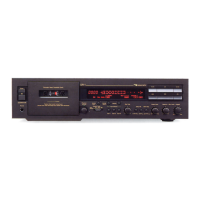
Shows tape movement during recording or playback.
Access to azimuth adjust, test tone, and pitch control.
Eject button opens lid for cassette access.
Displays tape position during operation.
Play, Pause, Stop, Fast Forward, Rewind, Record buttons for tape operation.
Switches for automatic tape rewinding and memory functions.
Adjusts monitoring sound and input signal levels.
Connections for microphones and headphones.
Dolby NR and DNL switches for noise suppression.
Tape Selector, MPX Filter, Pitch Control for tape and signal optimization.
Test Tone, Record Level Calibration, and Alignment Beacon for accurate settings.
Power Switch, Voltage Selector, DIN/Remote sockets for setup.
Connecting to stereo amp outputs/inputs via pin cords.
Connecting via DIN cord if stereo amp is equipped.
Connecting timers or remote controls to the unit.
Connecting stereo mics, blend mic, and headphones.
Power on, load cassette, set monitor switch.
Starting playback, using pause, stop, rewind, fast forward.
Understanding pitch control and tape speed settings.
Setting tape type and Dolby NR for optimal playback.
Adjusting record head azimuth for optimal playback.
Explanation of the tape spill sensing system.
Cleaning heads and demagnetizing metal parts.
Calibrating Dolby NR to 0 dB for specific tapes.
Using test tone and monitor switch for accurate calibration.
Using peak meters and Tone Cal Level for OdB reading.
How the switch adjusts bias and equalization for tape types.
Recommended SX tapes and models for optimal performance.
Recommended EX/EX II tapes and models for optimal performance.
Loading cassette, setting Dolby NR, MPX Filter.
Choosing tape type and resetting tape counter for recording.
Using Record, Pause, Play buttons and monitoring input levels.
Breaking cassette tabs to prevent accidental recording.
Performing Hi-Fi recording from other tape sources.
Using the Nakamichi as a mixer for multiple audio sources.
Understanding the peak reading level meters and their range.
Using meters to set record levels, especially for open reel dubbing.
Instructions for removing and fixing the cassette lid.
Information on lubrication for moving parts.
Adjusting the voltage selector for different power supplies.
How Dolby NR reduces hiss and improves signal-to-noise ratio.
How DNL reduces high-frequency noise during playback.
Troubleshooting tape not running or unsteady travel.
Resolving issues like no record lamp, hissing, distorted sound.
Troubleshooting weak treble or large hum noise.
Details on power, tape speed, frequency response, and S/N ratio.
Specifications for microphone, line inputs, and outputs.
Recommended SX and EX cassette tapes.
Head demagnetizer, microphones, remote controller, digital timer.
| power supply voltage | 100, 117, 220, 240 V |
|---|---|
| power frequency | 50/60 Hz |
| tape speed | 1-7/8 ips |
|---|---|
| wow and flutter | Less than 0.1% (DIN 45507 Weighted Peak) |
| frequency response | 35 - 20, 000 Hz +3 dB |
| signal to noise ratio | Better than 65 dB |
| total harmonic distortion | Less than 1.5% (at 400Hz, 0 dB) |
| erasure | Better than 60 dB (at 1 KHz, Saturation Level) |
| channel separation | Better than 35 dB (at 1 KHz, 0 dB) |
| cross talk | Better than 60 dB (at 1 KHz 0 dB) |
| bias frequency | 105 KHz |
| mic input | 0.5 mV 600 ohm |
|---|---|
| blend mic input | 0.5 mV 600 ohm |
| DIN mic input | 0.6 mV 600 ohm |
| line input | 100 mV 47 Kohm |
| DIN radio input | 10 mV 27 Kohm |
| line output | 1.0 V (Max.) Variable |
| DIN line output | 1.0 V (Max.) Variable |
| headphones output | 1 mW 0 dB |
| width | 20-11/16' |
|---|---|
| height | 11-11/167' |
| depth | 8-5/8' |