© National Instruments Corporation 3 BNC-2115 Installation Guide
1. Place the BNC-2110 near the host computer or use the optional DIN
rail-mounting kit, which you can order from National Instruments.
For more information about the DIN rail-mounting kit, refer to the
National Instruments Web site at
ni.com or call the office nearest you.
2. With your DAQ device powered off, connect the BNC-2115 to your
DAQ device with the extended I/O end of the SH1006868 cable.
3. Make sure the floating source (FS)/ground-referenced source (GS)
switches under BNC connectors AI <16..55> are set correctly for your
application. National Instruments recommends that you set the
switches to GS for analog output and digital signals.
4. Connect the field signals to the BNC connectors and/or digital screw
terminal plugs. Refer to the Connecting Signals to the BNC-2115
section for more information.
5. Refer to the DAQ Quick Start Guide to launch Measurement &
Automation Explorer (MAX), confirm that your device is recognized,
and configure your device settings. National Instruments recommends
that you use your DAQ device in differential mode when using the
BNC-2115.
6. Test specific device functionality, such as the ability to send and
receive data. Refer to the DAQ Quick Start Guide for more detailed
information on running test panels in MAX.
When you have finished using the BNC-2115, power off any external
signals connected to the BNC-2115 before you power off the computer.
Caution The BNC-2115 is not designed for input voltages greater than 42 V, even if a
user-installed voltage divider reduces the voltage to within the input range of the DAQ
device. Input voltages greater than 42 V can damage the BNC-2115, any device connected
to it, and the host computer. Overvoltage also can cause an electric shock hazard for the
operator. National Instruments is not liable for damage or injury resulting from misuse.
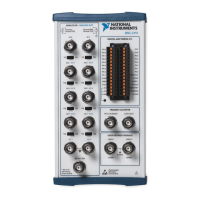
Connecting Signals to the BNC-2115
This section describes how to configure the BNC-2115. Figure 2 shows the
front panel of the BNC-2115
Note With NI-DAQmx, National Instruments has revised its terminal names so they are
easier to understand and more consistent among NI hardware and software products.
The revised terminal names used in this document are usually similar to the names they
replace. For a complete list of traditional NI-DAQ terminal names and their NI-DAQmx
equivalents, refer to the Terminal Name Equivalences table in the E Series Help at
ni.com/manuals.
 Loading...