English-18
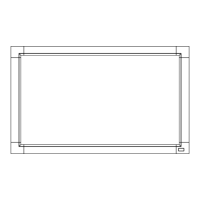
B Type
A Type
Computer
Figure 1
A: Sensor
Connecting a USB device
USB1: USB downstream port (Type-A).
Connect a USB compatible flash memory or keyboard to Down Stream Port.
USB2: USB upstream port (Type-B).
Connect to a USB compatible computer with a USB cable.
A USB compatible computer connected to USB2 can control the devices connected to USB1.
The device connected to USB2 allows the touch panel function to work.
USB CM1 (2A): Power supply port.
Please refer to the specifications page for power supply information (see page 65, page 66 and page 67).
USB CM2: Service port.
Please do not connect devices.
USB MP: USB downstream port (Type-A).
To use the Media Player function, please use this port.
• Pleasemakesuretheconnectorshapeandorientationis correctly aligned when connecting the USB device or cable.
• DependingontheuseofcomputerBIOS,OSordevice,theUSBfunctionmaynotbeworking.Inthiscase,pleasecheck
user’s manual of your computer or device, or contact your supplier for detailed information.
• BeforeturningoffthemainpowerswitchofthemonitororshuttingdownWindows
®
, please turn off the USB function and
remove the USB cable from the monitor. You may lose data when the computer crashes.
• ItmaytakeafewsecondsuntilthemonitorrecognizestheUSBinput.DonotdisconnecttheUSBcableordisconnect and
reconnect the USB cable before the monitor recognizes the input.
• You can set power supply for USB CM1 (2A) at USB POWER in the OSD menu (see page 43).
• When you use the USB CM1 (2A) port for power supply, please use a USB cable that supports 2A.
• Please refer to the USB in the OSD menu (See page 43) for the USB setting.
NOTE: USB CM1 (2A) and USB CM2 are not corresponding port.
Please refer to the connection (See page 16) to connect USB devices to the monitor.
CAUTION: Do not bind the USB cable. It may trap heat and start a fire.
For using Touch Panel
1. Turn off the monitor.
2. Install the equipment.*
1
- Using slot 2 type PC:
Connect the slot 2 type PC into the option board slot.
NOTE: Please refer to the slot 2 type PC’s manual for
connection.
NOTE: When you set option board accessory other than
slot 2 type PC, touch function may not work.
- Using external computer:
Connect the B type connector to the USB upstream port on the
left back side of the monitor and the A type connector to the
downstream port on the external computer (Figure 1).
3. Turn on the monitor.
*1: Please contact your NEC customer support for more detailed information.
Please contact your NEC customer support for the setting of the touch panel
function in multiple screens.
Monitor Setting
Select the input signal.
- Using slot 2 type PC: Select [OPTION]
- Using external computer: Select the input signal which is
supplied by the computer connected to USB connector.
NOTE: Please refer to “The touch panel does not respond” in
“Troubleshooting” when the touch panel function does not work.