FilterCart OriginalEN
14
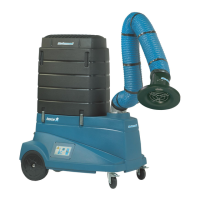
5 Directions for use
The unit is only intended for indoor use and is designed for extraction and
ltration of dust or welding fumes. It must not be used for extraction of uids.
Figure 4 and the following list illustrates how to use the unit:
1. Lever for adjusting the damper.
2. Switch for spotlight.
The hood of the extraction arm is to be positioned as close to the pollution
source as possible. The unit is to be moved from behind according to Figure 4,
item A and with the wheels unlocked. The extraction arm is to be positioned
with the wheels locked according to item B.
WARNING! Work safety regulations. Risk of personal injury, re or
explosion.
• The unit must not be used in an environment with danger of explosion or for
dust or gases in explosive concentrations.
• If the unit has been used for dust applications it must not be used for
welding fumes or grinding dust.
• The unit must not be used for extracting toxic substances.
• The unit must not be used without lter cartridge and casing.
6 Changing the lter cartridge
The lter cartridge is disposable and is to be thrown-away after use. The life of
the lter cartridge varies greatly depending on how the unit is used, how much
and what type of pollutants are collected.
Regularly monitor the unit’s extraction capacity at the hood and change the
lter cartridge when the extraction capacity is too poor. Always check that
the hoses for the extraction arm and the fan inlet are not damaged before it is
decided to change the lter cartridge.
WARNING! Risk of personal injury.
Use necessary personal safety equipment when replacing the lter cartridges.
Change the lter cartridge as follows (see also Figure 5):
1. Disconnect the mains connection cable.
2. Unlock the eccentric locks and remove the lter casing.
3. Use the plastic bag which comes with the new lter cartridge and pull it
over the used cartridge. Fold the plastic bag under the cartridge.
4. Handle the used lter cartridge according to the relevant regulations for
the collected substances.
5. Wipe off the lter cartridge contact surfaces in the unit.
6. Check that the new lter cartridge is not damaged. Then t it on the unit.
7. Ret the lter casing. Make sure the eccentric locks tighten the lter
casing properly.
• A: Increasing the locking power.
• B: Decreasing the locking power.

 Loading...