I
NSTALLATIOI{ INSTRUCTIOIIS
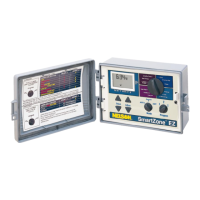
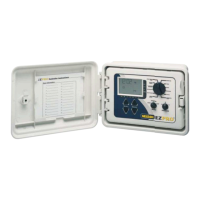
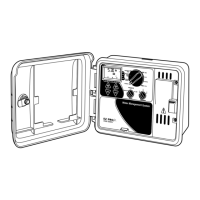
1 . Select an lND00R
location near a shndad lail AC clctt
outlet
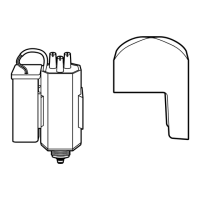
(230V
AC
outlet
lor models
8'1748176)-
httpoftarrt.
-
D0 NOT
plug
in transformer
until
you
IEE rr*
I
wiring connections.
-
D0 NOT
install
outdoors or
where unft utf
be ogoscd &ecily
to adverse weather
and/or direct sun[g[t-
-
D0 1{0T install
in
area
where temperafrses
aB Fsstil tr C
(32'
F) or higher than
55'C
(131"
D.
-
00 NOT install
on same
outlei,
or lim, e drr lif arnnt
draw
products.
2. a) Screw one #1
0 screw
in the wall af fn l:ifi
yut'd
fa
to view the
LCD. Leave a slight
gnp
bdwr hd d
screw and wall.
b) Place the keyhole
on the back of
the
cuffionrtrc
screw and slide
unit downward
to sd
ql
scrr-
c!
Remove
access door from bottom-fiod d ui d seanrc
thr0ugh
center
screw
hole with minimun lyr'scrr-
3.Wire
valves
using l8AWG color-coded, mtili-strri *eci
burial wire. D0 NOT
exceed 800
feet wire
nns"
-
Use one
wire
per
station
plus
one
'common
rire'.
-
All valve wires
MUST be connected before AC
pow
b spbd.
f,otE Connecti0ns that will
be buried
undergrilrd dml hE€l
connections and
be approved
lor undergrBnd
lEa
-
The common
wire should connect all Etv€s and bcqrc a
single
wire
that
connects
to the termirnl nEbd
ltr-
4.lt using a
pump
start relay, or master nfue, corrEd
riG
b
terminal marked
'MV'.
WABIllll0: Do not
connect
pump
direcfly to cortroh-
A
pump-start
relay must be used.
flOE Check local
reoulations to ensure compliance dh rt
-i|.".trlbl
I
installation
codes.
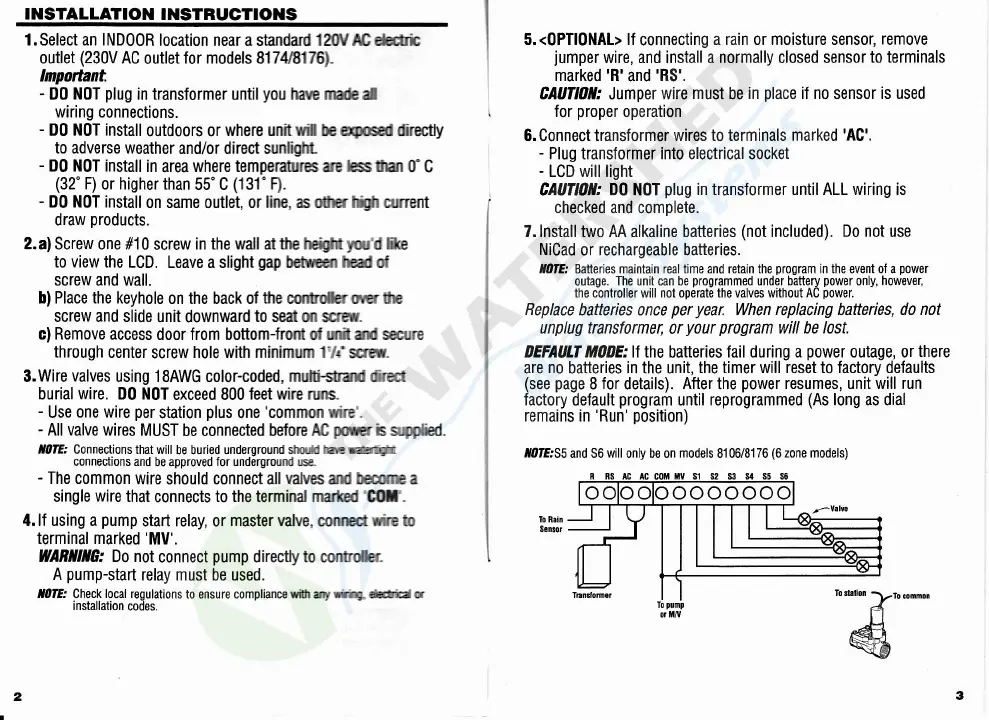
5.<OPTIONAb lf
connecting a
rain or moisture sensor,
remove
jumper
wire, and install a normally closed sensor
to terminals
marked
'R'and'RS'.
CAWOII: Jumper wire
must
be
in
place
if no
sensor
is used
for
proper
operation
6. Connect transformer wires t0 terminals marked 'AG'.
-
Plug transformer into electrical socket
-
LCD will light
CAUfl0lI: D0 NOT
plug
in transformer until ALL wiring is
checked and complete.
7. lnstall two AA
alkaline
batteries
(not
included). Do
not
use
NiCad
or rechargeable batteries.
tAtEi Batteries maintain real time and retain the
prooram
in the event of a
power
outage.
The
unit can
be
programmed
under battery
power
only,
however,
the conkoller will not operate the valves without AC
power.
Replace
bafteries 1nce
peryear.
When
replacing
batteries,
d0 not
unplug transf,rmer,
or
y\ur program
will be lost.
IIEFAULT M0llE: lf the
batteries
fail during a
power
outage, or there
are
no
batteries in the unit,
the timer will reset to factory defaults
(see
page
8
for
details).
After
the
power
resumes, unit will run
factory default
program
until reprogrammed
(As
long as dial
remains in
'Run'
position)
XotE
55 and SO will only be on models 8106/8176
(6
zone models)
 Loading...