EasyManua.ls Logo

New Holland BB1290 - User Manual

New Holland BB1290
4 pages
Print Icon
To Next Page IconTo Next Page
Loading...
Your Gazeeka package should contain the following items:
Transmit Antenna - An "Active" antenna, microwave cable assembly, and an ISObus control
cable that attaches to the antenna.
Receive Antenna - A "Passive" antenna.
Mounting Brackets - Two type "A" mounting brackets and two type "B" mounting brackets.
Each antenna support frame requires one type "A" and one type "B" bracket. Eight M10 x 25
bolts for attaching the antenna frames to these brackets.
Antenna Protection Bars - Two antenna protection bars with M8 hex head screws.
Bolts - Four M10 x 120mm bolts for attaching the antenna units to the rear baler frame
(M10x120).
Cable Ties - A quantity of large and medium cable ties.
Owner's Manual & Quick Reference Card
1. Unpack the box of Gazeeka components. Note that one antenna has the connector which attaches to the
baler cable. This antenna is the active (or transmitting) antenna and must be mounted on the left hand
side of the baler as viewed from the back.
2. Carry out this installation with the baler tailgate down.
3. Use the existing top hole for the top bracket.
4. Use the supplied template, or measure down 350mm and drill 10.5mm hole.
5. Secure the two top brackets in place using a spirit level to get them horizontal. Tighten these bolts up.
Note there are two types of brackets so make sure you use the appropriate bracket as per the photos
below. The flange of the brackets will be at the top for the top bracket and at the bottom for the bottom
bracket. This is done to minimize the chances of interference to the microwave signal.
6. Secure the bottom two brackets in place just tight enough to be able to move them around by hand. All
of the bracket bolts that go through the baler frame require Nyloc nuts.
7. Hang the two antennas (active on the left side) on the top brackets using the M10 x 30 hex head screws
provided (do not fully tightened at this stage). Move the bottom bracket around to line up with the bottom
holes in the antenna and secure this in place with the remaining screws. Now tighten up the four antenna
screws on each antenna and then tighten up the bottom bracket bolts.
BB1290 + (B07) & BB1290 HD (B11) INSTALLATION GUIDE
Question and Answer IconNeed help?

Do you have a question about the New Holland BB1290 and is the answer not in the manual?

Summary

Gazeeka Package Components and General Installation

Package Contents Identification

Lists the essential components included in the Gazeeka package for baler installation.

General Installation Steps

Provides sequential instructions for mounting antennas, protection bars, and routing cables.

ISObus Loom Installation

Connecting the ISObus Loom

Details the procedure for connecting the 870-E96-R00 ISObus loom to the baler and Gazeeka active antenna.

Overview

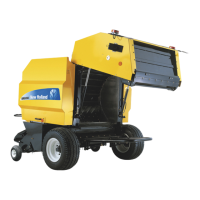
This document outlines the installation procedure for the Gazeeka system on New Holland BB1290 and BB1290 HD balers, specifically for models with the B07 and B11 designations. The Gazeeka system appears to be an agricultural monitoring or control system, likely related to baler operation, given its components and installation context.

Function Description:

The Gazeeka system consists of an "Active" (transmitting) antenna and a "Passive" (receiving) antenna, along with associated cabling, mounting hardware, and a touchscreen interface. The "Active" antenna is responsible for transmitting signals, while the "Passive" antenna receives them. The system utilizes microwave technology, as indicated by the "microwave cable assembly" and the need to minimize interference to the "microwave signal." The ISObus integration suggests that the Gazeeka system is designed to communicate with the baler's existing control network, allowing for integrated operation and data exchange. The touchscreen serves as the user interface for monitoring and controlling the system. The "Antenna Protection Bars" indicate a need to safeguard the antennas from physical damage during operation, which is common in agricultural environments. The mention of "baler cable" and "tractor cabin" implies that the system connects the baler to the tractor's control system, likely providing real-time feedback or control capabilities to the operator. The overall function appears to be related to enhancing or monitoring baler performance, possibly involving bale density, moisture, or other parameters critical for efficient baling.

Important Technical Specifications:

  • Antenna Types: Active (transmitting) and Passive (receiving).
  • Antenna Mounting: The active antenna must be mounted on the left-hand side of the baler (as viewed from the back).
  • Mounting Hardware: Includes two type "A" and two type "B" mounting brackets, eight M10 x 25 bolts for antenna frames, and four M10 x 120mm bolts for attaching antenna units to the rear baler frame.
  • Antenna Protection: Two antenna protection bars with M8 hex head screws are provided.
  • Cable Ties: Large and medium cable ties are included for securing cables.
  • ISObus Integration: The system is compatible with ISObus looms, specifically the 870-E96-R00 (CNH ISObus loom) for 870i units. This involves connecting to the baler UCM (Universal Control Module) and auxiliary power box.
  • Bolts: M10 x 25, M10 x 120, and M8 hex head screws are used for various mounting points. Nyloc nuts are required for bracket bolts going through the baler frame.
  • Cable Routing: The microwave cable assembly is contained within a flexible conduit.
  • Touchscreen: A Gazeeka touchscreen is installed in the tractor cabin using a RAM mount.

Usage Features:

  • Integrated Operation: The ISObus loom allows the Gazeeka system to integrate with the baler's existing control system, enabling the instrument to load on the ISObus terminal.
  • User Interface: A touchscreen in the tractor cabin provides the operator with an interface for monitoring and potentially controlling the system.
  • Antenna Placement: Specific instructions are provided for mounting the active antenna on the left-hand side of the baler, ensuring optimal signal transmission and reception.
  • Cable Management: The use of flexible conduit for the microwave cable and cable ties for securing other cables helps in organizing and protecting the wiring, minimizing interference and damage.
  • Protection Bars: The inclusion of protection bars for the antennas indicates a design consideration for durability in harsh agricultural environments, safeguarding critical components from physical impact.
  • Tailgate Position: The installation procedure specifies that the baler tailgate should be down during installation, which is a practical consideration for access and safety.
  • Bracket Orientation: The instructions emphasize the correct orientation of mounting brackets (flange at the top for the top bracket, bottom for the bottom bracket) to minimize microwave signal interference.

Maintenance Features:

  • Robust Design: The use of protection bars for the antennas suggests a design intended to withstand the rigors of agricultural use, reducing the likelihood of damage and subsequent maintenance.
  • Secure Fastening: The requirement for Nyloc nuts on bracket bolts indicates a focus on secure fastening to prevent loosening due to vibration during operation, thereby reducing the need for frequent re-tightening.
  • Cable Protection: Running cables clear of moving parts and following existing cable paths minimizes wear and tear, extending cable life and reducing the need for repairs or replacements.
  • Modular Components: The system appears to be composed of distinct modules (antennas, brackets, touchscreen, cables), which could simplify troubleshooting and replacement of individual components if necessary.
  • Owner's Manual Reference: The document frequently refers to the "Model 870 Owner's Manual" for detailed instructions on cable assembly (Section 2.2) and commissioning/setup (Section 2.3), indicating that comprehensive maintenance and operational guidelines are available in a separate, detailed manual. This suggests that users are expected to consult the owner's manual for routine checks, adjustments, and troubleshooting.

New Holland BB1290 Specifications

General IconGeneral
BrandNew Holland
ModelBB1290
CategoryFarm Equipment
LanguageEnglish

Related product manuals