6 7
5 FIRST TIME RUNNING
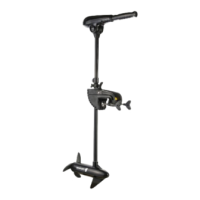
1. Place the Electric Outboard onto the back of the vessel in the
stow-away position.
2. Loosely tighten the Transom Mounting Screws until they grip the
Transom Mount.
3. Press the Tilt Lever and slowly let the motor enter the water.
4. Use the Depth Adjuster Collar to adjust the height of the motor.
Recommended running depth is between 6in to 12in (15cm to
30cm) below the waterline.
5. When you are satisfied that the motor is at a safe depth and isn’t
too close or in danger of hitting the bottom of the waterway, you
may proceed to tighten the Transom Mounting Screws.
6. Once this is done, connecting the battery to the motor should be
safe. Ensure that the twist grip is in the neutral position and the
nuts are tight on the terminals to prevent a poor connection.
7. Select the desired speed and direction using the twist grip on the
tiller arm.
8. Do not go from full forward speed to full reverse speed without
letting the propeller stop turning first, or motor damage
may occur.
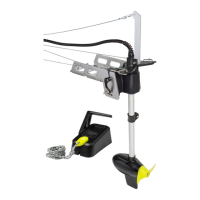
6 TRANSOM MOUNT USAGE
1. Tilt Position Lever
2. Steering
Tension
Adjustment
4. Transom
Mount Screw
3. Depth
Adjustment
Collar
WARNING: Before the installation, make sure the area between column
and bracket is clear.
1. Tilt Position Lever - This lever allows the user to adjust the tilt
(angle) of the motor. Push tilt position lever, adjust tilt of motor,
release lever.
2. Steering Tension Adjustment - To adjust the steering resistance,
simply tighten or loosen the tension knob located on front of the
mount.
3. Depth Adjustment Collar - The depth of the motor can be
adjusted up and down by loosening the depth collar tension knob
located on the column directly above the mount. The column can
be adjusted and the motor can be positioned at the desired depth
by re-tightening the tension knob.
4. Transom Screws - The transom clamp screws allow for easy motor
removal and installation. Mount your motor on the transom then
tighten the transom clamp screws securely.
7 BATTERY METER READING
When the motor is connected to the battery, the battery meter will
light up to indicate the amount of power left in the battery. There are
10 LED lights on the top cover, when nine (9) blue LED’s are out, the
meter is indicating that the input voltage is less than 9.5V (normal
voltage draw, 12V). It is advised to disconnect the motor from the
battery to prevent damage to the battery and recharge.
It is important to pay attention to the remaining power of the battery,
make sure to reserve enough battery power that you can travel back
with motor.
CAUTION: This battery voltage meter is only designed for 12V deep cycle battery
power supply system (24V for the 86lbs motor), not for lithium battery system. You
cannot trust the reading if the motor is powered by the lithium battery.
 Loading...