The NexiGo NS32 is a wireless game controller designed for use with the Nintendo Switch and Android devices. It offers enhanced functionality beyond a standard Switch Pro Controller, including a Turbo button for repetitive tasks and button mashing, a six-axis gyroscope, and built-in acceleration functions for competitive gaming. The controller is constructed from durable ABS material.
Product Overview:
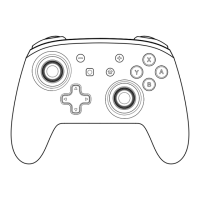
The controller features a standard layout with several key components:
- Front:
-
-
-
- Screenshot Button
-
- Home Button
-
-
-
- RGB Lights
-
- X/Y/A/B Buttons
-
- Right Joystick / R3
-
- Left Joystick / L3
-
- D-Pad
-
- Player Indicator LEDs
- Top/Back:
-
- R Button
-
- ZR Button
-
- L Button
-
- ZL Button
-
- USB Type-C Charging Interface
-
- Pairing Button
-
- Turbo Button
Technical Specifications:
- Battery Capacity: 600mAh
- Charging Voltage: DC 5V ⎓ 600mA
- Playtime: 6 Hours
- Connection Method: Wireless or Wired
Usage Features:
RGB Light Setting:
The controller features customizable RGB lighting with seven different colors and three light modes.
- Changing Color: Press the Turbo button and click the L3 or R3 key simultaneously. The colors will cycle through seven options.
- Adjusting Brightness: Press the Turbo button and hold the L3 or R3 key to cyclically increase or decrease the brightness of the RGB lighting. Holding the Turbo button for more than 6 seconds during this process will reset any applied turbo functions.
- Changing Light Mode: Press and hold the Turbo button, then double-click the L3 or R3 key simultaneously. This cycles through three modes: a breathing light pattern, a colorful flowing light pattern, and lights off.
Wireless Connection (for Switch/Android):
- Before First Use: Ensure your device is powered on and updated to the latest version.
- Place the Switch console in the dock.
- Connect the controller to the dock using the included USB cable.
- Unplug the cable from the controller. The controller will automatically connect wirelessly to the Switch console within 1-2 seconds. It is recommended to calibrate the joystick if this is the first connection (instructions in FAQ).
- Wireless Pairing (Switch Console):
- Ensure the Switch console is powered on. From the home menu, select "Controllers."
- Select "Change Grip/Order."
- Press and hold both the Y + Home buttons (or press and hold the Pairing button) for more than two seconds to enter pairing mode.
- The Player Indicator LEDs on the controller will flash, then the appropriate LED will illuminate upon successful pairing.
- Wireless Pairing (Android):
- Ensure the Android device is powered on.
- Press and hold the X + Home buttons for more than two seconds to enter pairing mode.
- On your Android device, navigate to "Settings" > "Wireless," then select "Gamepad" from the list of options.
- The Player Indicator LEDs will flash, then the appropriate LED will illuminate upon successful pairing.
- To Disconnect: While in wireless connection mode, press and hold the Home button for three seconds. The controller will unpair from your device.
- After First Use:
- Press and hold the Home button for one second to wake up the controller.
- The controller will automatically connect to the last paired device.
USB Wired Connection (for Switch/PC):
- Connect the controller to your device using the provided USB cable.
- Note: A PC will charge the controller while connected; a Switch console will not.
- There are three wired connection modes, switchable by pressing and holding the + and - buttons simultaneously for three seconds:
- a. DirectInput mode (Default for PC): The 2nd and 4th player indicator LEDs will remain permanently lit. This mode may have limitations in some games.
- b. XInput mode (Alternate for PC): Use this mode if DirectInput has limitations. The 1st and 4th player indicator LEDs will remain permanently lit.
- c. Switch mode (for Switch console): Only the player indicator LED corresponding to your controller position will remain permanently lit.
- Switching to a wired connection automatically disconnects any wireless connection.
- Unplugging the wired connection causes the controller to automatically attempt to reconnect to the last paired device.
Turbo Function:
Many buttons (A/B/X/Y/R/L/ZL/ZR) can be set to turbo functionality.
- Activating Turbo: Press the desired button (e.g., A) and the Turbo button simultaneously, then release. The button will now be in Turbo mode.
- Deactivating Turbo: Press the same button (e.g., A) and the Turbo button simultaneously again.
- Clearing All Turbo Settings: Press and hold the Turbo button for five seconds.
Turbo Speed Adjustment:
Turbo speed can be adjusted in three levels:
- Decreasing Speed: Press the Turbo button and the - key simultaneously.
- Increasing Speed: Press the Turbo button and the + key simultaneously.
- Speed Levels:
- a. Continuous burst at 5 times per second (Fast)
- b. Continuous burst at 12 times per second (Faster)
- c. Continuous burst at 20 times per second (Fastest)
- Indicator: When adjusting speed, the controller lights will flash. A slow flash indicates the slowest speed, and the frequency increases with faster turbo speeds.
Motor Vibration Strength Adjustment:
The controller has four vibration adjustment levels:
- Decreasing Strength: Press the Turbo button and the Down key simultaneously.
- Increasing Strength: Press the Turbo button and the Up key simultaneously.
- Vibration Levels:
- a. 0% - Vibration motors off completely (can also be done in game settings).
- b. 30% - Lightest setting, minimal feedback.
- c. 75% - Default setting, noticeable feedback.
- d. 100% - Maximum setting, significant feedback.
- Indicator: After choosing a vibration level, the motor will vibrate at that level for 0.5 seconds to confirm the selection.
Maintenance Features:
Factory Reset:
To reset the controller, press and hold the Home button for at least ten seconds. The controller will power off and reset itself. After a factory reset, you will need to re-pair the controller to your devices using the methods outlined above.
Sleep Function:
- The controller automatically goes to sleep if a wireless connection is unsuccessful after ten seconds.
- To prolong battery life, the controller will automatically go to sleep after five minutes of inactivity (no buttons pressed).
Charging Indicator:
- Low Battery: The built-in player indicator LEDs will rapidly flash. Charge the controller when this occurs.
- Very Low Battery: If the charge level drops too low, the controller will automatically enter sleep mode to preserve the battery.
- Charging: The player indicator LEDs will slowly flash while charging.
- Fully Charged: The LEDs will remain illuminated and stop flashing. The lights will turn off after a few minutes if the controller is fully charged and not in use.
FCC Requirement:
The device complies with Part 15 of the FCC Rules, meaning it is subject to two conditions: (1) it may not cause harmful interference, and (2) it must accept any interference received, including interference that may cause undesired operation. Users are advised that any changes or modifications not expressly approved by the manufacturer could void their authority to operate the equipment. If the equipment causes harmful interference to radio or television reception, users are encouraged to try to correct the interference by reorienting or relocating the receiving antenna, increasing the separation between equipment and receiver, connecting the equipment to a different circuit, or consulting a dealer or experienced radio/TV technician.
Support:
For further assistance, users can contact cs@nexigo.com. Product registration at nexigo.com/warranty within 14 days of delivery extends the warranty coverage to two years. An FAQ section is available by scanning a QR code for the latest manual and details.