English – 11
smxi - smxis radio receiver
0682
SMXI and SMXIS are 4-channel radio receivers for control units equipped
VHSG2,SXODBNMMDBSNQ3GDODBTKH@QHSXNEBNLO@SHAKDSQ@MRLHSSDQRHRSG@SSGD
HCDMSHjB@SHNMBNCDHRCHEEDQDMSENQD@BGSQ@MRLHSSDQ3GDQDENQDHMNQCDQSN@KKNV
the receiver to recognise a determined transmitter, the recognition code must
ADLDLNQHRDC3GHRNODQ@SHNMLTRSQDOD@SDCENQD@BGSQ@MRLHSSDQQDPTHQDCSN
communicate with the control unit.
Notes:
– Up to a maximum of 256 transmitters can be memorised in the receiver. No
one transmitter can be cancelled; all the codes must be deleted
– For more advanced functions use the appropriate programming unit.
PRODUCT DESCRIPTION
3GDQDBDHUDQED@STQDRNTSOTSR@KK@U@HK@AKDNMSGDTMCDQKXHMFBNMMDBSNQ3N
jMCNTSVGHBGETMBSHNMHRODQENQLDCAXD@BGNTSOTSRDDBG@OSDQ
During the transmitter code memorisation phase, one of these two options may
be chosen:
Mode I - Table B1: Each transmitter button activates the corresponding out-
OTSHMSGDQDBDHUDQSG@SHRATSSNM@BSHU@SDRNTSOTSATSSNM@BSHU@SDRNTS-
put 2, and so on. In this case there is a single memorisation phase for each
SQ@MRLHSSDQCTQHMFSGHROG@RDHSCNDRMSL@SSDQVGHBGATSSNMHROQDRRDC@MC
just one memory sector is occupied.
Mode II - Table B2: Each transmitter button can be associated with a particu-
K@QNTSOTSHMSGDQDBDHUDQDFATSSNM@BSHU@SDRNTSOTSATSSNM@BSHU@SDR
NTSOTS@MCRNNM(MSGHRB@RDSGDSQ@MRLHSSDQLTRSADLDLNQHRDCOQDRRHMF
the required button, for each output to activate. Naturally, each button can
activate just one output while the same output can be activated by more than
NMDATSSNM.MDLDLNQXRDBSHNMHRNBBTOHDCENQD@BGATSSNM
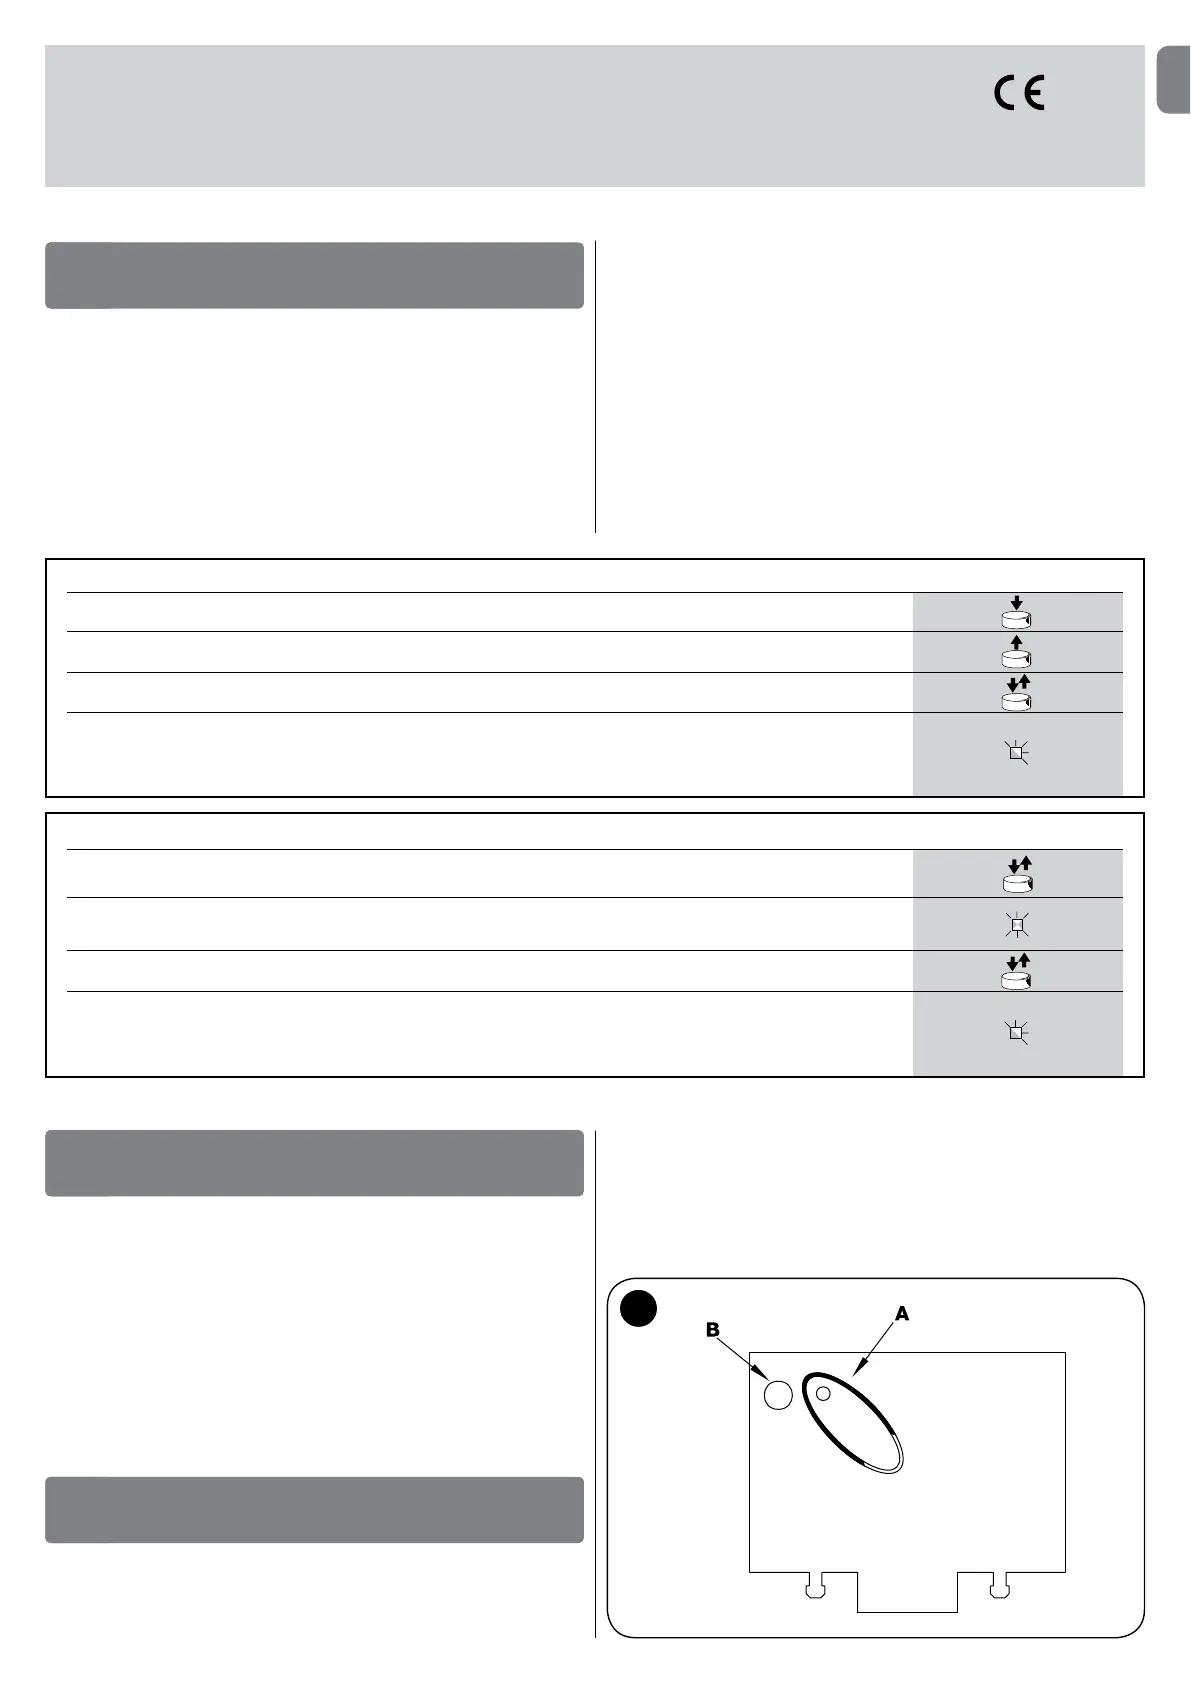
TABLE%0RGH,PHPRULVLQJ$OOEXWWRQVDUHPHPRULVHGRQWKHUHODWHGUHFHLYHURXWSXW
01. Press and hold down the receiver button for at least 3 seconds
02. Release the button when the Led lights up
03. /TRGENQ@SKD@RSRDBNMCR@MXNESGDATSSNMRNESGDSQ@MRLHSSDQSNADLDLNQHRDCVHSGHMRDBNMCR
Notet,IWKHSURFHGXUHZDVPHPRULVHGFRUUHFWO\WKH/HGRQWKHUHFHLYHUZLOOƅDVKWLPHV,IWKHUHDUHRWKHUWUDQVPLWWHUV
WRPHPRULVHUHSHDWVWHSZLWKLQDQRWKHUVHFRQGV7KHPHPRULVDWLRQSKDVHƄQLVKHVLIQRQHZFRGHVDUHUHFHLYHG
for 10 seconds.
3s
RX
RX
2s
x3
INSTALLING THE AERIAL
2
3GDQDBDHUDQQDPTHQDR@M !%NQ !%*(3SXOD@DQH@KSNVNQJOQNODQKXVHSGNTS@M
@DQH@KSGDQ@MFDHRKHLHSDCSNITRS@EDVLDSQDR3GD@DQH@KLTRSADHMRS@KKDC@R
GHFG@RONRRHAKDHESGDQD@QDLDS@KNQQDHMENQBDCBNMBQDSDRSQTBSTQDRMD@QAXXNT
can install the aerial on top. If the cable supplied with the aerial is too short, use
@BN@WH@KB@AKDVHSG.GLHLODC@MBDDFKNVCHRODQRHNM1&SGDB@AKD
LTRSADMNKNMFDQSG@ML
If the aerial is installed in a place that is not connected to earth (masonry struc-
STQDRSGDAQ@HCRSDQLHM@KB@MADD@QSGDCSNOQNUHCD@K@QFDQQ@MFDNE@BSHNM
3GDD@QSGONHMSLTRSNEBNTQRDADKNB@K@MCNEFNNCPT@KHSX(E@M !%NQ
!%*(3@DQH@KB@MMNSADHMRS@KKDCXNTB@MFDSPTHSDFNNCQDRTKSRTRHMFSGD
KDMFSGNEVHQDRTOOKHDCVHSGSGDQDBDHUDQ@RSGD@DQH@KK@XHMFHSk@S
:$51,1*t:KHQWKHPHPRULVDWLRQSKDVHLVDFWLYDWHGDQ\WUDQVPLWWHU
correctly recognised within the reception range of the radio is memo-
ULVHG&RQVLGHUWKLVDVSHFWZLWKFDUHDQGUHPRYHWKHDHULDOLIQHFHVVDU\
WRUHGXFHWKHFDSDFLW\RIWKHUHFHLYHU
MEMORISING A REMOTE CONTROL
3
3GDOQNBDCTQDRENQLDLNQHRHMFSGDQDLNSDBNMSQNKRLTRSADODQENQLDCVHSGHM
@BDQS@HMSHLDKHLHSOKD@RDQD@C@MCTMCDQRS@MCSGDVGNKDOQNBDCTQDADENQD
starting.
In order to carry out the following procedure, it is necessary to use the button
located on the box of the radio receiver (reference A%HF@@MCSGDBNQQD-
sponding LED (reference B%HF@SNSGDKDESNESGDATSSNM
1a
TABLE B2 - 0RGH,,PHPRULVLQJ$VSHFLƄFUHFHLYHURXWSXWFDQEHDVVRFLDWHGWRHDFKEXWWRQ
01. /QDRR@MCQDKD@RDSGDQDBDHUDQATSSNM@RL@MXSHLDR@RSGDMTLADQNESGDCDRHQDCNTSOTS.MBDENQNTSOTS-N
SVHBDENQNTSOTS-N
02. "GDBJSG@SSGD+$#DLHSRSGDR@LDMTLADQNEk@RGDR@RSGDCDRHQDCNTSOTSQDOD@SDC NUDQRDBNMCRHMQDFTK@Q
HMSDQU@KRk@RGHENTSOTS-Nk@RGDRHENTSOTS-N
03. 6HSGHMRDBNMCROQDRRSGDCDRHQDCATSSNMNMSGDSQ@MRLHSSDQSNADLDLNQHRDCGNKCHMFHSCNVMENQ@SKD@RSRDBNMCR
Notet,IWKHSURFHGXUHZDVPHPRULVHGFRUUHFWO\WKH/HGRQWKHUHFHLYHUZLOOƅDVKWLPHV,IWKHUHDUHRWKHUWUDQVPLWWHUV
WRPHPRULVHUHSHDWVWHSZLWKLQDQRWKHUVHFRQGV7KHPHPRULVDWLRQSKDVHƄQLVKHVLIQRQHZFRGHVDUHUHFHLYHG
for 10 seconds.
2s
x3
RX
TX
EN