7
THOR
MURATURA DELLA PIASTRA DI FONDAZIONE WALLING THE FOUNDATION PLATE
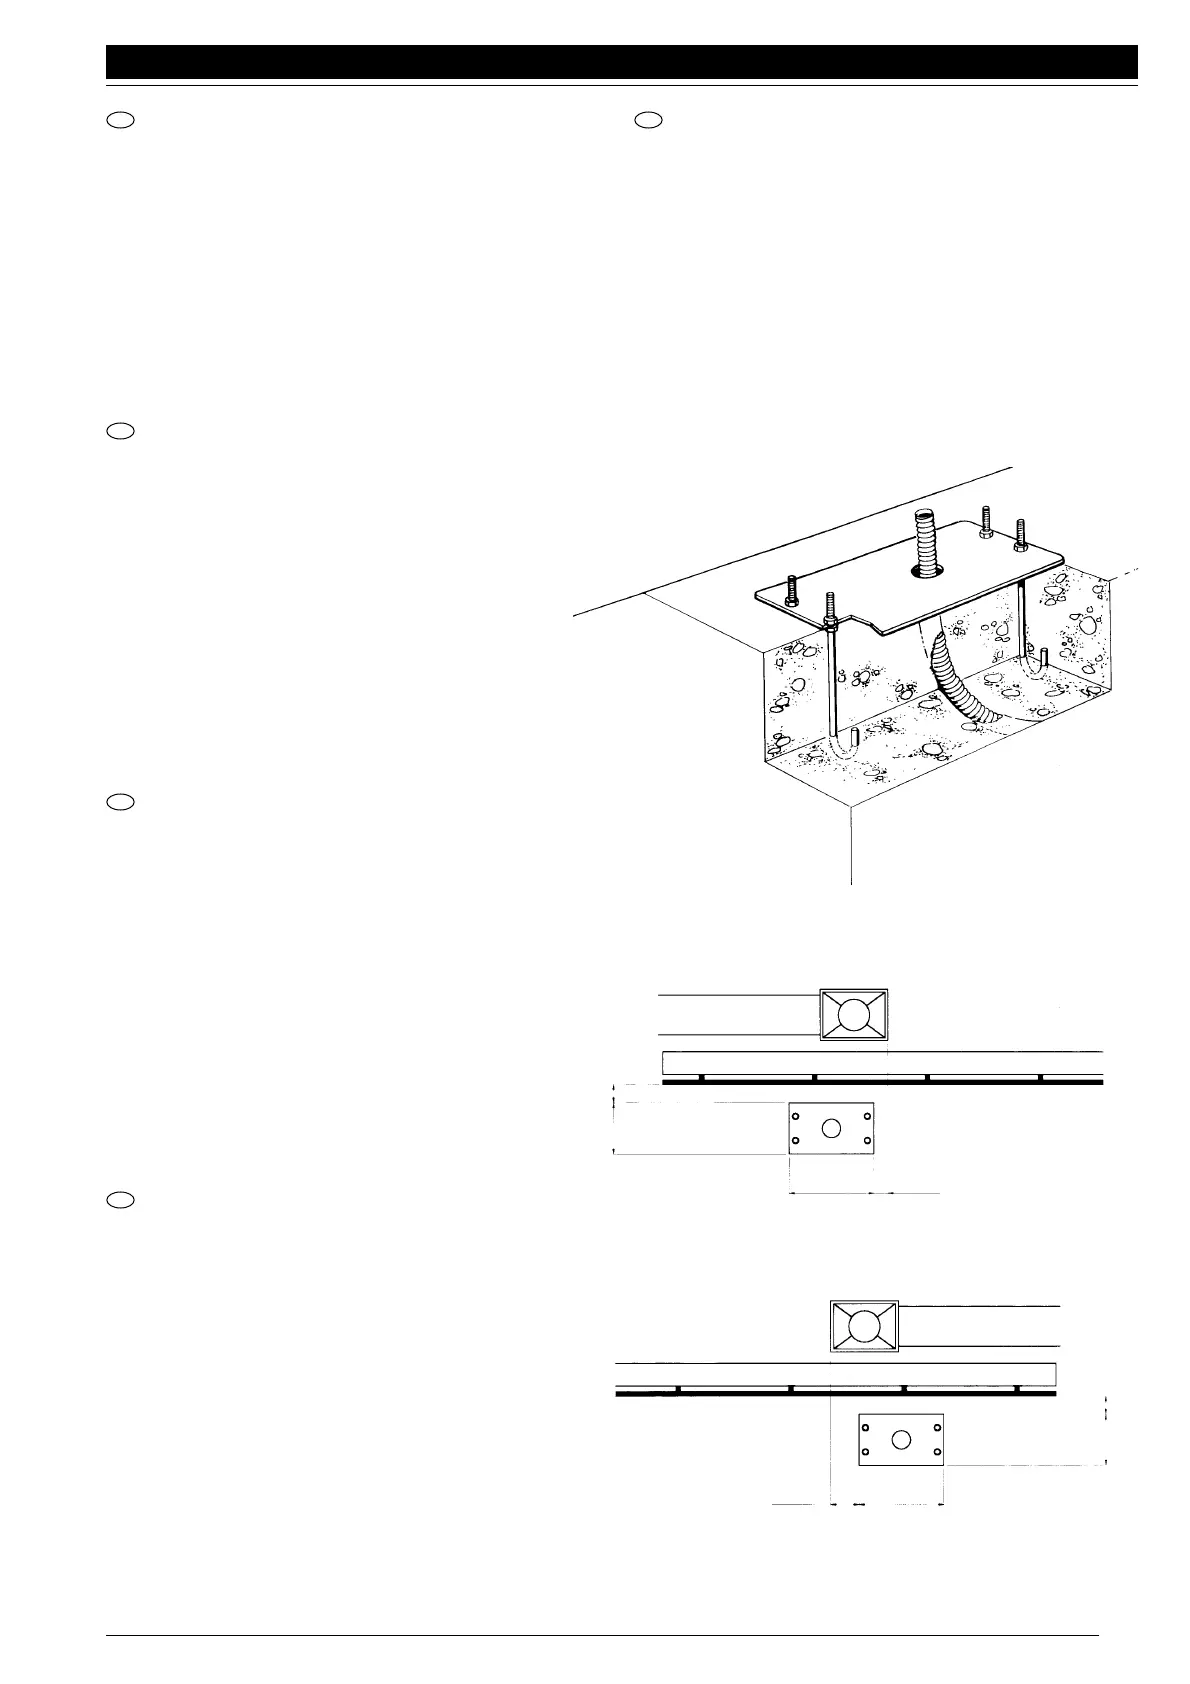
Avvitare a mano per ognuna delle 4 zanche in dotazione 1 dado
M 12 basso per tutto il filetto.
Infilare le quattro zanche nella piastra di fondazione fig. 7
Prevedere una o più guaine per il passaggio di cavi elettrici.
Inserire nel calcestruzzo la piastra avendo cura di metterla
perfettamente in bolla.
È importante rispettare la distanza della piastra di fondazione
dalla cremagliera (bisogna quindi sapere anzi tempo se sarà
saldata al cancello oppure fissata con viti e distanziali), in modo
da poter usufruire del fissaggio asolato del motoriduttore.
Screw right down by hand, for each of the 4 fish-tail clamps
provided, 1 M12 low nut.
Insert the four clamps in the foundation plate, Fig. 7.
Use one or more sheaths for the passage of the electric cables.
Insert the plate in the concrete, taking care to place it perfectly
level.
It is important to observe the distance of the foundation plate from
the rack (hence you must know in advance whether it is going to
be welded to the gate or secured with screws and spacers), so
you can make use of the slotted fixing on the gearmotor.
170 10
170 10
335 0 ÷ 50
335
50 ÷ 100
destro - right - droite
rechts - der.
sinistro - left- gauche
links - izq.
I
GB
F
D
E
SCELLEMENT DE LA PLAQUE DE FONDATION
Visser à la main pour chacune des agrafes fournies 1
écrou M12 bas jusqu’en bas de la partie filetée.
Enfiler les quatre agrafes dans la plaque de fondation
(fig. 7).
Prévoir une ou plusieurs gaines pour le passage des
câbles électriques.
Sceller la plaque dans le ciment en ayant soin de la
mettre parfaitement de niveau.
Il est important de respecter la distance entre la plaque
de fondation et la crémaillère (il faut donc savoir en
temps utile si elle sera soudée au portail ou bien vissée
avec les vis et les entretoises), de manière à pouvoir
utiliser la fixation à fente du motoréducteur.
EINMAUERN DER FUNDAMENTPLATTE
Für jedes der 4 mitgelieferten Verankerungsbeine 1
flache M12 Mutter mit Gewinde ganz von Hand
anschrauben.
Die 4 Verankerungsbeine in die Fundamentplatte
einstecken, Abb. 7.
Einen oder mehrere Mäntel für den Durchgang von
Elektrokabeln vorsehen.
Die Platte in den Beton einfügen und perfekt nivellieren.
Wichtig ist, dass der Abstand der Fundamentplatte von
der Zahnstange eingehalten wird (man muss vorher
wissen, ob die Zahnstange an das Tor geschweisst oder
mit Schrauben und Distanzstücken befestigt wird), so
dass der Getriebemotor mit Schlitz befestigt werden kann.
COLOCACIÓN DE LA PLACA DE FUNDACIÓN
Enrosque a mano hasta el fondo las cuatro tuercas M 12
bajas en las 4 grapas suministradas de serie.
Introduzca las cuatro grapas en la placa de fundación
(fig. 7).
Disponga de una o varias vainas para pasar los cables
eléctricos.
Introduzca en el hormigón la placa teniendo cuidado en
colocarla perfectamente nivelada.
Es importante respetar la distancia de la placa de
fundación desde la cremallera (por consiguiente, es
necesario saber por anticipado si ésta será soldada a la
verja, o fijada con tornillo y distanciadores), para poder
aprovechar la las ranuras de regulación de la sujeción
del motorreductor.
Fig. 7
Fig. 8
 Loading...