EasyManua.ls Logo

Noctua DX Series - User Manual

Noctua DX Series
2 pages
Print Icon
To Next Page IconTo Next Page
Loading...
Take the fans off the cooler. Install the NM-XFB8 brackets to the
heatsink using the NM-SCC2 short screws.
Dear customer,
Thank you very much for choosing the Noctua NH-D9 DX-4189 4U.
Our DX line of coolers has become a default choice in high
performance quiet cooling solutions for Intel Xeon processors,
and I’m confident that you will be able to sense some of the
research, attention and care we’ve put into making this product.
Enjoy your NH-D9 DX-4189 4U!
Yours sincerely,
Roland Mossig, Noctua CEO
This manual will guide you through the installation process of the
SecuFirm2™ mounting system step by step.
Prior to installing the cooler, please consult the compatibility
centre on our website (ncc.noctua.at) and verify that the cooler
is fully compatible with your motherboard.
Please also make sure that your PC case offers sufficient clearance for
the cooler and that there are no compatibility issues with any other
components (e.g. tall RAM modules).
Doub le check t hat th e heat sink and f an clips do n ot make co ntac t with
the VGA card, other PCIe cards, motherboard heatsinks or any other
components. Noctua cannot be held responsible for any damage
or losses caused by compatibility issues.
Should you encounter any difficulties, please check the FAQs on our
website (www.noctua.at/faqs) and don’t hesitate to contact our
support team at support@noctua.at.
NOCTUA NH-D9 DX-4189 4U
INSTALLATION MANUAL
Required mounting parts:
1x NM-XRF6
plastic CPU carrier frame for
LGA4189-4 (P4)
Installing the brackets1
When attaching the CPU carrier frame to the base of the heatsink,
turn the heatsink upside down so that the base is facing upwards.
Carefully put it down onto the tips of the heatpipes and secure
it with your hand so that it cannot tilt and that the fins cannot
get bent. Remove the plastic protection cover from the base of the
heatsink and be careful not to damage the layer of pre-applied
thermal compound.
Caution: If you are not using the heatsink for the first time and
it therefore doesn’t have a fresh layer of pre-applied thermal
compound anymore, you need to apply a thin layer of thermal
compound to the CPU yourself before clipping it to the heatsink.
If there are residual traces of previous thermal paste or thermal
pads on your CPU or on the heatsink, please clean them off first.
Assembly of carrier frame, CPU and heatsink &
installation to the socket
2
Caution: The supplied plastic CPU carrier frame is for LGA4189-4
(P4) only. LGA4189-5 (P5) systems use the same mounting
mechanism system but require a different CPU carrier frame.
Please contact us at support@noctua.at if you would like to use
the cooler on a LGA4189-5 (P5) type system.
Please follow the official Intel installation manual for how to
attach the CPU carrier frame to the heatsink, insert the CPU to the
carrier frame and install the CPU/heatsink assembly to the socket:
www.intel.com/processorinstall
Note that while the Intel illustrations show a 2U heatsink, the
Noctua NM-XFB8 brackets use the same mounting parts, so the
procedure is identical for Noctua heatsinks.
NOCTUA MOBILE-TAG
Reattach the fans to the heatsink using the supplied steel clips:
Installing the fans3
4x NM-SSC2
short screws
2x NM-XFB8
brackets
Caution: Gently tighten the screws until they stop, but do not use
excessive force (max. torque 0.6 Nm).
Question and Answer IconNeed help?

Do you have a question about the Noctua DX Series and is the answer not in the manual?

Summary

Installing the brackets

NM-XFB8 bracket attachment

Attach NM-XFB8 brackets to the heatsink using the NM-SCC2 short screws.

Assembly of carrier frame, CPU and heatsink & installation to the socket

CPU carrier frame and heatsink mounting

Mount the CPU carrier frame to the heatsink, then install the CPU and heatsink assembly to the socket.

Installing the fans

Fan clip attachment to heatsink

Reattach the fans to the heatsink using the supplied steel clips.

Transporting your system

System transport safety

Recommend removing the cooler during transport to avoid damage from unknown forces.

Warranty, support and FAQs

Customer support information

Details on the 6-year warranty, how to contact support, and FAQ resources.

Removing the heatsink from the socket and the CPU from the heatsink

CPU and heatsink removal procedure

Follow official Intel guidelines for removing the heatsink and CPU from the socket.

Overview

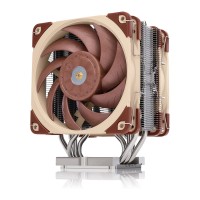
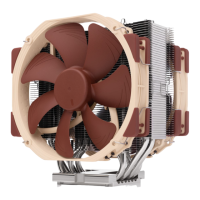
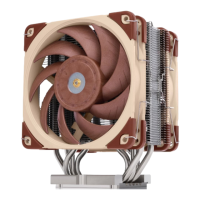
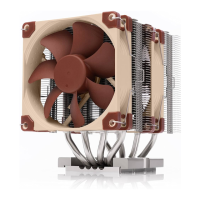
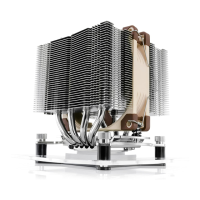
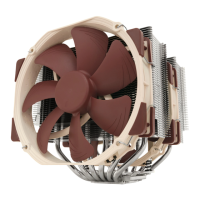
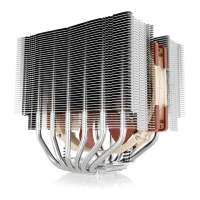
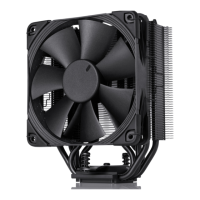
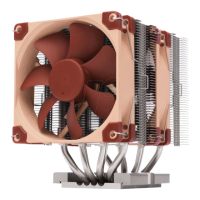
The Noctua NH-D9 DX-4189 4U is a high-performance quiet cooling solution designed specifically for Intel Xeon processors, particularly those using the LGA4189-4 (P4) socket. This cooler is part of Noctua's DX line, known for its robust design and efficient thermal management in demanding server and workstation environments. The "4U" in its name indicates its compatibility with 4U rackmount chassis, suggesting a compact yet powerful design suitable for space-constrained systems.

Function Description:

The primary function of the NH-D9 DX-4189 4U is to dissipate heat generated by Intel Xeon CPUs, ensuring stable operation and preventing thermal throttling. It achieves this through a combination of a heatsink and two cooling fans. The cooler is designed to be a reliable and quiet alternative to stock cooling solutions, catering to users who prioritize both performance and low noise levels in their systems. The SecuFirm2™ mounting system, a hallmark of Noctua coolers, is employed to ensure secure and straightforward installation.

Important Technical Specifications & Components:

The cooler comprises several key components that work in concert to deliver its cooling performance:

  • Heatsink: The core of the cooling solution, designed with a dense array of fins and heatpipes to maximize surface area for heat dissipation. The manual shows a dual-tower heatsink design, where each tower is cooled by a fan.
  • Fans: Two cooling fans are included, which attach to the heatsink using steel clips. These fans are responsible for moving air through the heatsink fins, carrying away the heat. The manual suggests connecting these fans to the motherboard's CPU fan header(s), and a supplied NA-YC1 y-cable allows both fans to be connected to a single header if needed.
  • NM-XFB8 Brackets: These brackets are essential for mounting the heatsink to the CPU carrier frame. They are installed onto the heatsink using NM-SCC2 short screws.
  • NM-XRF6 Plastic CPU Carrier Frame: This specific carrier frame is designed for LGA4189-4 (P4) CPUs. It's a critical component for securely holding the CPU and mounting the heatsink assembly to the socket. The manual explicitly warns that LGA4189-5 (P5) systems, while using a similar mounting mechanism, require a different CPU carrier frame, highlighting the importance of compatibility.
  • NM-SCC2 Short Screws: Used to attach the NM-XFB8 brackets to the heatsink.
  • Pre-applied Thermal Compound: The heatsink comes with a layer of pre-applied thermal compound on its base. This compound ensures efficient heat transfer from the CPU's integrated heat spreader (IHS) to the heatsink. Users are advised to reapply thermal compound if the heatsink is not being used for the first time or if residual traces of old paste are present.

Usage Features:

  • Installation Process: The manual provides a step-by-step guide for installation, starting with preparing the heatsink by attaching the NM-XFB8 brackets. This is followed by the assembly of the CPU carrier frame, CPU, and heatsink, and finally, installation into the socket. Users are directed to Intel's official installation manual for detailed instructions on attaching the CPU carrier frame and inserting the CPU.
  • Compatibility: The cooler is specifically designed for Intel Xeon processors with the LGA4189-4 (P4) socket. Users are strongly advised to consult Noctua's compatibility centre (ncc.noctua.at) to verify full compatibility with their specific motherboard and to ensure sufficient clearance within their PC case for the cooler and other components (e.g., tall RAM modules).
  • Thermal Compound Management: The pre-applied thermal compound simplifies initial installation. However, for subsequent installations or if the original compound is compromised, users are instructed to clean off any old thermal paste and apply a thin, fresh layer.
  • Fan Connection: The inclusion of an NA-YC1 y-cable simplifies fan management, allowing both fans to be powered from a single CPU fan header on the motherboard.
  • Gentle Tightening: The manual emphasizes the importance of gently tightening screws until they stop, with a maximum torque of 0.6 Nm, to prevent damage to the components.

Maintenance Features:

  • Cleaning: While not explicitly detailed as a maintenance feature, the instruction to clean off old thermal paste implies a need for periodic cleaning during reinstallation or if the cooler is moved. Keeping the heatsink fins and fans free of dust is crucial for maintaining optimal cooling performance.
  • Transport Considerations: For safety reasons, Noctua generally recommends removing the cooler from the system during transport (e.g., shipping). This is because it's impossible to reliably control the forces acting on the system, and excessive stress could lead to damage if the heatsink remains installed. Noctua explicitly states it cannot be held responsible for damage arising from keeping the heatsink installed during transport.
  • Warranty and Support: Noctua offers a 6-year warranty period and direct, fast, and straightforward RMA service, reflecting confidence in the product's quality and reliability. Users encountering problems are encouraged to contact Noctua's support team (support@noctua.at) and consult the FAQ section on their website (www.noctua.at/faqs). This robust support system ensures that users can maintain their cooler effectively and address any issues that may arise.

In summary, the Noctua NH-D9 DX-4189 4U is a specialized, high-quality cooling solution for Intel Xeon processors, designed with ease of installation, compatibility, and long-term reliability in mind. Its robust construction and comprehensive support system make it a suitable choice for demanding server and workstation environments where efficient and quiet cooling is paramount.

Noctua DX Series Specifications

General IconGeneral
BrandNoctua
ModelDX Series
CategoryComputer Hardware
LanguageEnglish

Related product manuals