26
HOW TO ADJUST THE CONSOLE PIVOT AND TILT
If the console feels loose or does not stay in place
when it is moved from side to side, first remove
the Mount Cover (12). Next, use the included tool to
slightly tighten the M25 Locknut (17) until the console
stays in place when moved from side to side. Then,
press the Mount Cover back into place.
If the console
feels loose or
does not stay in
place when it is
tilted upward and
downward, first
use a standard
screwdriver to pry
off the Upper and
Lower Console
Covers (22, 23).
(Note: For clar-
ity, the console is
not shown in the
drawing at the
right.) Tighten the
four M6 x 16mm
Screws (96) in
the Rear Bracket
Mount (10) until
the upward and
downward move-
ment no longer
feels loose. Tilt
the console upward and downward to access the
Screws. Then, reattach the Upper and Lower Console
Covers (22, 23).
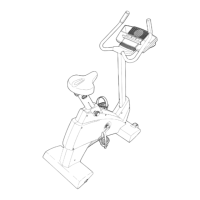
HOW TO ADJUST THE REED SWITCH
If the console does not display correct feedback, the
reed switch should be adjusted. To adjust the reed
switch, first unplug the power adapter.
Next, remove
the Row Bar (19)
from the Row
Bar Hook (88).
Then, remove the
two M4 x 16mm
Screws (107)
from the Flywheel
Cover (86). Pivot
the Flywheel
Cover upward and
remove it from the
rower.
Next, locate the
Reed Switch (67).
Turn the Flywheel
(60) until a
Flywheel Magnet
(81) is aligned
with the Reed
Switch. Then,
slightly loosen
the two indicated
M4 x 16mm
Screws (107),
slide the Reed
Switch slightly closer to or away from the Flywheel
Magnet, and then retighten the Screws.
Plug in the power adapter, and then turn the
Flywheel (60) so that the Flywheel Magnet (81) passes
the Reed Switch (67) repeatedly. Repeat the actions
described above until the console displays correct
feedback.
When the reed switch is correctly adjusted, reattach
the parts that you removed.
12
17
22
23
7
96
10
96
107
86
19
88
81
60
67
107
 Loading...