PICO Pµlse
®
and Nexµs
™
System
Quick Start Guide
Guia Rápida • Guide Rapide de Montage • Guida rapida di avvio • Guia Rápido • Schnellstartanleitung
Průvodce rychlým nastavením • Szybki start • Краткое руководство пользователя • Gyors Beüzemelési Útmutató
快速启动指南 • クイックスタートガイド • 빠른 시작 안내서
Unpack and Check
Desembale y Compruebe
Déballer et Vérifier
Disimballo e controllo
Desembale e verifique
Auspacken und Überprüfen
Rozbalte a zkontrolujte
Csomagolja ki és ellenőrizze le
Распакуйте и проверьте
Rozbaľte a skontrolujte
拆箱和检查
開梱と内容物のチェック
개봉 과 확인
Unpack and Check
Desembale y Compruebe
Déballer et Vérifier
Disimballo e controllo
Desembale e verifique
Auspacken und Überprüfen
Rozbalte a zkontrolujte
Csomagolja ki és ellenőrizze le
Распакуйте и проверьте
Rozbaľte a skontrolujte
拆箱和检查
開梱と内容物のチェック
개봉 과 확인
1 2
Montaje del Controlador
Montage du contrôleur
Montare il Controller
Montagem do Controlador
Controller montieren
Připojte kontrolér
Zamontuj kontroler
Монтируемый контроллер
Vezérlő rögzítése
安装控制器
コントローラー取付
컨트롤러 설치
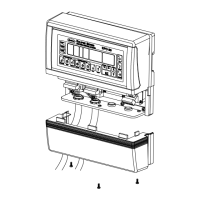
Mount Controller
3
Monte la placa de arranque
Montage de la carte électronique
Montare Breakout Board
Monte a placa de partida
Montage des Breakout Boards montieren
Připojte Propojovací Board
Zamontuj płytę rozdzielającą
Монтируемая коммутационная плата
Felfogatási keret
安装接线板
ブ レイクアウトボ ード 取 付
탈부착 보드 설치
Mount Breakout Board
4