Do you have a question about the Nortek Vector and is the answer not in the manual?
Connect power, install software, run functional test, set pressure offset, and calibrate compass if needed.
Erase the recorder in advance of each deployment to ensure clean and accurate data collection.
Specify operation parameters, including Nominal velocity range, and use Advanced Settings if necessary.
Establish communication, set start time, name, and comment for data files before beginning recording.
Check that all expected items listed are included in the instrument shipment.
Install the instrument's software from the attached USB memory stick.
Verify deployment configuration sent to the instrument and stop data recording when complete.
Retrieve recorded data files and convert them to ASCII format for analysis.
Start real-time data acquisition and optionally save it to disk.
Follow mounting guidelines and understand cable specifications for proper operation.
Configure analog inputs, which have an input range of 0-5V.
Understand pulse-coherent operation, wave measurement techniques, and data analysis capabilities.
Details on power requirements and controlling Nortek products with non-PC controllers.
Address common problems like power, connectors, serial ports, and noise in velocity data.
Access technical support, manuals, software, and firmware updates via the Nortek website.
Pinout diagrams and descriptions for RS232 and RS422 cable connections.
Wiring diagram for RS232 cables with optional analog input connections.
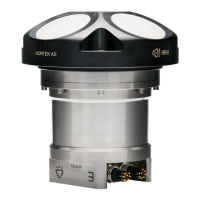
The Nortek Vector velocimeter is an instrument designed to measure water velocity and other related parameters. This quick guide provides essential information for setting up, deploying, and maintaining the device, ensuring users can get it operational as quickly as possible. For those new to Nortek instruments and software, a comprehensive manual and the Nortek Support site offer more detailed information on principles of operation, mounting guidelines, troubleshooting, service, and system integration.
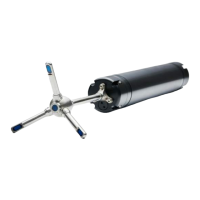
The Vector velocimeter utilizes pulse-coherent acoustic principles to determine water velocity. It emits pairs of acoustic pulses with a known time lag, measuring the Doppler-induced phase shift. This phase shift is then converted into velocity by scaling with the speed of sound in water. The Vector employs a bistatic system, using separate transducers for transmitting and receiving acoustic beams.
Beyond velocity, the Vector can also measure waves using the PUV method. Pressure measurements provide a means to estimate all non-directional wave parameters, while combined P, U, and V measurements allow for estimating directional wave parameters. These wave data require post-processing after acquisition.
The instrument is capable of reading two analog inputs simultaneously, with an input range of 0-5V, corresponding to 0-65535 counts in the data file. An optional version of the RS232 cable with analog inputs can output pressure instead of Z velocity.
Preparation and Setup: Before deployment, several preparatory steps are necessary. Users should connect the battery or power cable and install the software from the provided USB memory stick. After installation, the application related to the instrument should be launched. A functional test, detailed in the Service Manual, is recommended to ensure the instrument is operating correctly. Setting the pressure offset (On-line > Set Pressure Offset) is crucial. If magnetic materials are near the instrument during mounting, a compass calibration (On-line > Compass Calibration) is required. Finally, the recorder should be erased before each deployment to ensure sufficient storage space.
Deployment Planning: The "Deployment Planning" dialog allows users to specify all operational parameters. A key parameter is the "Nominal velocity range," which defines the maximum unambiguous velocity the instrument can measure. It is recommended to set this range as low as possible to minimize measurement uncertainty and noise. If actual velocities exceed this range, data quality may be impaired. The "Deployment Planning" frame on the right-hand side of the dialog displays performance parameters that update automatically with setting changes. The "Standard configuration" is recommended for planning deployments unless there's a specific reason to use "Advanced" settings, which offer more flexibility but increase the risk of errors. The "Use Advanced Settings" box (Standard tab) must be checked for advanced settings to be effective. Once settings are finalized, pressing "Update" accepts the changes. Deployment parameters can be saved and re-loaded using the "Open/Save" commands in the File menu.
Starting Recorder Deployment: To begin data recording, establish communication with the instrument and select "Start Recorder Deployment" from the menu or toolbar. Users must specify the start date and time for recording. A six-character identifier for the data file and up to 180 characters for a file comment can be entered. After confirming, the "Set Clock" dialog appears. Setting the clock to PC time is highly recommended for proper synchronization with other independently collected datasets, which can save significant post-processing time.
On-line Data Collection: For real-time data acquisition, select "Start Data Collection" from the On-line menu or toolbar. The real-time display shows velocity and sensor data as it is collected. To capture this data to disk, select "Disk Recording..." from the On-line menu and define a filename. Once defined, "Start Disk Recording" and "Stop Disk Recording" menu items and toolbar buttons become enabled.
Data Retrieval and Conversion: After data acquisition, "Recorder Data Retrieval" allows users to view a list of all files stored in the recorder, including measurement times and file sizes. Files can be selected and retrieved to a specified disk location. It is advisable to check retrieved data before a second deployment to identify any instrument or configuration issues. To convert binary data files to a readable ASCII format, select "Data Conversion." Files can be added to the conversion list, and the output location, optional prefix/suffix, and viewing options can be specified.
Cables and Communication: Most instruments are shipped with RS232 communication, while RS422 is used for cables longer than 50m. The output can be in ASCII, fixed NMEA, or binary format. Communication baud rates range from 300-115200 (user setting), with recorder download baud rates of 600/1200 kBaud. Connectors and dummy plugs should be lubricated with dielectric silicone, preferably 3M silicone spray, ensuring proper sealing. The silicone grease included in the shipment should only be used on the O-rings.
Troubleshooting: Many problems arise from simple mistakes. Users should initially check if the system is powered, the connector is securely attached to the computer, and the correct serial port is being used. If velocity data is noisy, potential causes include insufficient particles in the water, an excessively high velocity range setting, the sampling volume being beyond the bottom, reflection/reverberation conditions, or a probe malfunction. The "Probe Check" feature can be used to identify issues with the probe.
Software and Firmware Updates: Nortek regularly provides updates for both software and firmware. Users are encouraged to check the Nortek website regularly for these updates to ensure optimal performance and access to the latest features and bug fixes. The instrument's software is located on the attached memory stick for initial installation.
Mounting Guidelines: Proper mounting is critical for successful data collection. Users should refer to the "Mounting Guidelines" in the Comprehensive Manual to ensure the instrument is installed correctly.
Support Resources: The Nortek website offers technical support, user manuals, the latest software and firmware, general information, technical notes, and user experience. For general inquiries or technical support, users can contact Nortek via email at inquiry@nortekgroup.com or support@nortekgroup.com.
| Resolution | 0.1 mm/s |
|---|---|
| Maximum operating depth | 300 m |
| Category | Acoustic Doppler Velocimeter |
| Sampling rate | 1-64 Hz |
| Operating temperature | -4°C to 40°C |
| Power consumption | 1.5 W (typical) |
| Beam angle | 25 degrees |
| Power Supply | 9-15 VDC |
| Communication Interface | RS-232 |
| Storage Temperature | -20°C to 60°C |