EasyManua.ls Logo

NORWii N86s - User Manual

NORWii N86s
19 pages
Print Icon
To Next Page IconTo Next Page
Loading...
The Professional Presenter
- 1 -
Wireless Presenter User Manual
N86s
Be sure to read this user manual
carefully before using the wireless
presenter and keep it for future
reference.
Question and Answer IconNeed help?

Do you have a question about the NORWii N86s and is the answer not in the manual?

Overview

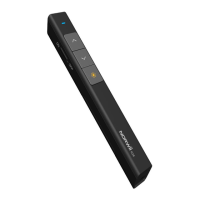
The Norwii N86s is a professional wireless presenter designed for various presentation environments, offering a range of features for efficient and dynamic control.

Function Description

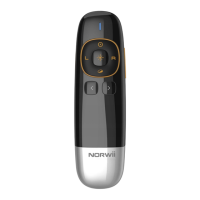
The N86s presenter supports essential navigation functions for presentations. It allows users to move to the previous page by clicking the "page up" key and to the next page by clicking the "page down" key. A long press on the "page up" key initiates slides playback from the current page, while a long press on the "page down" key enters a black screen mode.

A key feature is the multi-functional pointer key. Pressing and holding this key activates a digital laser, zoom-in, highlight, and mouse cursor control on the screen. A single click on the pointer key can open a video or hyperlink, and a double click switches between different pointer modes. These advanced pointer functions require the Norwii Presenter software to be running.

The device also includes a full-screen mark function, allowing users to mark the screen with one key and erase marks with another. Volume control is integrated, enabling adjustment of the computer's volume directly from the presenter.

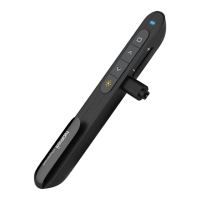
For enhanced cursor control, the N86s features an aerial mouse function, providing flexible and precise movement. The USB receiver is designed for convenience, integrating into the tail of the wireless presenter for easy storage and portability.

The presenter incorporates a Class 2 safe laser module, compliant with IEC/EN60825-1:2014 standards. It supports USB 2.0 and utilizes a universal USB driver for plug-and-play functionality across various operating systems. The "page up/down" keys are customizable via the Norwii Presenter software, and the USB receiver's firmware is updatable.

The power switch allows users to turn the presenter "ON" or "OFF." The physical laser key, when pressed and held, activates a physical laser beam, which turns off upon release.

When the Norwii Presenter software is running, the pointer key offers several modes:

  1. Digital Laser: Press and hold the pointer key to activate the digital laser. The size of the digital laser can be increased or decreased using the "<" or ">" keys, transforming it into a red dot or a red circle.
  2. Zoom In: Double-clicking the pointer key switches to zoom-in mode, displaying a magnifying glass. Holding down the pointer key and pressing "<" zooms in, while pressing ">" zooms out.
  3. Highlight: Double-clicking the pointer key activates highlight mode, showing a white spotlight. Content outside the spotlight appears in dark gray, while content inside is bright white, emphasizing the highlighted area. Holding down the pointer key and pressing "<" or ">" adjusts the spotlight size.

Without the Norwii Presenter software, the pointer key has two modes, switched by a double click:

  1. Mouse Mode: Clicking the digital laser key acts as a mouse click, enabling interaction with hyperlinks. Long pressing and holding the digital laser key allows dragging windows.
  2. Presentation Mode: In this mode, clicking the pointer key has no function, preventing accidental page turns. Pressing and holding the pointer key utilizes PowerPoint's built-in digital laser function in full-screen mode.

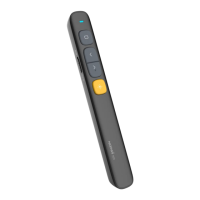
The air mouse key allows free cursor movement and can be pressed again to stop movement. The "left mouse" key functions as a computer's left mouse click, and the "right mouse" key as a computer's right mouse click.

The "mark" key enables drawing on the screen. Clicking it enters mark state, allowing users to draw lines and circles by holding down the mark key and moving the presenter. Releasing the mark key stops drawing.

The "eraser/volume" key serves a dual purpose. A single click erases marks. A long press (more than 1 second) activates volume control; moving the presenter up or down increases or decreases the computer's volume.

The N86s is compatible with popular presentation software like PowerPoint, Keynote, and Prezi. By default, the "page up" and "page down" keys correspond to the up and down arrows on the computer keyboard, supporting page navigation in PowerPoint and Keynote. Pressing "page up" and "page down" simultaneously for the first time switches their function to the left and right arrows, supporting Prezi navigation. A second simultaneous press switches them to "Page Up" and "Page Down" for internet browsers and Microsoft Photo software. A third simultaneous press reverts them to the default up and down arrows.

Important Technical Specifications

Transmitter:

  • Technology: Radio frequency
  • Frequency: 2.4GHz
  • Control Distance: 50 meters
  • Laser Power: <1mW (Class 2)
  • Laser Distance: >200m
  • Wavelength (Red): 640-660nm
  • Wavelength (Green): 495-545nm
  • Battery Capacity: 300mAh
  • Battery: AAAx2pcs
  • Working Voltage: 3V
  • Dimension: 143.7 x 41.7 x 27mm
  • Weight: 46.5g

USB Receiver:

  • Working Voltage: 4.5-5.5V
  • Dimension: 36 x 14.8 x 6.5mm
  • Weight: 2.7g

Operation System Compatibility:

  • Windows 7 / 8 / 10 / 11 or later
  • macOS / Linux / Android system (page turning function only on Android/Linux)

Usage Features

Installation:

  1. Battery Installation: The device uses two AAA batteries. Open the battery cover, insert the batteries, and close the cover.
  2. USB Receiver Installation: Remove the USB receiver from the presenter's lower part and plug it into a computer's USB interface. The system will automatically install the necessary drivers, indicated by "Discovered New Hardware" and "New hardware installed and ready to use" messages on Windows.
  3. Control: Once installed, the presenter can be used by operating its keys.
  4. Power Off: After use, turn off the presenter and return the USB receiver to its storage slot to conserve power.

Calibration: Calibration is necessary if the mouse cursor moves unintentionally or if horizontal/vertical movements on the presenter do not correspond to horizontal/vertical cursor movements on the screen. To calibrate:

  1. Place the presenter on a horizontal and stable surface.
  2. Press and hold the "page down" key and turn on the power.
  3. The blue LED will flash, indicating entry into calibration mode.
  4. Release both hands and keep the product as level as possible.
  5. The blue LED will flash for 3 seconds, then remain on for 5 seconds before turning off, signaling successful calibration.

Maintenance Features

Troubleshooting Battery and Laser Issues:

  • Low Battery: If the power is on but the LED indicator light does not activate when a key is pressed, the battery is low and needs replacement.
  • Damaged Laser Module: If the laser button is pressed, the LED indicator is on, but the laser does not activate, the laser module may be damaged and requires replacement.
  • Dim Laser Beam: A dim laser beam usually indicates insufficient battery power. Replace the AAA battery. If the laser remains a dark spot after battery replacement, the laser module may be aging, and after-sales repair should be sought.

Troubleshooting USB Receiver Detection:

  • If the computer does not detect the USB receiver, first check if the USB port is functional by testing it with another USB mouse or keyboard.
  • If the USB port works with other devices but not the presenter's receiver, the receiver might be broken or the computer's USB drivers are incompatible.
  • Try using another USB port on the same computer or on a different computer. If the receiver works on another computer, the issue is with the original computer's USB drivers, requiring data backup and OS reinstallation.

Software and Customization:

  • For key function customization, digital laser, highlight, and magnifier features, download the Norwii Presenter software from the "Downloads" section under the "Support" menu on the official Norwii website (www.norwii.com).
  • The presenter and USB receiver can be paired using the Norwii Presenter software if the receiver fails to save the presenter's address properly.

macOS Settings for Norwii Presenter Software:

  • On macOS, users must grant operation permissions for "Input Monitoring," "Screen Recording," and "Accessibility" to the Norwii Presenter software within "System Preferences" > "Security & Privacy" > "Privacy."

Safety Warning: The product generates a laser beam. Users must NOT stare into the beam or expose users of telescopic optics to it. Avoid shining the laser beam into people's or animal's eyes to prevent eye damage. This product is not a toy and should not be given to children.

Battery Safety: The product contains AAA batteries. Do not dispose of the product in fire, as batteries may explode. Do not immerse the product in water or any other liquid, as short-circuited or damaged batteries may explode.

NORWii N86s Specifications

General IconGeneral
BrandNORWii
ModelN86s
CategoryDigital Presenters
LanguageEnglish

Related product manuals