NOTTINGHAM ANALOGUE STUDIO
128 CORDY LANE, UNDERWOOD, NOTTINGHAM NG16 5FD
Design and Manufacture of Quality Audio Equipment
Telephone: +(44) (0) 1773 762947
Fax: +(44) (0) 1773 533566
V.A.T. REGISTRATION NO. 667 3729 92
HYPERSPACE INSTRUCTIONS
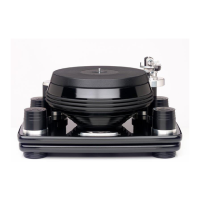
Place the turntable on a level surface. Put two capfuls of oil into the bearing well. Carefully lower
the platter assembly into the bearing well centrally and allow to sink slowly under its own weight.
This can take several minutes. After placing the main platter into the bearing well fit the plastic
spacer over the spindle shaft, then gently lower the graphite top onto the main platter. Place the
second rubber band in the groove between the main platter and the graphite top/ Level the
turntable by the two adjusting feet.
Place the motor up to the platter and align the two motor pulley grooves to coincide with the two
bottom grooves in the platter by pushing the motor housing into the body up or down. If pushing
down, do not push from the top of the pulley as motor damage may result. Place the belt around
the bottom grooves of the platter and motor pulley. The bottom groove is 33 1/3 rpm and the top
is 45 rpm.
Place the motor cut out groove by the static leg of the turntable without touching it and pull the
motor body away from the leg to leave a gap of 6mm between the top of the pulley and the
player. Always use the turntable with the mat on. The plastic cover is a dust cover only. Do not
touch the three caphead bolts on the top of the platter.
To start the turntable, give the platter a push by the thick rubber band. If pushed to fast, it will
adjust to the correct speed in a few seconds. To stop the platter, gently place your hand on the
thick rubber band.
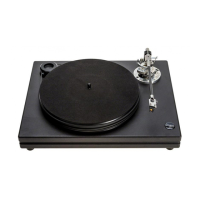
Attach the cartridge to the arm and place the arm into the hole. The headshell should face directly
to the front when the arm is ‘parked’. Place the mat and an old record onto the platter. Position
the arm so that it sweeps the whole of the record before hitting the ‘stop’. Adjust the height and
level with the small spirit level on top of the headshell. Tighten the two grub screws in the arm
pillar. Align the cartridge and playing weight in the usual way. When using scales, place them
directly onto the mat, not on the record. The adjustment of the playing-weight is set by moving the
heavy bronze inner-weight. The bias is set by ear, but a rough guide is to lower the arm onto the
runout groove of the record. It should stabilize before running gently into the center of the record.
If the stylus moves quickly to the inside or outside of the record, the bias needs to be increased or
decreased.
Note: if unable to get the correct cartridge adjustment, the armboard satellite can be adjusted by
removing the platter and undoing the cap head bolt on the right side of the baseboard.