33
The Screen Label
The screen label provides an overview of which controls
currently display across the screens. When a Live device
changes or you bank through the parameters of a device,
this label will update to show what you can currently control.
Control Notifications
At the bottom of the notification screen is an area that gives
you instant feedback on the changes you make to certain
parameters. This feedback is a ‘pop-up’ notification. This
only appears when you make changes and disappears again
after a brief time. This notification area also shows volume
changes when you move a fader.
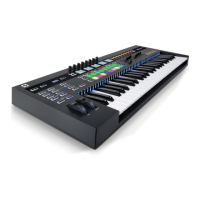
Pads
Controlling Clips and Scenes
By default, the SL MkIII’s 8x2 pads represent clips in Live’s
Session view. More specifically, the pads show which clips -
or empty clip slots - are within the selection ring, and which
clips you can record, launch or stop.
When you arm a track, available clip slots turn pads red.
Press these red pads to begin recording. Press them again
to stop clip recording and start playback. A recorded clip
ready to launch or play will pulse green; a recorded clip that
is idle will take the colour of its track. In other words, press
any coloured pad (assuming it is not bright red) to launch
playback.
Press the play button (green right arrow button) to the right
of a pad row to launch a scene (i.e., all clips in the same
row). This play button, as well as available clips, will flash
until the scene successfully launches. To stop a clip on an
unarmed track, press the dim (unlit) pad above or below on
the same track.
To stop a clip on an armed track, or to stop all clips, hold the
Shift button. This turns the lower row of pads and the lower
scene launch button red. Pressing a red pad will stop the
clip on that track and pressing the red play button will stop
all playing clips (equivalent to how the ‘stop all clips’ button
acts in Live).
8x2 Soft Buttons
The 8x2 soft buttons area (above the faders) allow you to
change the state of your tracks quickly. The button labels
show on the rightmost screen the current function of the
soft buttons.
Grid
Pressing Grid changes the pads to a ‘drum view’. The Grid
button will turn green. This view is ideal for playing Ableton
Live’s Drum Racks as it allows you to use pads to play drums
or samples, which some producers find more ‘drummer-
friendly’ than using a chromatic keyboard.
The leftmost pad on the bottom row triggers C1. The pad
to its right triggers C#2, and so on until you reach the
top row’s rightmost pad, which triggers D#2. To access
different octaves, click the green up/down buttons left of
the pad area.
With a Drum Rack on a track, pads containing audio samples
will appear yellow. The last played pad will be blue. Muted
pads turn orange, while pads in solo mode take on a purple
colour. Finally, empty pads will be dark.
Press the Grid button again to return pads to their clip-
launch capabilities.
Mute and Solo
By default, the 8x2 soft buttons function according to bank
one where the top row (the yellow buttons) mutes and
unmutes tracks, and the lower row (the dark blue buttons)
toggles solo on and off. When muted, the yellow soft
buttons will become a dark yellow, when soloing a track, the
corresponding soft button will become bright blue.
Monitor and Record Arm
You can move to bank two by pressing the green down arrow
to the right of the 8x2 soft button area. Now, the rightmost
screen will show the top row of soft buttons (again in yellow)
cycles through MIDI/Audio Monitoring options. By default,
Ableton Live tracks are set to ‘Auto’, but pressing the top
row of buttons will allow you to change monitoring to ‘Off’
or ‘In’. The bottom row (dark red) controls the ‘record arm’
option. When you set a track to ‘Monitor In’ its soft button
turns ice blue, and when you record arm a track its soft
button becomes bright red.
Options
Within InControl mode, pressing the Options button opens
the Options view. Options view allows you to view and edit
track parameters, displays device chains and select from
the devices in the chain.
 Loading...