Do you have a question about the Novexx Solutions 64 Series and is the answer not in the manual?
Describes the rewinder as a peripheral device for specific label printer types.
Explains the rewinder is permanently attached to the printer and powered by it.
Details how rotational speed is controlled by the bouncer arm's lateral deflection.
Explains the ability to roll material with labels facing outwards or inwards.
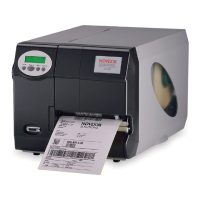
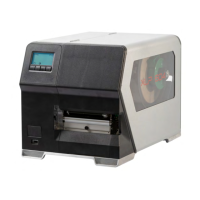
Lists the printer types compatible with the rewinder.
Outlines the necessary peripheral preparation for printers used with the rewinder.
Provides steps to verify if a printer is equipped with peripheral preparation.
Specifies the Allan key 3mm as the required tool for assembly.
Details the step-by-step procedure for attaching and detaching the rewinder.
Explains the two rotation directions and their parameter designations for different printers.
Discusses how dancer arm deflection affects rewinding and software adjustments.
Provides detailed steps for activating the rewinder and choosing the rotation direction.
Guides on setting the sensor current using a potentiometer on the rewinder.
Details the procedure for adjusting the sensor using the bouncer arm positions.
Steps to activate the rewinder by setting the peripheral device parameter.
Procedure for selecting the rewinder's direction of rotation through printer settings.
Explains how material is wound based on the set direction of rotation.
Step-by-step guide to start the rewinder with TTX 350/TTK printers.
Step-by-step guide to start the rewinder with 64-xx/AP 5.4/AP 7.t printers.
Lists the required Allen keys for assembling the run-in roller.
Steps for screwing the axle of the run-in roller into the designated hole.
Procedure for aligning the roller groove with the material mark.
Instruction on how to feed the material over the roller.
The Rewinder 2000 is a peripheral device designed to wind up label material after it has been printed by compatible label printers. Unlike standalone rewinding units, this rewinder option is permanently attached to the printer, drawing power from a front-mounted socket that also receives signals related to the bouncer arm's lateral deflection.
The primary function of the Rewinder 2000 is to neatly collect printed label material onto a roll. This process is dynamically controlled to ensure consistent tension and smooth winding. The device's rotational speed is regulated by the lateral deflection of a bouncer arm. When the bouncer arm experiences greater lateral deflection, the rotational speed decreases. Conversely, if the label material sags, causing the bouncer arm to deflect only slightly, the rewinder increases its speed to compensate, ensuring the material is wound tautly and evenly. If no material is being wound—for example, when the label roll is finished—the rewinding process automatically stops after approximately four seconds.
The rewinder offers flexibility in how the label material is rolled up. Users can choose to wind the labels with the printed side facing outwards or inwards by reversing the direction of rotation. This feature is particularly useful for different application requirements or storage preferences.
Before initial use, the rewinder must be physically attached to the printer and then configured through the printer's parameter menu. The attachment process involves securing the rewinder to the front of the printer with two screws, ensuring the support leg is properly positioned to bear the weight of the material roll. A connector plug then links the rewinder to the printer. It is crucial to ensure the printer is switched off and unplugged before attaching or removing the connector plug to prevent damage to the device electronics.
Once attached, the printer needs to be set up for operation with the rewinder. This involves selecting the appropriate parameter in the printer's menu. The direction of rotation can be specified, with different designations depending on the printer model (e.g., "DIRL" or "Printing outside" for one direction, and "DIRR" or "Printing inside" for the other). The default setting is typically "Printing outside." When the "Printing inside" mode is selected, the software adjusts the dancer arm deflection to approximately 50% of its maximum range, which helps prevent the material from wrapping excessively around the arm, especially with larger roll diameters, and ensures smoother winding.
To insert material, the guide disk, clamping lever, and clamping bar are first removed. The end of the label web is then fed around the dancer arm and winding core, secured by the clamping bar. If a cardboard core is used, the clamping bar is pushed underneath it. The guide disk is then remounted, ensuring its recesses align with the clamping bar legs, and pushed up to the material edge before the clamping lever is closed. Finally, the material guides on the bouncer arm are adjusted sideways to match the width of the material, leaving a small gap for smooth operation.
Starting the rewinder involves a simple process. After securing the material end, the printer is set to off-line mode. For TTX 350 / TTK printers, pressing the CUT button initiates rewinding until the bouncer arm reaches its final position, at which point the rewinder stops. Switching the printer to on-line mode then allows printing and rewinding to commence nearly simultaneously if a print job is loaded. The CUT button can also be used to start or stop the rewinder in both on-line and off-line modes. If no material is present, the rewinder stops after about four seconds and displays a status report (ST13), which can be acknowledged by pressing the ON/OFF button.
For 64-xx / AP 5.4 / AP 7.t printers, the process is similar. Pressing the Cut button starts rewinding until the bouncer arm reaches its final position. It is important to allow the bouncer arm to reach this final position initially, as this enables it to take control over the rotation speed. Switching the printer on-line then allows simultaneous printing and rewinding. The Cut button also controls starting and stopping the rewinder. If no material is present, the rewinder stops after approximately six seconds and displays a status report (5004), which is acknowledged by pressing the Online button. The rotation speed with these printer types is dependent on the print speed, with lower print speeds leading to slower rewinder rotation, except for the initial startup phase.
Proper setup and calibration are essential for the rewinder's optimal performance. Before its first use, the sensor current must be set via a potentiometer located on the rewinder, accessible through a slot in the back cover. This involves navigating through the printer's menu to a "SCHK" parameter and adjusting the potentiometer until a specific value (between 20 and 30) is displayed. Subsequently, the bouncer arm is moved to its final position (towards the support leg), and the displayed value is checked. The difference between the zero position value and the final position value should be at least 100 (ideally 110) to ensure proper sensor functionality. If the difference is too small, the zero position value needs to be adjusted higher.
Adjusting the sensor is another critical maintenance step. The bouncer arm controls the winding speed through this sensor, and it needs to be calibrated at both its end positions. This involves entering a "RADJ" parameter in the printer's menu. The bouncer arm is first positioned at its zero position, and the sensor value is noted. Then, the bouncer arm is moved approximately 5 mm out of the zero position, and the value is noted again. Finally, the bouncer arm is moved up to the stop plate in the direction of the support leg, then back approximately 5 mm, and the value is noted. These steps ensure the sensor accurately reads the bouncer arm's position, which is vital for controlling the winding speed. It is important to set the values approximately 5 mm before reaching the final or zero position. Interrupting the programming process by pressing the CUT+FEED or Esc button can cause the printer to use preset values, potentially leading to device malfunction.
| Print Method | Thermal Transfer / Direct Thermal |
|---|---|
| Print Resolution | 203 dpi |
| Interfaces | USB, Ethernet |
| Supported Media Types | Labels, Tags |
| Media Thickness | 0.06 - 0.25 mm |
| Operating Temperature | 5°C to 40°C |
| Storage Temperature | -20°C to 60°C |