Setup
1. Use the Device Discovery Tool (found at http://www.networktechinc.com/download/d-environment-monitor-16.html) to locate
the ENVIROMUX on the network. Update the IP address, Mask, and Gateway as needed to connect to the local network.
Click on Submit to update the ENVIROMUX.
Note: The Device Discovery Tool requires the Java Runtime Environment to operate. Here is a link
to the web page from
which Java can be downloaded and installed.
Note: The computer using the Device Discovery Tool and the ENVIROMUX must be connected to the same physical
network in order for the Device Discovery Tool to work.
If there are more than one ENVIROMUX connected, the Device Discovery Tool can isolate the unit for IP address
assignment. By pressing the “Blink LED” button associated with the unit in question, the “Pwr” LED on that
ENVIROMUX will blink rapidly.
2. Type the updated IP address into the browser address bar.
3. Log in to the web interface as the administrator
- username = root password= nti (letters are case sensitive)
4. Configure Network and SMTP server settings (Administration->Network).
5. Set the date and time.
6. Configure SNMP settings. This may require rebooting the ENVIROMUX. (Power OFF ENVIROMUX, wait until all LEDs power
OFF, then power ON.)
7. Add users (Administration->Users->Add New User) and specify email address, contact methods, etc. as needed.
8. Temperature and Humidity sensors will be automatically detected. External contact sensors and sensors connected to “Digital
Inputs” must be added manually through the web interface before configuring them.
9. Configure sensors (Monitoring->Sensors->click on Edit link for sensor) as desired for thresholds, sampling, alert
notification methods, etc.
10. Configure the log settings (Log->Log Settings) for log record overflow action and contact methods.
11. To access ENVIROMUX using a terminal locally connected to the “Console” port (shown in drawing above), set port on
terminal at 115200bps, 8-N-1, no flow.
Press <Enter>,
At the logiin prompt type “root”
Press <Enter>,
Type “nti” for the password,
Press <Enter> again to access the main menu.
Sensor and Device Connection
1. Connect each of the sensors (purchased separately) to the ENVIROMUX.
A. Connect any RS485 sensors (i.e. ENVIROMUX-STS temperature sensor, ENVIROMUX-SHS humidity sensor,
ENVIROMUX-STHS temperature + humidity sensor, ENVIROMUX-LDS liquid detection sensor, ENVIROMUX-VSSB
vibration sensor) to the "RJ45 Sensors" ports using CAT5/5e/6 patch cable.
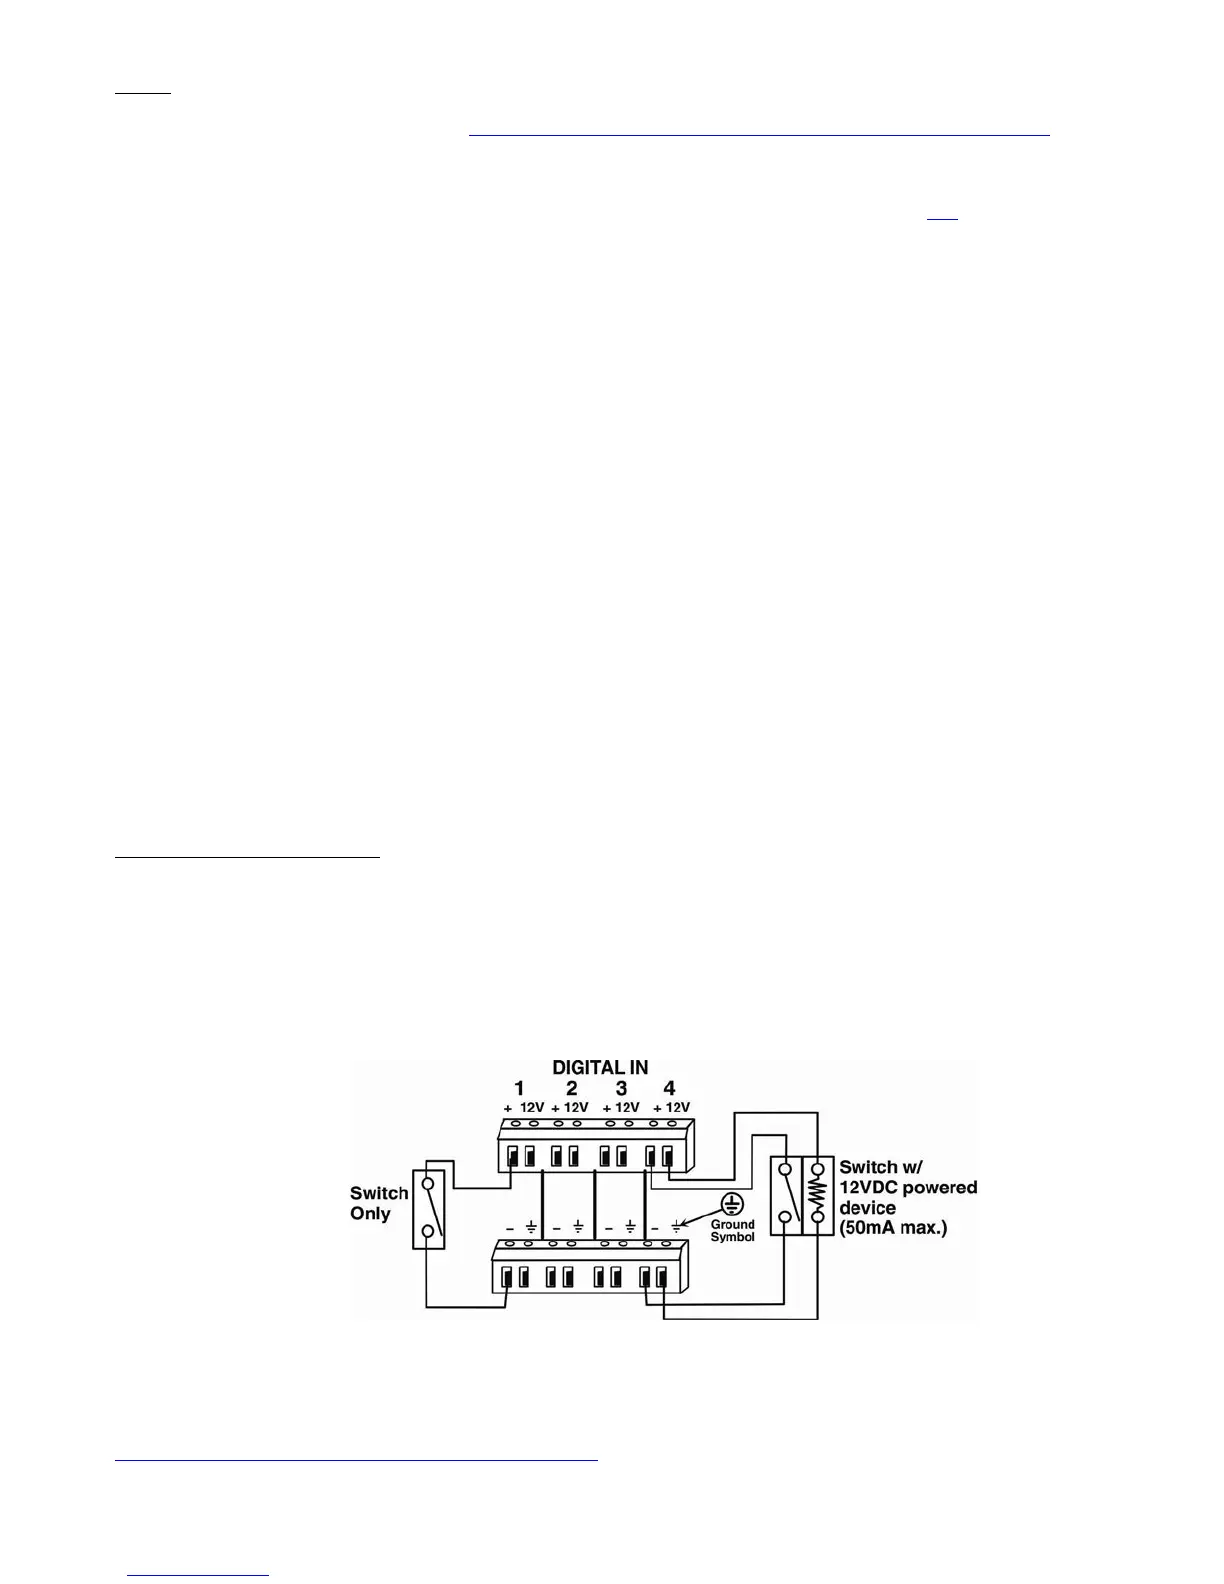
B. Connect contact sensors (i.e. ENVIROMUX-GBS glass break sensor, ENVIROMUX-SDS smoke detection sensor, and
others) to the terminal blocks labeled “Digital In”. If sensors require a 12VDC power source to operate, 12VDC (50mA
max.) and ground terminals have been provided for each set of terminals. Connect each two-wire or four-wire contact
sensor using 16-26 AWG wire.
2. For control o
v
er additional devices using relay contacts (30VDC/1A, 100VAC/500mA max.) connect devices to terminal blocks
labeled “Output Relays”. Relay contacts will work as a switch to either open or close a circuit.
For more details, specifications, and troubleshooting tips, see the Installation and Operation Manual or go to
http://www.networktechinc.com/environ
ment-monitor-16.html). .
MAN155 Rev. 4/21/17
 Loading...