21
GB
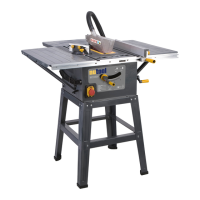
COMPONENTS AND CONTROLS (PIC. 1)
OPERATING INSTRUCTIONS (PICS.2&3)
Keep guards in place and in good working order at all times to
avoidseriousaccidents.
Supportlargepanelsasshown in(Pic.2)tominimizetherisk
ofbladepinchingandkickback.Pic.3showsthewrongwayto
cut large pieces of wood, cutting in this way will cause serious
injurytotheoperator.
Whencutting, the saw should rest on the larger piece of the
materialandthesmallerpiececutoff.
Use a rip fence at all times, this will help to prevent side pressure
beingexertedonthebladeandwillalsogiveastraightercut.
GUARDING AGAINST KICK BACK (PIC.4)
Kick back occurs when the saw stalls rapidly and is driven back
towardstheoperator.Toavoidkickbackkeepbladessharpand
alwayssupportlargeworkpiecescorrectly.Releasetheswitch
immediatelyifbladebindsorifthecircularsawstalls.
Do not remove the saw from a work piece while the blade is
still moving. Never place your hands or fingers behind or in
frontofthesaw(Pic4).Ifkickbackoccurs,thesawcouldjump
backwardsoveryourhand,possiblycausingsevereinjury.
Alwayslowerguardwiththeretaininghandle.Beforecuttingbe
surethatthedepthandbeveladjustmentsaretight.
Use only the correct blades for your power tool with the correct
boresize.
Neverusedefectiveorincorrectbladewashersorbolts.
Avoidcuttingnailsbyinspectingtheworkpiece,removeallnails
fromtheworkpiecebeforecutting.
Operatewiththecorrecthandandworkpiecesupport.
WARNING!
It is important to support the work piece properly and to hold the
saw firmly to prevent loss of control which could cause personal
injury.
Pic.5illustratesthecorrecthandpositionstosupportofthesaw
safely.
Place the wider portion of the saw base on that part of the work
piece which is solidly supported, not on the section that will fall
offwhen thecutismade. If the workpieceisshort or small,
clampittoasuitablesupport.
DO NOT TRY TO HOLD SHORT PIECES BY HAND!
Pic.6illustratesthecorrectwaytocut offtheend ofa board.
Pic.7showsthewrongwaytocutofftheendofaboard.
Never attempt to saw with the Circular Saw held upside down
inavice(Pic.8)thisisextremelydangerousandcanleadtoa
seriousaccident.
Before setting the tool down after completing a cut, be sure
that the lower guard has closed and the blade has come to a
completestop.
ADJUSTMENTS (PICS. 9 TO 12)
DEPTH OF CUT AT 90° (PIC.9)
TheCircularSawhasanadjustabledepthofcut.Toadjustthe
depth of cut slacken the lever located on the side of the machine
(Pic.9).Measurethedepthrequiredfromthebaseplatetothe
highest point of the blade or use the depth gauge on the fixed
guard.(Pic.10).
ANGLE OF CUT 0-45° (PIC.11)
Locatedatthefrontofthemachineisthe0-45°lockinglever
(Pic.11). Slacken the lever and the base plate assembly will
rotate between 0-45°. Set the desired cutting angle by using
degree scale at the front of the machine and tighten the locking
lever.
Atthefrontofthebaseplatetherearetwonotchesmarked90°
and45°.Thesenotchesareaguidetoindicatethepositionof
thebladeinrelationtothecutbeingmadeinthematerial.
PARALLEL CUTTING (PIC.12)
This machine is supplied with a parallel cutting guide. This
cutting guide is fitted to the front of the machine and secured
withthelockingknob(Pic.12).
CHANGING THE BLADE (PICS. 13 TO 16)
CAUTION:AlwaysensurethattheCircularSawisdisconnected
from the mains supply before carrying out any maintenance or
adjustments.
The blade is extremely sharp and care must be observed when
handling.
Caution must be observed as the blade guard is spring loaded
and if released maycause an injury. Rotate the blade guard
into the fully open position and secure it in this position using a
screwdriverorpieceofwood.
Depress the spindle lock and using the supplied hex key,
unscrew the hex socket screw in a anti-clockwise direction.
(Pic.13-14)
CAUTION: The hex socket screw is a normal right hand
thread.
Removethehexsocketscrewandtheretainingflangenoting
whichwayroundtheretainingflangeisfitted(Pic.14).Youcan
nowremovetheblade.
NOTE: Donotdisposeofthebladeinhouse-holdwaste,recycle
1 Hand grip incorporating on/off switch
2 Dust extraction outlet
3 Blade guard
4 Blade cover
5 Front hand grip
6 Power cable
7 Base plate locking knob
8 Tungsten carbide tipped blade
9 Blade bolt
10 Blade flange
11 Base plate
12 Blade spanner
13 Parallel guide