EasyManua.ls Logo

nvent LENTON - User Manual

nvent LENTON
2 pages
Print Icon
To Next Page IconTo Next Page
Loading...
Push pin in and through
center of coupler
Section of rebar
to be spliced
Mark Rebar
Mark Rebar
Slide
coupler
Slide
coupler
Stop Pin
Read all instructions and procedures. Ensure nVent LENTON Connect is sized properly per project plans. Refer to
product instruction sheet for coupler installation procedure details. Additional copies of instructions and
application information are available at www.nVent.com
Step 1
: Slide the coupler onto each rebar end until the rebar touches the stop pin. Mark the rebar to ensure
proper coupler/rebar engagement.
Step 2
: To allow rebar to pass entirely through the coupler, remove the stop pin by pushing the pin into the
inside diameter of sleeve. Discard the stop pin.
TECHNICAL SUPPORT:
www.nVent.com
PDF139_A
INSTRUCTION SHEET
1 of 2
nVent, nVent CADDY, nVent ERICO Cadweld, nVent ERICO Critec, nVent ERICO, nVent ERIFLEX, and nVent LENTON are registered trademarks
of nVent or its global affiliates. All other trademarks are the property of their respective owners. nVent reservers the right to change
specifications without prior notice.
WARNING:
nVent products shall be installed and used only as indicated in nVent product instruction sheets and training materials. Instruction sheets are available at
www.nVent.com
and from your
1.
nVent customer service representative.
nVent products must never be used for a purpose other than the purpose for which they were designed or in a manner that exceeds specified load ratings.
2.
All instructions must be
completely
followed to ensure proper and safe installation and performance.
3.
Improper installation, misuse, misapplication or other failure to completely follow nVent's instructions and warnings may cause product malfunction, property damage, serious bodily
4.
injury and/or death, and void your warranty.
The customer is responsible for:
a. Conformance to all governing codes.
b. The integrity of structures to which the products are attached, including their capability of safely accepting the loads imposed, as evaluated by a qualified engineer.
c. Using appropriate industry standard hardware as noted above.
SAFETY INSTRUCTIONS:
All governing codes and regulations and those required by the job site must be observed.
Always use appropriate safety equipment such as eye protection, hard hat, and gloves as appropriate to the application.

© 2019 nVent All Rights Reserved
Question and Answer IconNeed help?

Do you have a question about the nvent LENTON and is the answer not in the manual?

Overview

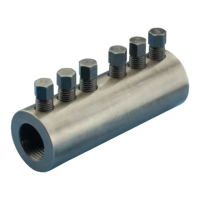
The nVent LENTON Connect Closure Pour Splice is a specialized rebar coupler designed for connecting rebar sections, particularly in closure pour applications. This device facilitates the splicing of rebar by providing a secure mechanical connection, eliminating the need for traditional lap splicing or welding in certain scenarios.

Function Description:

The primary function of the nVent LENTON Connect Closure Pour Splice is to create a robust and reliable mechanical splice between two rebar ends. It is specifically engineered for situations where a closure pour is required, meaning a section of concrete is poured to connect two previously cast concrete elements. The coupler allows for the rebar to be connected within this closure pour, ensuring structural continuity.

The installation process involves several key steps that highlight its operational features:

  1. Initial Engagement: The coupler is designed to slide onto each rebar end. A "stop pin" within the coupler ensures proper engagement by preventing the rebar from being inserted too far. This feature helps in achieving the correct positioning and overlap within the coupler. Users are instructed to mark the rebar to confirm proper engagement, indicating a visual verification step in the installation process.

  2. Stop Pin Removal for Through-Passage: A unique feature for closure pour applications is the ability to remove the stop pin. This allows the rebar to pass entirely through the coupler sleeve. This is crucial when one rebar section needs to extend beyond the coupler initially, or when the coupler needs to be positioned over an existing rebar end that cannot be fully inserted from one side. The stop pin is pushed into the inside diameter of the sleeve and then discarded, indicating a one-time removal for this specific functionality.

  3. Rebar Alignment and Positioning (Option A - Through-Passage): For scenarios where the rebar passes entirely through the coupler, the instructions detail "Option A." After removing the stop pin, the rebar is allowed to pass through, and the coupler is then aligned. The instructions emphasize aligning the rebar marks (made in Step 1) to ensure the coupler is centered correctly over the splice. This method is suitable when a new section of bar needs to be introduced or when existing bars need to be connected with the coupler positioned over them.

  4. Rebar Alignment and Positioning (Option B - New Bar and Couplers): "Option B" describes a scenario where a new bar and couplers are introduced. This implies a situation where the coupler is pre-installed on one end of a new rebar section, and then connected to an existing rebar. The process again emphasizes aligning the rebar marks to ensure proper centering and engagement.

  5. Bolt Tightening: The final step in securing the splice involves tightening the bolts on the coupler. This is a critical step that ensures the mechanical connection is fully engaged and capable of transferring loads. The instructions refer to a separate product instruction sheet (IP8515) for specific bolt tightening procedures, indicating that precise torque or tightening sequences are required for optimal performance.

Important Technical Specifications (Inferred):

While explicit numerical specifications are not provided in the document, several aspects can be inferred:

  • Material: The coupler is likely made from high-strength steel or a similar robust material to withstand the tensile and compressive forces transferred by the rebar.
  • Load Rating: The warning section explicitly states that nVent products must not "exceed specified load ratings." This indicates that the nVent LENTON Connect Closure Pour Splice is designed for specific load capacities, which would be detailed in accompanying technical documentation or product specifications. These ratings are crucial for engineers to ensure the splice meets the structural requirements of the project.
  • Rebar Compatibility: The coupler is designed to connect rebar, implying it comes in various sizes to match different rebar diameters. The initial instruction to "Ensure nVent LENTON Connect is sized properly per project plans" confirms this.
  • Installation Method: The use of bolts for tightening suggests a mechanical connection method that does not require specialized welding equipment or extensive heat treatment on site, potentially simplifying installation and reducing associated risks.
  • Compliance: The product is designed to be installed and used according to "all governing codes," indicating that it is engineered to meet relevant building and construction standards.

Usage Features:

  • Ease of Installation: The step-by-step instructions, including visual aids, suggest a relatively straightforward installation process for trained personnel. The ability to remove the stop pin offers flexibility in installation scenarios.
  • Versatility: The existence of "Option A" and "Option B" indicates the coupler's adaptability to different construction sequences and rebar configurations in closure pour applications.
  • Visual Verification: The emphasis on marking rebar and aligning these marks provides a simple visual check for installers to confirm correct positioning and engagement.
  • Mechanical Connection: As a mechanical splice, it offers an alternative to traditional lap splicing, which can reduce rebar congestion and simplify concrete placement. It also avoids the complexities and quality control issues associated with field welding of rebar.
  • Safety: The warning section highlights the importance of following instructions for "proper and safe installation and performance," indicating that the design incorporates safety considerations when installed correctly. The need for appropriate safety equipment (eye protection, hard hat, gloves) during installation is also emphasized.

Maintenance Features:

The document does not explicitly detail maintenance features for the nVent LENTON Connect Closure Pour Splice. As a structural component embedded within concrete, it is generally considered a maintenance-free item once properly installed and the concrete is poured. The long-term performance relies heavily on correct initial installation.

  • Durability: Given its intended use in structural concrete, the coupler is expected to be highly durable and resistant to environmental factors once encased in concrete, requiring no ongoing maintenance.
  • Inspection (Pre-pour): While not maintenance, the installation process itself includes critical inspection points (e.g., verifying rebar marks, ensuring proper bolt tightening) that are essential for long-term performance and prevent future issues.
  • No Moving Parts (Post-installation): Once installed and tightened, the coupler becomes a static component, eliminating the need for lubrication, adjustments, or replacement of wear parts.

In summary, the nVent LENTON Connect Closure Pour Splice is a robust, mechanically fastened rebar coupler designed for critical closure pour applications, offering flexibility in installation and ensuring structural continuity through a reliable, code-compliant connection. Its design prioritizes ease of use and safety during installation, leading to a durable, maintenance-free splice once embedded in concrete.

nvent LENTON Specifications

General IconGeneral
Brandnvent
ModelLENTON
CategoryCables and connectors
LanguageEnglish

Related product manuals