EasyManua.ls Logo

nvent RAYCHEM User Manual

nvent RAYCHEM
6 pages
To Next Page IconTo Next Page
Page #1 background imageLoading...
Page #1 background image
RayClic
®
F
M
APPROVED
with HWAT, IceStop,
and XL-Trace heating
cables.
CL I, Div. 2, Gr. A,B,C,D
Hazardous Locations
with GM-XT only.
WARNING:
Do not open while energized
Shock Hazard
718K Pipe Heating Cable
also Listed De-icing and
Snow Melting Equipment
-W
DESCRIPTION
The nVent RAYCHEM RayClic-LE Lighted End Seal Kit is for use
with nVent RAYCHEM IceStop, XL-Trace and HWAT heating
cables. The connection is designed to be installed above the
pipe insulation or mounted on the wall at the end of the heating
cable circuit. These installation instructions should be used
in conjunction with the IceStop, XL-Trace and HWAT System
Installation and Operation Manuals.
For technical support contact your nVent representative or call
nVent (800)545‑6258.
TOOLS REQUIRED
Utility knife Wire cutters
• TORX
®
T20 screw driver
OPTIONAL ACCESSORIES (Not included in this kit):
nVent RAYCHEM RayClic‑SB‑02 Wall mounting bracket
KIT CONTENTS
Item Qty Description
A 1 Lighted end seal
B 1 Pipe mounting bracket
C 2 Plastic cable ties
D 1 Clip
E 1 Cable lubricant
A B C D E
APPROVALS
718K Pipe Heating Cable
877Z De-Icing and Snow Melting
Not UL Listed with XL-Trace heating
cable for buried piping.
APPROVED
-w
For HWAT, IceStop, and XL-Trace only
Hazardous Locations: For IceStop (GM-XT) only
Class I, Div. 2, Groups A,B,C,D
RayClic Connection System
RayClic-LE Lighted End Seal Kit Installation Instructions
This component is an electrical device that must be
installed correctly to ensure proper operation and to
prevent shock or fire. Read these important warnings and
carefully follow all the installation instructions.
To minimize the danger of fire from sustained electrical
arcing if the heating cable is damaged or improperly
installed, and to comply with the requirements of nVent,
agency certifications, and national electrical codes,
ground-fault equipment protection must be used. Arcing
may not be stopped by conventional circuit breakers.
Bus wires will short if they contact each other. Keep bus
wires separated.
Keep components and heating cable ends dry before
and during installation.
The black heating cable core is conductive and can
short. It must be properly insulated and kept dry.
Component approvals and performance are based
on the use of nVent-specified parts only. Do not use
substitute parts or vinyl electrical tape.
Leave these instructions with end user for reference
and future use.
WARNING:
Question and Answer IconNeed help?

Do you have a question about the nvent RAYCHEM and is the answer not in the manual?

nvent RAYCHEM Specifications

General IconGeneral
Product CategoryHeating Cables
BrandnVent Raychem
Product TypeSelf-Regulating Heating Cable
Jacket ColorBlack
Maximum Maintain Temperature150°F (65°C)
Minimum Installation Temperature-40°F (-40°C)
Maximum Exposure Temperature185 °F
CertificationsCSA | ATEX | IECEx
Voltage Rating120 V | 240 V

Summary

Product Description and Tools

Product Description

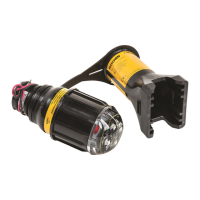
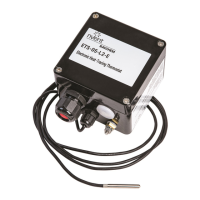
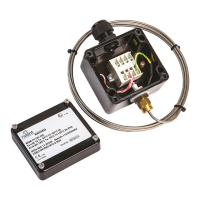
Details the nVent RAYCHEM RayClic-LE Lighted End Seal Kit for heating cables.

Tools and Accessories

Lists required tools and optional accessories for installation.

Approvals and Kit Contents

Specifies product approvals and lists all items included in the kit.

Installation Warning

Provides critical safety warnings for electrical device installation.

Lighted End Seal Installation Steps

Attach Bracket to Pipe

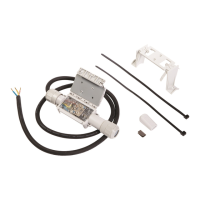
Attach the mounting bracket to the pipe using plastic cable ties.

Connect End Seal to Bracket

Fold snaps and position connector over snaps, then press down.

Prepare Heating Cable End

Ensure sufficient cable for loops and a clean cut at the end.

Score and Cut Outer Jacket

Score and remove outer jacket 3 1/8 inches from the end, avoiding braid.

Remove Outer Jacket and Apply Clip

Remove outer jacket and place metal clip over the exposed braid base.

Prepare Cable Braid and Wrap

Cut braid and aluminum wrap as per heating cable type (HWAT/IceStop/XL-Trace).

Apply Cable Lubricant

Apply lubricant to jacket surface near the end, avoiding the exposed end.

Insert Cable into Connector

Insert cable into connector until fully seated and visible; installation is permanent.

Tighten Connection Screws

Securely tighten screws to specified height, alternating sides.

Close Lid and Secure Cable Entries

Close lid, snap lever, and tighten cable entry nuts; check screws if lid won't close.

Roof Installation Method

Mount Bracket for Roof Installation

Mount bracket under eaves using screws, avoiding gutters and water.

Position Attachment Clips

Position the attachment clips on the mounting bracket as illustrated.

Connect Cable for Roof Installation

Connect the heating cable following previously detailed steps.

Attach Connector and Install Drip Loop

Attach connector to bracket, install drip loop, and protect cable from sharp edges.

Troubleshooting Guide

Braid Clips and Mounting Brackets

Troubleshoot missing braid clips or mounting brackets and how to obtain them.

Connector and Cable Fit Issues

Address issues with connector snapping, cable type compatibility, and insertion.

Cable Preparation and Lid Closure

Resolve problems related to cable preparation, lid closure, and screw tightening.

Heating Cable Removal and Light Function

Information on permanent installation and troubleshooting light not coming on.

Related product manuals