This is a VERY simple install and can t into virtually any car made in the last 10 years.
WITHOUT removing your spare tire. Follow the instructions for a SUPER easy install!
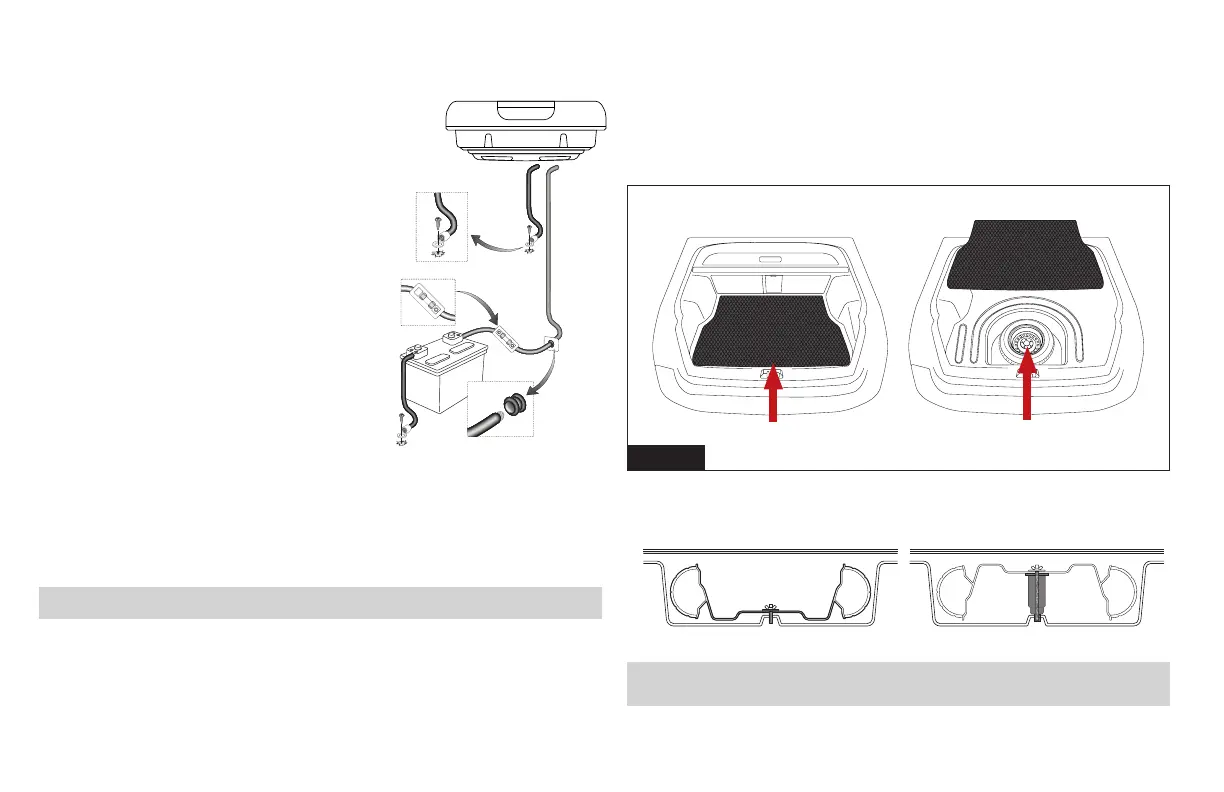
1. Remove the trunk liner. Typically it is NOT screwed or bolted down. It should simple pull
out as shown below in Figure 1
POWER & INPUT SIGNAL WIRING INSTALLATION
4
LOW LEVEL HI LEVEL
GNDGNDL- R- L- R-
L+ R+ L+ R+ GNDGND
+12V +12V
+12V +12VREM
Power wiring is very straight forward. Use a high quality
power kit (not supplied or included)
NOTE: DO NOT USE CCA wiring kits EVER! Using
this type of wire VOIDS your warranty!
1. Connect your 8 gauge power wire DIRECTLY to the
battery B+ terminal with a high quality ring terminal.
Make sure that a fuse holder is approx. 18 inches from
the battery and the fuse should be NO larger than 50
amperes.
2. Make sure to run the power wire through a grommet
in the rewall to eliminate any possibility of shorts.
3. Route the Remote Control cable (phone wire) through
your vehicle to the spare tire area of you trunk.
4. Connect a remote turn on wire to your head units
remote output using 16 gauge blue wire (not included)
NOTE: The QBSTA is equipped with an automatic
turn on circuit if NO switched 12 volts is available
for turn-on.
LOW LEVEL INPUT WIRING
Low-level (RCA) input wiring is preferred for best audio performance. Most trunk or hatchback
installations will require a 15-20 foot RCA cable, Always use a high quality cable.
NOTE: Do not connect BOTH the high level and low level inputs from your receiver to
your amplier at the same time!
SPECIAL NOTE: ALWAYS ROUTE POWER AND SIGNAL SEPARATELY
CAUTION! MAKE SURE TO NOT DRILL OR SCREW INTO
VITAL VEHICLE COMPONENTS!!
2. Once the trunk liner is removed and you can get access to your spare tire. Make a
mental note if the spare tire is deep side down or deep side up???
Deep side down Deep side up
THE TRUNK: Shown is a hatchback,. But coupes or sedans should be almost identical
FIGURE 3
TRUNK LINER
SPARE TIRE
 Loading...