EasyManua.ls Logo

Nyce NCZ-3011-HA User Manual

Nyce NCZ-3011-HA
2 pages
To Next Page IconTo Next Page
Page #1 background imageLoading...
Page #1 background image
DOOR/WINDOW SENSOR
INSTALLATION GUIDE
STEP 1: INSTALL BATTERY
Slide open the Door/Window
Sensor’s top housing. Install the
CR2032 battery in the housing top
as shown below.
STEP 2: JOIN THE NETWORK
Users:
Refer to the instructions on your web portal or
smart phone application to join and configure the
Door/Window Sensor.
Developers:
Refer to NYCE’S “ZigBee Device Messaging
Specification” document for details on how to join
the Door/Window Sensor to the ZigBee network.
This document can be found on NYCE’s Website
Support page: www.nycesensors.com/support/
STEP 3: PROPER DEVICE ORIENTATION
Ensure that the Door/Window Sensor and the Magnet are facing each
other as shown in the diagram below on the left.
The Magnet and Sensor can be a maximum of 0.75” (1.9 cm) apart. If
aligned properly, you will be able to hear a ‘click’ when they approach.
Check that the icon on your web portal or smart phone application
updates with a “Closed” and “Open” icon as the magnet is moved to
and from the device.
INCORRECT ALIGNMENT
CORRECT ALIGNMENT
Question and Answer IconNeed help?

Do you have a question about the Nyce NCZ-3011-HA and is the answer not in the manual?

Nyce NCZ-3011-HA Specifications

General IconGeneral
BrandNyce
ModelNCZ-3011-HA
CategoryAccessories
LanguageEnglish

Summary

Install Battery

Battery Installation

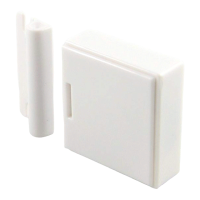
Slide open the sensor's top housing and install the CR2032 battery.

Join the Network

User Network Joining

Instructions for users to join and configure the sensor via web portal or smartphone app.

Developer Network Joining

Details for developers on joining the sensor to the ZigBee network using the ZigBee Device Messaging Specification.

Proper Device Orientation

Sensor and Magnet Alignment

Ensure sensor and magnet face each other, max 0.75" apart, for proper function and audible click feedback.

Verification of Alignment

Verify correct operation by checking status updates in the portal or app as the magnet moves.

Install Sensor Housing

Mounting Options

Install the sensor housing using either 2-sided tape or screws on a clean surface.

Installation Notes and Precautions

Test location before permanent installation; avoid metal and ensure a dry environment.

Install the Magnet

Magnet Placement and Distance

Place the magnet correctly within 0.75" (1.9 cm) of the sensor using tape or screws.

Magnet Tab Modification

Optionally remove the magnet's tab by snapping it along the scored line if using 2-sided tape.

Install the Sensor

Final Sensor Assembly

Insert the sensor top housing after confirming device communication.

Product Function and LED Indicators

Button Actions and LED Status

Details on button presses, corresponding LED indicators, and their meanings for device status and actions.

Related product manuals