Introduction
Important Safety Information
1. Know Your Monitor
2. Preparation
3. Using Your Monitor without a Smart Device
4. Using Your Monitor with a Smart Device
5. Using Memory Function
6. Other Settings
7. Error Messages and Troubleshooting
8. Maintenance
9. Optional Accessories
10. Specifications
11. FCC/ISED Statement
12. Limited Warranty
13. Guidance and Manufacturer’s Declaration
Thank you for purchasing the OMRON BP5250 Blood Pressure Monitor.
This monitor can be used by multiple users. This blood pressure monitor
uses the oscillometric method of blood pressure measurement. This
means this monitor detects your blood movement through your brachial
artery and converts the movements into a digital reading.
Safety Instructions
This instruction manual provides you with important information about the
OMRON BP5250 Blood Pressure Monitor. To ensure the safe and proper
use of this monitor, READ and UNDERSTAND all of these instructions. If
you do not understand these instructions or have any questions,
contact 1-800-634-4350 before attempting to use this monitor. For
specific information about your own blood pressure, consult with
your physician.
Intended Use
This device is a digital monitor intended for use in measuring blood
pressure and pulse rate in adult patient population. The device detects the
appearance of irregular heartbeats during measurement and gives a
warning signal with readings.
Receiving and Inspection
Remove this monitor and other components from the packaging and
inspect for damage. If this monitor or any other components is damaged,
DO NOT USE and contact 1-800-634-4350.
Symbols Glossary
For symbol information, visit:
OmronHealthcare.com/symbols-glossary
• This monitor is contraindicated for use in ambulatory environments.
• This monitor is contraindicated for use on aircraft.
Read the Important Safety Information in this instruction manual
before using this monitor.
Follow this instruction manual thoroughly for your safety.
Keep for future reference. For specific information about your own blood
pressure, CONSULT WITH YOUR PHYSICIAN.
Warning
Indicates a potentially hazardous situation which, if not
avoided, could result in death or serious injury.
• DO NOT use this monitor on infants, toddlers, children or persons
who cannot express themselves.
• DO NOT adjust medication based on readings from this blood
pressure monitor. Take medication as prescribed by your
physician. ONLY a physician is qualified to diagnose and treat high
blood pressure.
• DO NOT use this monitor on an injured arm or an arm under
medical treatment.
• DO NOT apply the arm cuff on your arm while on an intravenous
drip or blood transfusion.
• DO NOT use this monitor in areas containing high frequency (HF)
surgical equipment, magnetic resonance imaging (MRI) equipment,
computerized tomography (CT) scanners. This may result in
incorrect operation of the monitor and/or cause an inaccurate
reading.
• DO NOT use this monitor in oxygen rich environments or near
flammable gas.
• Consult with your physician before using this monitor if you have
common arrhythmias such as atrial or ventricular premature beats
or atrial fibrillation; arterial sclerosis; poor perfusion; diabetes;
pregnancy; pre-eclampsia or renal disease. NOTE that any of these
conditions in addition to patient motion, trembling, or shivering
may affect the measurement reading.
• NEVER diagnose or treat yourself based on your readings. ALWAYS
consult with your physician.
• To help avoid strangulation, keep the air tube and AC adapter cable
away from infants, toddlers and children.
• This product contains small parts that may cause a choking hazard
if swallowed by infants, toddlers and children.
Data Transmission
• This product emits radio frequencies (RF) in the 2.4 GHz band. DO
NOT use this product in locations where RF is restricted, such as
on an aircraft or in hospitals. Turn off the Bluetooth
®
feature in this
monitor, remove batteries and/or unplug the AC adapter when in RF
restricted areas. For further information on potential restrictions
refer to documentation on the Bluetooth usage by the FCC/ISED.
Silver Upper Arm Blood
Pressure Monitor
Model BP5250
Instruction Manual
3787143-0A
Table of Contents
Introduction
Important Safety Information
AC Adapter (optional accessory) Handling and Usage
• DO NOT use the AC adapter if this monitor or the AC adapter cable
is damaged. If this monitor or the cable is damaged, turn off the
power and unplug the AC adapter immediately.
• Plug the AC adapter into the appropriate voltage outlet. DO NOT
use in a multi-outlet plug.
• NEVER plug in or unplug the AC adapter from the electric outlet
with wet hands.
• DO NOT disassemble or attempt to repair the AC adapter.
Battery Handling and Usage
• Keep batteries out of the reach of infants, toddlers and children.
Caution
Indicates a potentially hazardous situation which, if not
avoided, may result in minor or moderate injury to the user or
patient, or cause damage to the equipment or other property.
• Stop using this monitor and consult with your physician if you
experience skin irritation or discomfort.
• Consult with your physician before using this monitor on an arm
where intravascular access or therapy, or an arterio-venous (A-V)
shunt, is present because of temporary interference to blood flow
which could result in injury.
• Consult with your physician before using this monitor if you have
had a mastectomy.
• Consult with your physician before using this monitor if you have
severe blood flow problems or blood disorders as cuff inflation can
cause bruising.
• DO NOT take measurements more often than necessary because
bruising, due to blood flow interference, may occur.
• ONLY inflate the arm cuff when it is applied on your upper arm.
• Remove the arm cuff if it does not start deflating during a
measurement.
• DO NOT use this monitor for any purpose other than measuring
blood pressure.
• During measurement, make sure that no mobile device or any other
electrical device that emits electromagnetic fields is within 12
inches (30 cm) of this monitor. This may result in incorrect
operation of the monitor and/or cause an inaccurate reading.
• DO NOT disassemble or attempt to repair this monitor or other
components. This may cause an inaccurate reading.
• DO NOT use in a location where there is moisture or a risk of water
splashing this monitor. This may damage this monitor.
• DO NOT use this monitor in a moving vehicle such as in a car.
• DO NOT drop or subject this monitor to strong shocks or
vibrations.
• DO NOT use this monitor in places with high or low humidity or
high or low temperatures. Refer to section 10.
• During measurement, observe the arm to ensure that the monitor is
not causing prolonged impairment to blood circulation.
• DO NOT use this monitor in high-use environments such as
medical clinics or physician offices.
• DO NOT use this monitor with other medical electrical (ME)
equipment simultaneously. This may result in incorrect operation of
the monitor and/or cause an inaccurate reading.
• Avoid bathing, drinking alcohol or caffeine, smoking, exercising
and eating for at least 30 minutes before taking a measurement.
• Rest for at least 5 minutes before taking a measurement.
• Remove tight-fitting or thick clothing from your arm while taking a
measurement.
• Remain still and DO NOT talk while taking a measurement.
• ONLY use the arm cuff on persons whose arm circumference is
within the specified range of the cuff.
• Ensure that this monitor has acclimated to room temperature
before taking a measurement. Taking a measurement after an
extreme temperature change could lead to an inaccurate reading.
OMRON recommends waiting for approximately 2 hours for the
monitor to warm up or cool down when the monitor is used in an
environment within the temperature specified as operating
conditions after it is stored either at the maximum or at the
minimum storage temperature. For additional information on
operating and storage/transport temperature, refer to section 10.
• DO NOT use this monitor after the durable period has ended. Refer
to section 10.
• DO NOT crease the arm cuff or the air tube excessively.
• DO NOT fold or kink the air tube while taking a measurement. This
may cause an injury by interrupting blood flow.
• To unplug the air plug, pull on the plastic air plug at the base of the
tube, not the tube itself.
• ONLY use the AC adapter, arm cuff, batteries and accessories
specified for this monitor. Use of unsupported AC adapters, arm
cuffs and batteries may damage and/or may be hazardous to this
monitor.
• ONLY use the approved arm cuff for this monitor. Use of other arm
cuffs may result in incorrect readings.
• Inflating to a higher pressure than necessary may result in bruising
of the arm where the cuff is applied. NOTE: refer to “If your
systolic pressure is more than 210 mmHg” in section 3 of this
instruction manual for additional information.
Data Transmission
• DO NOT replace batteries or unplug the AC adapter while your
readings are being transferred to your smart device. This may
result in incorrect operation of this monitor and failure to transfer
your blood pressure data.
AC Adapter (optional accessory) Handling and Usage
• Fully insert the AC adapter into the outlet.
• When unplugging the AC adapter from the outlet, be sure to safely
pull from the AC adapter. DO NOT pull from the AC adapter cable.
• When handling the AC adapter cable:
DO NOT damage it.
DO NOT break it.
DO NOT tamper with it.
DO NOT forcibly bend or pull it.
DO NOT twist it.
DO NOT use it if it is gathered in a bundle.
DO NOT pinch it.
DO NOT place it under heavy objects.
• Wipe any dust off of the AC adapter.
• Unplug the AC adapter when not in use.
• Unplug the AC adapter before cleaning this monitor.
Battery Handling and Usage
• DO NOT insert batteries with their polarities incorrectly aligned.
• ONLY use 4 “AA” alkaline or manganese batteries with this monitor.
DO NOT use other types of batteries. DO NOT use new and used
batteries together. DO NOT use different brands of batteries
together.
• Remove batteries if this monitor will not be used for a long period
of time.
• If battery fluid should get in your eyes, immediately rinse with
plenty of clean water. Consult with your physician immediately.
• If battery fluid should get on your skin, wash your skin immediately
with plenty of clean, lukewarm water. If irritation, injury or pain
persists, consult with your physician.
• DO NOT use batteries after their expiration date.
• Periodically check batteries to ensure they are in good working
condition.
1.1 Contents/Product Includes
Monitor, Easy Wrap ComFit Cuff, 4 “AA” batteries, storage case,
instruction manual, quick start guide
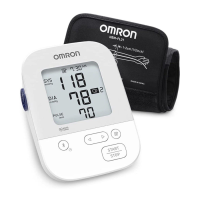
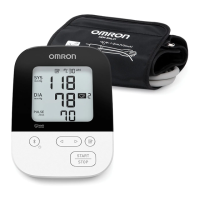
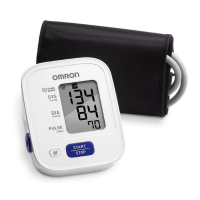
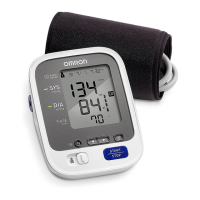
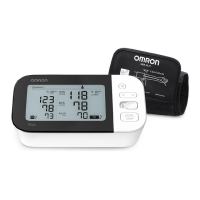
1.2 Monitor and Arm Cuff
Front of the monitor
Left side, back and bottom of the monitor
Arm cuff
(Upper arm circumference: 9" - 17" (22 - 42 cm))
1.3 Display and Symbols
1. Know Your Monitor
Display
[Forward/Backward] buttons
[Connection] button
(Date/Time)
[Memory] button
[START/STOP] button
Air jack
AC adapter jack
(for optional AC adapter)
Battery compartment
Air plug
Air tube
a
c
b
e
d
B
C
D
E
F
G
H
O
A
J
I
K
L
M
N
1.4 Classification of BP (Blood Pressure)
ACC/AHA 2017 Hypertension guidelines define categories of BP in adults
as below.
Categories of BP in Adults*
• NEVER diagnose or treat yourself based on your readings. ALWAYS
consult with your physician.
Memory symbol
Appears when viewing readings stored in the memory.
Average value symbol
Flashes when viewing the average of the latest 2 or 3
readings taken within the most recent 10 minute timeframe.
Sync symbol
Flashes/appears when your data needs to be transferred
because the stored memory is either almost, or completely
full. Once you pair your monitor with your smart device,
transfer your readings immediately before the monitor
deletes the oldest reading. Up to 80 readings can be stored
in the internal memory of your monitor.
Systolic blood pressure reading
Diastolic blood pressure reading
Deflation symbol
Appears during cuff deflation.
Heartbeat symbol
Flashes while taking a measurement.
Date / Time display
Bluetooth ON symbol
Appears when your readings are being transferred.
Bluetooth OFF symbol
Appears when Bluetooth is disabled.
High symbol
Appears if your systolic blood pressure is ≥ 130 mmHg or
the diastolic blood pressure is ≥ 80 mmHg. Refer to sub-
section 1.4 for more information.
or
Irregular heartbeat symbol
Appears when irregular rhythm is detected 2 or more times
during a measurement. The symbol with the number
appears as below:
Irregular heartbeat is detected 2 times:
Irregular heartbeat is detected 3 times or more:
An irregular heartbeat rhythm is defined as a rhythm that is
25 % less or 25 % more than the average rhythm detected
while your monitor is measuring blood pressure.
Irregular heartbeat symbol may be displayed when the
monitor detects arm movements. Refer to section 7 for more
information.
If it continues to appear, we recommend you to consult
with and follow the directions of your physician.
Movement error symbol
Appears with your reading when your body is moving during
a measurement. If it appears, remove the arm cuff and wait
for 2 to 3 minutes. Then, reapply the cuff, remain still and
take another measurement.
OK symbol
Flashes when your monitor is connected to your smart
device or readings are transferred successfully.
Low battery symbol
Flashes when batteries are low.
Depleted battery symbol
Appears when batteries are depleted.
Pulse display / Memory number
Pulse rate appears after the measurement.
When pressing the button, the memory number will also appear
for approximately 1.5 seconds before the pulse rate shows again on
the display.
BP Category Systolic BP Diastolic BP
Normal < 120 mmHg and < 80 mmHg
Elevated 120 - 129 mmHg and < 80 mmHg
Hypertension
Stage 1 130 - 139 mmHg or 80 - 89 mmHg
Stage 2 ≥ 140 mmHg or ≥ 90 mmHg
* Individuals with Systolic BP and Diastolic BP in 2 categories should be
designated to the higher BP category.
BP indicates blood pressure (based on an average of ≥ 2 careful readings
obtained on ≥ 2 occasions).
Source: ACC/AHA 2017 High Blood Pressure Clinical Practice Guideline
A
B
C
K
Short
Long
Irregular Heartbeat
Normal Heartbeat
L
M
N
O
2.1 Installing Batteries
1. Push down on the hook of the
battery cover and pull
downward.
2. Insert 4 “AA” batteries as
indicated in the battery
compartment.
3. Close the battery cover.
As soon as batteries are correctly installed, the year
flashes on the display.
Refer to sub-section 2.2 to set the date and time
manually, or refer to sub-section 4.1 to pair your
monitor to set the date and time automatically.
• When the “ ” symbol flashes on the display, it is recommended you
replace batteries.
• To replace batteries, turn your monitor off and remove all batteries. Then
replace with 4 new batteries at the same time.
• Replacing batteries will not delete previous readings.
• The supplied batteries may have a shorter life span than new batteries.
• Disposal of used batteries should be carried out in accordance with local
regulations.
2.2 Setting the Date and Time
• Set your monitor to the correct date and time before taking a
measurement for the first time.
• The date and time will automatically be set when the monitor is paired
with “OMRON connect US/CAN” app. Refer to sub-section 4.1.
• As soon as batteries are correctly installed, the year flashes on the
display of your monitor.
1. If nothing is displayed, press the button to display the year.
If the year is already displayed, skip this step.
2. Press the or button to adjust the year.
Press and hold the button to quickly advance the years.
Press and hold the button to quickly go backwards through the
years.
3. Press the button to
confirm the year, then the
month will flash. Repeat
the same steps to adjust
the month, day, hour, and
minute.
4. Press the button to store the setting.
Your monitor automatically turns off 3 seconds after the minutes have
been set in this sequence.
• If you need to reset the date and time, replace batteries or press the
button, then set the date and time as shown in above steps.
• If the date and time are not set, “ ” flashes during or after
measurement.
2.3 Blood Pressure Measurement Tips
To help ensure an accurate reading, follow these directions:
• Stress raises blood pressure. Avoid taking measurements during
stressful times.
• Measurements should be taken in a quiet place.
• It is important to take measurements at the same times each day. Taking
measurements in the morning and in the evening is recommended.
• Remember to have a record of your blood pressure and pulse readings
for your physician. A single measurement does not provide an accurate
indication of your true blood pressure. You need to take and record
several readings over a period of time.
• Avoid bathing, drinking alcohol or caffeine, smoking, exercising and
eating for at least 30 minutes before taking a measurement.
• Rest for at least 5 minutes before taking a measurement.
2. Preparation
2.4 Applying the Arm Cuff
• The following steps are for applying the arm cuff to your left arm. When
you take a measurement on your right arm, follow the cuff wrap
instructions for a right arm use mentioned under “To take a measurement
on your right arm” located at the end of this sub-section.
• The blood pressure can differ between the right arm and the left arm, and
the measured blood pressure readings can be different. OMRON
recommends to always use the same arm for measurement. If the
readings between both arms differ substantially, check with your
physician to determine as to which arm to use for your measurements.
• Remove tight-fitting or thick clothing from your arm while taking a
measurement.
1. Plug the arm cuff into your monitor
by inserting the air plug into the air
jack securely until it clicks.
2. Apply the arm cuff to your left upper arm.
•The bottom edge of the arm
cuff should be 0.5 inch (1 to 2
cm) above the inside elbow.
The air tube is on the inside of
your arm and aligned with
your middle finger.
3. Make sure that the air tube is positioned
on the inside of your arm and wrap the cuff
securely, so it can not move around your
arm.
To take a measurement on your right arm
When you take a measurement on your right arm, the air tube should run
along the side of your elbow, along the bottom of your arm. Be careful not
to rest your arm on the air tube.
2.5 Sitting Correctly
To take a measurement, you
need to be relaxed and
comfortably seated in a room
with a comfortable temperature.
Place your arm on the table.
• Sit in a comfortable chair with
your back and arm supported.
• Keep your feet flat and your
legs uncrossed.
• The arm cuff should be placed
on your arm at the same level
as your heart, with the arm
resting comfortably on a table.
Bottom edge
0.5 inch (1 to 2 cm)
Bottom edge
3.1 Taking a Measurement
You can use your monitor without pairing to a smart device. To pair your
monitor with a smart device, refer to sub-section 4.1.
• To stop the measurement, press the [START/STOP] button once to
deflate the arm cuff.
• DO NOT use this monitor with other medical electrical (ME) equipment
simultaneously. This may result in incorrect operation of the monitor and/
or cause an inaccurate reading.
• Remain still and DO NOT talk while taking a measurement.
1. Press the [START/STOP] button.
All symbols appear on the display before starting the measurement.
2. Remain still and do not talk until the entire measurement
process is complete.
The “ ” symbol flashes at every heartbeat.
After your monitor has detected your blood pressure and pulse rate,
the cuff automatically deflates. Your blood pressure and pulse rate are
displayed.
If either the systolic or the diastolic reading is high (refer to sub-
section 1.3), the “ ” symbol appears.
3. Press the [START/STOP] button to turn your monitor off.
•Your monitor automatically turns off after 2 minutes.
• Wait 2 - 3 minutes between measurements. The wait time allows the
arteries to decompress and return to their pre-measurement state.
You may need to increase the wait time depending on your
individual physiological characteristics.
Using the Guest Mode
The guest mode can be used to take a single measurement for another
user.
• No readings are stored in the memory.
1. Press and hold the [START/STOP] button for
more than 2 seconds.
The date/time display will disappear.
2. Release the [START/STOP] button when the date/time display
turns off.
The arm cuff automatically starts to inflate.
If your systolic pressure is more than 210 mmHg
If your systolic pressure is more than 210 mmHg, take a measurement
manually.
After the arm cuff starts to inflate, press and hold the [START/STOP]
button until the monitor inflates 30 to 40 mmHg higher than your expected
systolic pressure.
• Do not inflate above 299 mmHg.
• Inflating to a higher pressure than necessary may result in bruising of the
arm where the cuff is applied.
4.1 Pairing Your Monitor with a Smart Device
The date and time on your monitor will automatically be set when you pair
your monitor with your smart device.
1. Enable Bluetooth on your smart device.
2. Download and install the free “OMRON connect US/CAN” app
onto your smart device.
If you already have the “OMRON connect US/CAN” app and have
created your account, open the app and add your new monitor.
3. Open the app and follow the pairing instructions shown on your
smart device.
4. Confirm that your monitor is connected successfully.
When your monitor is connected
successfully to your smart device, the OK
symbol appears.
5. Press the [START/STOP] button to turn your monitor off.
• If the “Err” symbol appears, follow the instructions in
the “OMRON connect US/CAN” app.
•Your monitor automatically turns off after 2 minutes.
• Be aware that OMRON will not be responsible for the
loss of data and/or information in the app.
• “OMRON connect US/CAN” is the only app that we
recommend to use with your monitor to transfer data correctly.
3. Using Your Monitor without a Smart Device
INFLATINGSTART COMPLETED
4. Using Your Monitor with a Smart Device
Review the list of compatible smart devices at OmronHealthcare.com