18 Safety Sensors / Components
List of Recommended Substitute Products
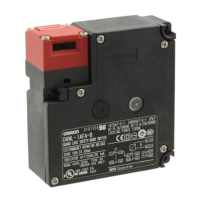
Switch
Note: With standard products, terminals 12 and 41 are connected with a short-
ing pin. In cases where D4DL terminals 11 and 12 and terminals 41 and
42 are currently being used independently, remove the shorting pin.
* Use a voltage of 115 VAC/VDC max. for the D4NL-@@@@-B. Do
not apply a voltage exceeding 115 VAC/VDC.
Operation Key
• D4DS-K1
• D4DS-K2
• D4DS-K3
• D4DS-K5
All of the above Operation Keys can be used with the D4NL.
D4DL product Recommended substitute product
D4DL-1CFA-B D4NL-1AFA-B, D4NL-1BFA-B
D4DL-2CFA-B D4NL-2AFA-B, D4NL-2BFA-B
D4DL-1DFA-B D4NL-1CFA-B, D4NL-1DFA-B
D4DL-2DFA-B D4NL-2CFA-B, D4NL-2DFA-B
D4DL-1CFG-B D4NL-1AFG-B, D4NL-1BFG-B
D4DL-2CFG-B D4NL-2AFG-B, D4NL-2BFG-B
D4DL-1DFG-B D4NL-1CFG-B, D4NL-1DFG-B
D4DL-2DFG-B D4NL-2CFG-B, D4NL-2DFG-B
D4DL-1CFB-B D4NL-1AFB-B, D4NL-1BFB-B
D4DL-2CFB-B D4NL-2AFB-B, D4NL-2BFB-B
D4DL-1DFB-B D4NL-1CFB-B, D4NL-1DFB-B
D4DL-2DFB-B D4NL-2CFB-B, D4NL-2DFB-B
D4DL-1CFH-B D4NL-1AFH-B, D4NL-1BFH-B
D4DL-2CFH-B D4NL-2AFH-B, D4NL-2BFH-B
D4DL-1DFH-B D4NL-1CFH-B, D4NL-1DFH-B
D4DL-2DFH-B D4NL-2CFH-B, D4NL-2DFH-B
D4DL-1CFC-E* D4NL-1AFC-B, D4NL-1BFC-B
D4DL-2CFC-E* D4NL-2AFC-B, D4NL-2BFC-B
D4DL-1DFC-E* D4NL-1CFC-B, D4NL-1DFC-B
D4DL-2DFC-E* D4NL-2CFC-B, D4NL-2DFC-B
D4DL-1CFJ-E* D4NL-1AFJ-B, D4NL-1BFJ-B
D4DL-2CFJ-E* D4NL-2AFJ-B, D4NL-2BFJ-B
D4DL-1DFJ-E* D4NL-1CFJ-B, D4NL-1DFJ-B
D4DL-2DFJ-E* D4NL-2CFJ-B, D4NL-2DFJ-B
D4DL-1CFA-B-HT D4NL-1AFA-B4, D4NL-1BFA-B4
D4DL-2CFA-B-HT D4NL-2AFA-B4, D4NL-2BFA-B4
D4DL-1DFA-B-HT D4NL-1CFA-B4, D4NL-1DFA-B4
D4DL-2DFA-B-HT D4NL-2CFA-B4, D4NL-2DFA-B4
D4DL-1CFG-B-HT D4NL-1AFG-B4, D4NL-1BFG-B4
D4DL-2CFG-B-HT D4NL-2AFG-B4, D4NL-2BFG-B4
D4DL-1DFG-B-HT D4NL-1CFG-B4, D4NL-1DFG-B4
D4DL-2DFG-B-HT D4NL-2CFG-B4, D4NL-2DFG-B4