This document provides assembly instructions and product information for the OneSpace™ Large Corner Wall Mount Shelf, Model 50-SH0105, with supplier code SPRG.
Function Description:
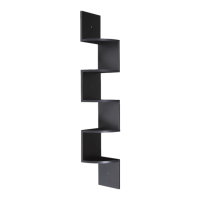
The OneSpace™ Large Corner Wall Mount Shelf is a decorative and functional storage solution designed to be mounted in a corner. It consists of multiple shelves arranged vertically, providing space for displaying items or storing small objects. The design allows for efficient use of corner space, making it suitable for various rooms in a home or office. The assembly process involves connecting end boards, middle boards, and shelves using screws and then securing the entire unit to a wall using anchors and screws.
Important Technical Specifications:
- Model Number: 50-SH0105
- Supplier Code: SPRG
- Product Type: Large Corner Wall Mount Shelf
- Color: Black
- Shelf Maximum Weight Capacity: 10 lbs per shelf. It is crucial not to exceed this weight limit to ensure stability and prevent damage.
- California 93120 Compliant: This product is compliant with California 93120 standards for Formaldehyde, indicating adherence to specific emission limits for formaldehyde.
Parts List (50-SH0105):
- A - End Board: 2 pieces (Stock No. 51-SH0105A)
- B - Middle Board: 4 pieces (Stock No. 51-SH0105B)
- C - Shelf: 5 pieces (Stock No. 51-SH0105C)
Hardware Kit (Stock # 51-SH0105HA):
- 1 - M5x40MM Screws: 20 pieces (for connecting boards and shelves)
- 2 - M3.5x35MM Screws: 2 pieces (for mounting to the wall)
- 3 - Wall Anchor: 2 pieces (for securing the shelf to the wall)
- 4 - Screw Cap: 20 pieces (to cover screw heads for a finished look)
- 5 - Allen Wrench: 1 piece (for tightening M5x40MM screws)
- Extra Hardware Pack: 1 pack (containing extra pieces of hardware 1-4 for convenience)
Usage Features:
- Corner Design: Specifically designed to fit into room corners, maximizing space utilization.
- Multi-Tiered Shelving: Features multiple shelves (five in total) for organized display or storage.
- Wall-Mounted: The unit is secured to the wall, providing stability and freeing up floor space.
- Easy Assembly: The assembly instructions are provided in a step-by-step format with illustrations, making the process straightforward. An Allen wrench is included for assembly.
- Aesthetic Finish: Screw caps are provided to cover exposed screw heads, contributing to a cleaner and more finished appearance.
Assembly Steps:
- Step 1: Lay one End Board (A) flat. Attach one Shelf (C) and one Middle Board (B) to the End Board (A) using M5x40MM Screws (1) and the Allen Wrench (5). Each connection uses two screws.
- Step 2: Continue attaching the remaining four Shelves (C) and three Middle Boards (B) in sequence using M5x40MM Screws (1). Finally, attach the second End Board (A) to the last Shelf (C) using two M5x40MM Screws (1). A total of fourteen screws are used in this step.
- Step 3: Push the twenty Screw Caps (4) securely onto all exposed screw heads to conceal them.
- Step 4 (Wall Mounting):
- Position the assembled shelf in the desired corner at the desired height.
- Mark the wall through the predrilled holes on the End Boards (A) using a pencil.
- Drill holes in the marked spots on the wall. Ensure the drill bit is smaller in diameter than the Wall Anchors (3). Alternatively, a hammer and nail can be used for marking and creating pilot holes.
- Insert the Wall Anchors (3) into the drilled holes, using a rubber hammer if necessary to tap them in securely.
- Align the shelf with the installed anchors.
- Insert two M3.5x35MM Screws (2) through the holes in the End Boards (A) and screw them into the Wall Anchors (3) to firmly secure the shelf to the wall.
Maintenance Features:
- Cleaning: Surfaces should be cleaned with a dry or damp cloth. Abrasive cleaners, furniture wax, or polish should not be used as the unit is finished with a protective clear lacquer.
- Screw Tightness Check: It is recommended to check all screws every 6 months to ensure they remain tight.
- Stability: Do not use the shelf unless all screws are firmly secured.
- Movement: Do not shift or drag the product after assembly; this can damage the unit or the wall.
- Documentation: Keep the sales receipt as documentation of ownership for warranty claims.
Safety Precautions (A CAUTION):
- Read the instruction manual thoroughly before assembly.
- Remove all pieces from packaging before beginning installation.
- Open hardware as needed during assembly.
- Assemble in an area with sufficient space.
- Read each step before beginning construction.
- Have the necessary tools (not included: drill, hammer) before starting assembly.
- Never force screws or fittings.
- Keep the manual for future reference.
- Tighten all screws every 6 months.
- Do not shift or drag the product after assembly.
Limited Warranty:
Comfort Products offers a one (1) year limited warranty against defects in material and workmanship to the original end-user customer who purchased the product from authorized dealers. The remedy is limited to repair or replacement of parts at Comfort Products' option. Damaged parts may need to be returned. Consent from Comfort Products is required before any warranty work. The warranty does not cover defects from improper assembly/disassembly, product modification, intentional damage, fire, misuse, negligence, exposure to elements, or labor/assembly costs. It does not cover transportation costs. Comfort Products is not liable for consequential or exemplary damages. This warranty is not applicable to rental purposes and applies only to end-user customers in the United States. All warranties are limited to normal use. The weight capacity of shelves is 10 pounds. For warranty claims or questions, visit www.comfortproducts.net/support or email customerservice@comfortproducts.net.