7
USER SETUP SCREENS
As shown in the programming owchart, while in the START screen press twice to nd the USER SETUP screen.
Adjusting the charger’s audible tones and melodies is done here.
1. Press to nd the MELODY screen. To change, press CHANGE, and then (+) or (–) to select from 5 different tones,
or turn off. Press CHANGE again to con rm.
2. Press
to nd the BEEP screen. To turn on or off the beeper, press CHANGE, then (+) or (–). When turned on, the
beeper will sound anytime a button is pressed. Press CHANGE again to con rm.
VIEW DATA SCREENS
While in the START screen press three times to nd the VIEW DATA screens. The charger can display several types of
input, output, and battery data in these screens, as follows:
1. Press to nd the INPUT V screen. This is the DC voltage measured on the charger’s input. Even if connected to
an AC input, that voltage is converted to a DC voltage inside the charger and will be displayed in this screen.
2. The OUTPUT V screen shows the DC voltage measured on the charger’s output.
3. The PEAK V screen shows the highest measured battery voltage during the last charge.
4. The CHG CAPACITY screen shows how much charge energy was delivered to the battery during the last charge.
5. The CHG TIME screen shows how many minutes the charger delivered a charge to the battery. This does not include
any time that a trickle charge was delivered.
6. Press to return to the START screen.
BATTERY CONNECTION
1. After determining which battery type is to be charged, what connector is being used and all appropriate
programming is completed, the correct adapter will need to be installed prior to charging. If an adapter other than
what is included is needed, please refer to the ‘CONTROLS AND CONNECTIONS’ section on page 4 for a list of
adapters that are sold separately.
2. For NiCd/NiMH: Plug the adapter into the charger FIRST. Then connect the battery to the adapter ONLY after it has
been connected to the charger. Proceed to the ‘Starting Charge’ section.
3. For LiPo, LiIon OR LiFe: Lithium batteries for R/C are commonly available in two different assembly/wiring
con gurations: wired for balancing, and non-balanced. It’s important to know which con guration you have before
proceeding. Consult your battery supplier if you are unsure if your battery is wired for balancing, if it’s not
wired for balancing but has a built-in safety circuit, or neither.
WARNING! It is NOT recommended to charge a LiPo battery which is not wired for balancing, or
which does not have a built-in protection circuit! Such types of LiPo batteries have NO means to
protect the equipment or the user from damage that could result from an overcharge condition of
any single cell in the pack.
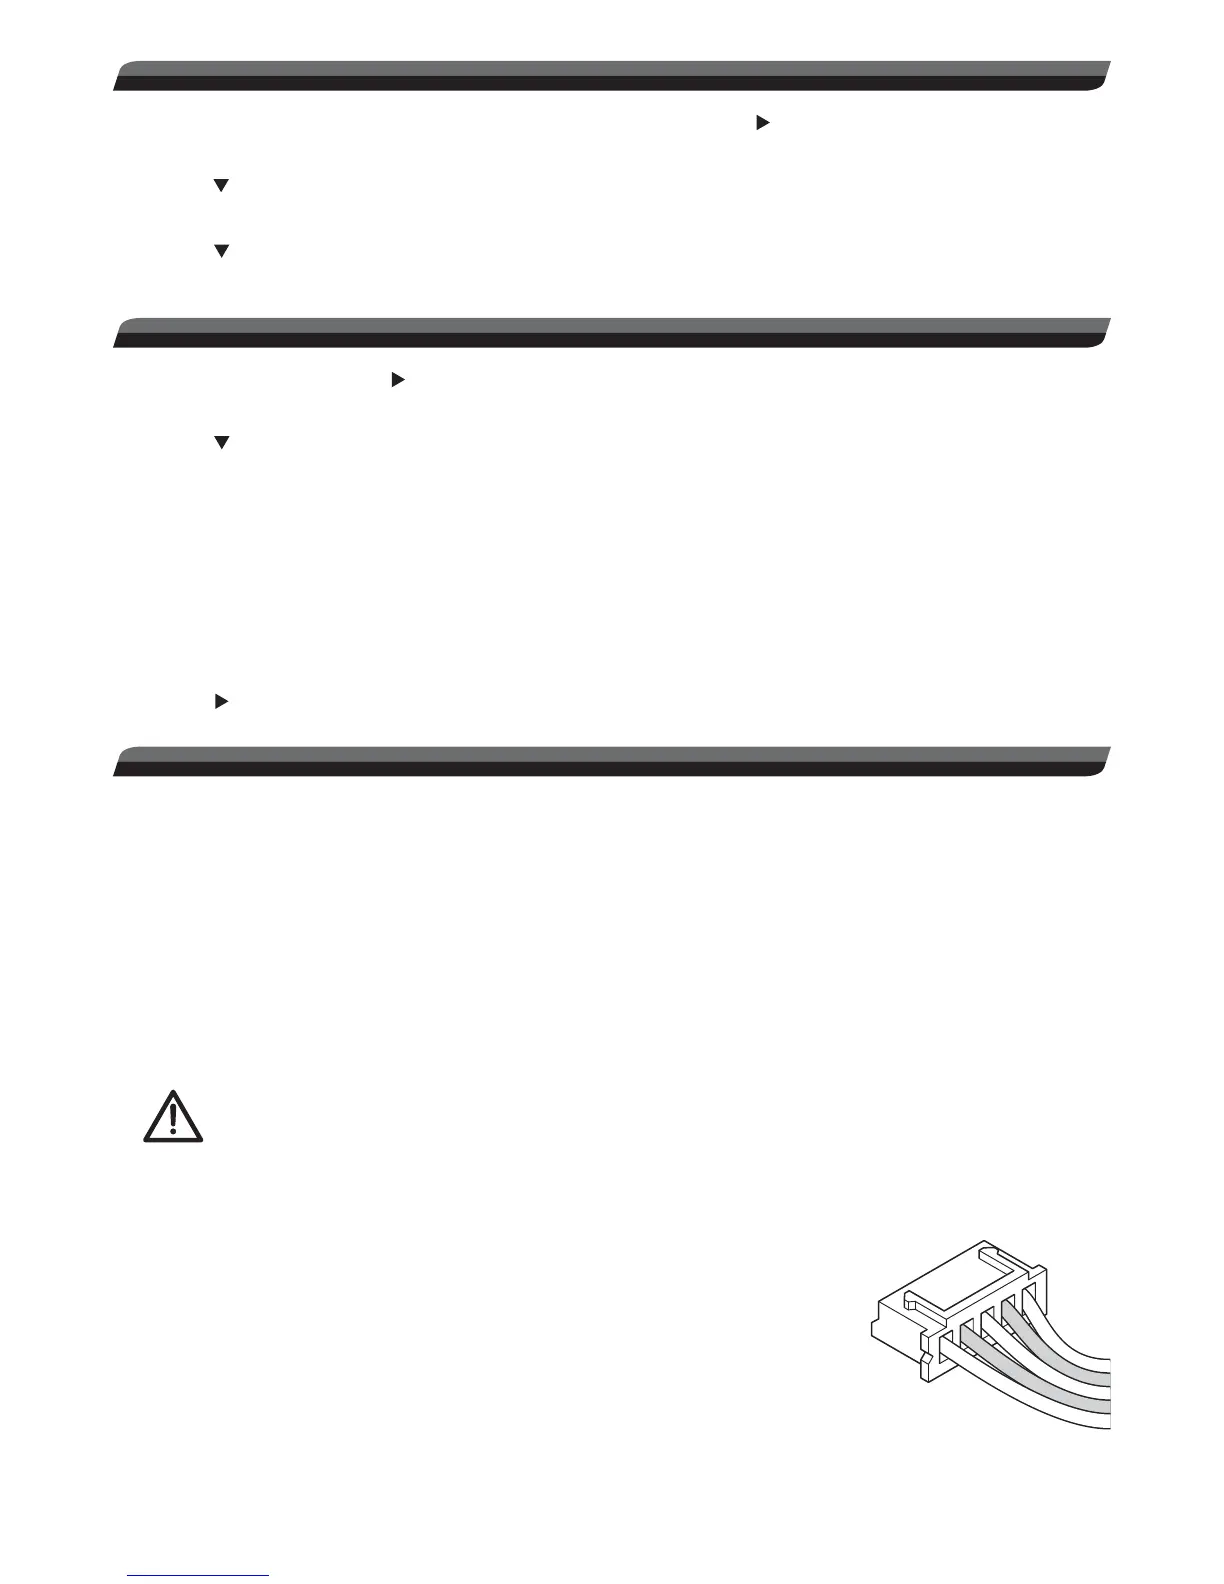
Packs wired for BALANCING have a unique connector which has more than two wires
going to the pack itself (like shown at right.) Each wire is connected to an individual
cell inside the pack, by which the charger monitors the condition of the individual cell
and controls whether it should be charged. Such packs SHOULD be charged with a
LiPo charger that is capable of balancing, such as the Onyx 225.
NON-BALANCED packs are wired so the charger can only detect the voltage of
the entire pack (not individual cells), so there is only one charge lead. It’s highly
recommended to ONLY use such types of LiPo packs if they have a built-in charge
safety circuit which prevents any single cell in the pack from being overcharged.
Simply connect the battery’s main power lead to the charger’s banana jacks (note
proper polarity).
Balancing Connector