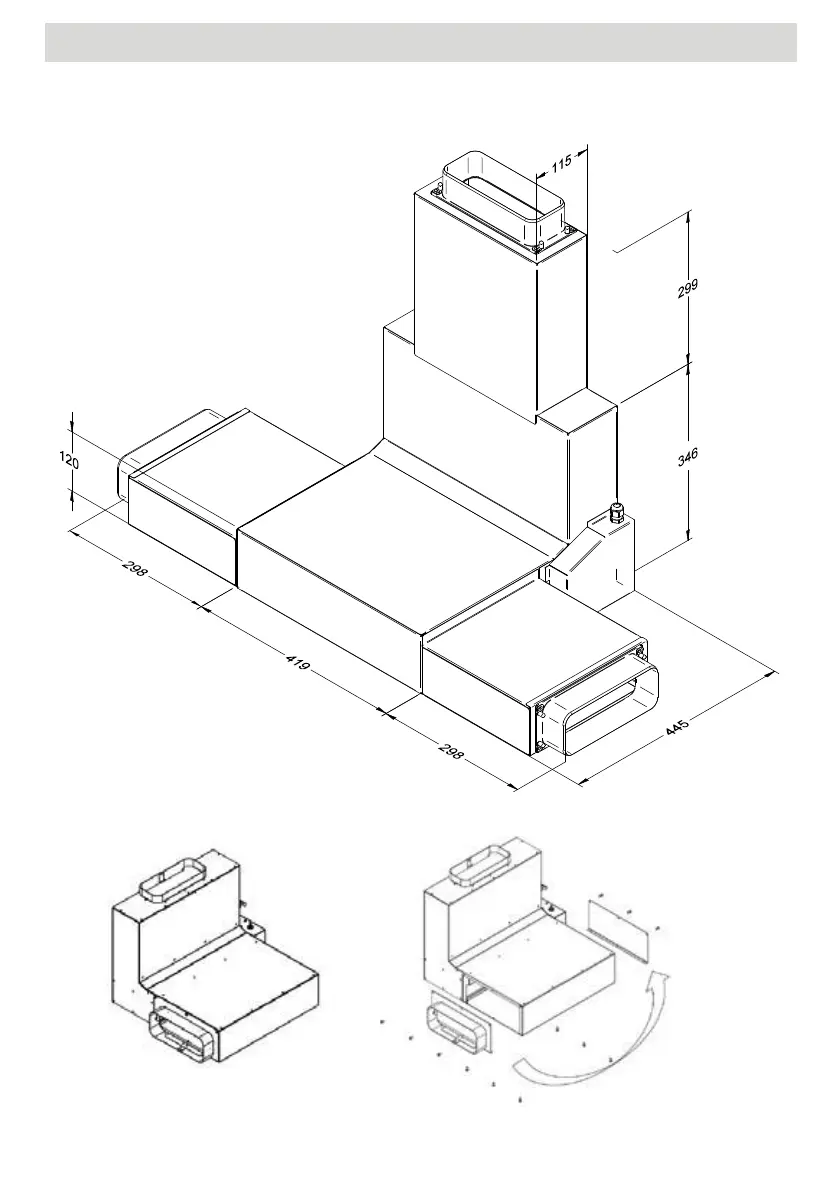
Drawer extension
Installation - example
Note: Minimum distances should be maintained.
"A" hob - upper cabinet > 600 mm
"B" hob - side cabinet > 300mm
To avoid water steam damage, we recommend
placing a panel behind the wall cupboards.
This will prevent accumulation of moisture between
the cabinets.
1. Remove the front or drawers
2. Define and mark the positions forthe cut-out on the kitchen worktop. Please pay attention to
minimum distances and minimum web width ! These may vary depending on the material and
material properties! (Under certain circumstances use auxiliary crossbar "Reinforcement").
3. Saw out the cut -out on the worktop. Pay attention to straightness and freedom from burrs ! For "�
ush installation", mill out the recess.
4. Seal milled surfaces
5. If necessary, make cut -outs in the base cabinet �oor and plinth.
6. Adjust rear drawer panels if necessary.
12
EN
619
1069
17
65>
616
74/92
104/122
146/164
176/194
79/97
109/127
89 587
115 566
120
445
Drawer extension
Installation - example
7. PU sealing tape 3x10 mm at the mount bearing surfaces all around. Flush mounting also possible in
the countersink. Consider the height of the glass plate. Level adjustment if required.
8. Installation instructions for OPERA hobs with downdraft fan. If the underlay has to be carried out, this
underlay must be carried out evenly according to the specification below.ù Milling must be checked
for evenness after assembly of the worktop . ! We accept no liability for incorrectly placed hobs !
Insert 12x shims in the hob cut-out according to the dimensions
9. Remove the furniture drawers or remove the front of the kitchen unit.
10. Check base cut-out for dimensions and flatness and adjust if necessary
11. Unscrew the handle and outlet nozzle of the Nivel Professional.
12. Insert the Nivel Professional hob extractor. Make sure that the seal is
placed properly. Observe and compensate for height di�erences. Here
the highest caution is required - danger of breakage !
13. Align the hob, fill the joint (e.g. Novasil® or Ottoseal®) and smooth.
14. Create duct connection. If the silencers are installed, then also the height of the intake silencer must
be considered when measuring X.
22
12. Insert the Nivel Professional hob extractor. Make sure that the seal is
placed properly. Observe and compensate for height dierences.
Here the highest caution is required - danger of breakage !
13. Align the hob, ll the joint (e.g. Novasil®
or Ottoseal®) and smooth.
2mm
9. Remove the furniture drawers or remove the front of the kitchen unit.
10. Check base cut-out for dimensions and atness and adjust if necessary.
11. Unscrew the handle and outlet nozzle of the Nivel Professional.
EN
Note: Minimum distances should be maintained.
"A" hob - upper cabinet > 600 mm
"B" hob - side cabinet > 300mm
To avoid water steam damage, we recommend
placing a panel behind the wall cupboards.
This will prevent accumulation of moisture between
the cabinets.
1. Remove the front or drawers
2. Define and mark the positions forthe cut-out on the kitchen worktop. Please pay attention to
minimum distances and minimum web width ! These may vary depending on the material and
material properties! (Under certain circumstances use auxiliary crossbar "Reinforcement").
3. Saw out the cut -out on the worktop. Pay attention to straightness and freedom from burrs ! For "�
ush installation", mill out the recess.
4. Seal milled surfaces
5. If necessary, make cut -outs in the base cabinet �oor and plinth.
6. Adjust rear drawer panels if necessary.
Duct terminal
changeable
13
EN
Duct terminal changeable
7. PU sealing tape 3x10 mm at the mount bearing surfaces all around. Flush mounting also possible in
the countersink. Consider the height of the glass plate. Level adjustment if required.
8. Installation instructions for OPERA hobs with downdraft fan. If the underlay has to be carried out, this
underlay must be carried out evenly according to the specification below.ù Milling must be checked
for evenness after assembly of the worktop . ! We accept no liability for incorrectly placed hobs !
Insert 12x shims in the hob cut-out according to the dimensions
9. Remove the furniture drawers or remove the front of the kitchen unit.
10. Check base cut-out for dimensions and flatness and adjust if necessary
11. Unscrew the handle and outlet nozzle of the Nivel Professional.
12. Insert the Nivel Professional hob extractor. Make sure that the seal is
placed properly. Observe and compensate for height di�erences. Here
the highest caution is required - danger of breakage !
13. Align the hob, fill the joint (e.g. Novasil® or Ottoseal®) and smooth.
14. Create duct connection. If the silencers are installed, then also the height of the intake silencer must
be considered when measuring X.
49
DIMENSIONS EN
 Loading...