DROPPER OC214 | ORBEA TECHNICAL MANUAL OC | 15
EN
Insert the guides into their housings making sure they are
fully seated.
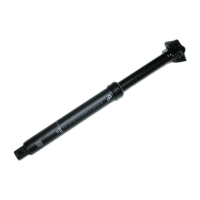
Insert the upper tube assembly into the lower tube. Ensure
the guides slide into the notches on the lower tube.
The OC logo should be aligned with the higher part of
upper tube head (back of the seatpost).
Install the lower bushing, making sure it is seated into the
notches on the base of the upper tube.
Screw and tighten with your bare hands the seal collar
ring.
Completely insert the hydraulic cartridge into the seatpost
assembly so the notch on the top of the cartridge is alig-
ned with the setscrew on the back of the seatpost head.
With a 3mm Allen wrench, tighten the setscrew on the
seatpost head (3.5Nm). Pull from the cartridge shaft to
make sure the cartridge is correctly installed.
3
5
4
6
7.3
7.1 7.2