7
ASSEMBLY INSTRUCTIONS
4
5
6
Hardware Used
Hardware Used
4.1 Now, go back and tighten all bolts. Make sure that
all the parts are tight and there are no gaps between
the parts. This will help keep the unit square.
4.2 Flip the assembled unit around at its front edges.
Unfold the Back Panel (I) and position it onto the back
edges of the assembly. Make sure that the overlaps
on the panels are even all the way around. Secure the
Back Panel (I) in place with the 15 mm Washer Head
Screws (EE).
NOTE: We recommend attaching back panel with the
screws at the corners rst.
EE
K
J
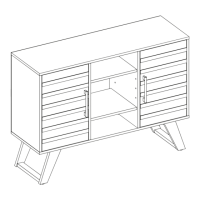
6. Attach the assembled base to the Bottom Panel (B)
with six 32 mm Bolts (AA), six Lock Washers (BB), six
Flat Washers (CC) and six 32 mm Screws (FF).
Hardware Used
B
M3.5 x 15mm
Washer Head Screw
x 24
EE
I
Adhesive tape
faces outward
5. Attach the Metal Frame (K) between the Legs (J) with
four 32 mm Bolts (AA), four Lock Washers (BB) and
four Flat Washers (CC).
x 4
1/4”x 32mm Bolt
1/4” Lock Washer
x 4
1/4” Flat Washer x 4
AA
CC
BB
AABBCC
FF
M4 x 32 mm
Screw
x 6
1/4”x 32 mm Bolt
1/4” Lock Washer
x 6
1/4” Flat Washer x 6
FF
x 6
FF
J
BB
AA
CC
BB
AA
CC