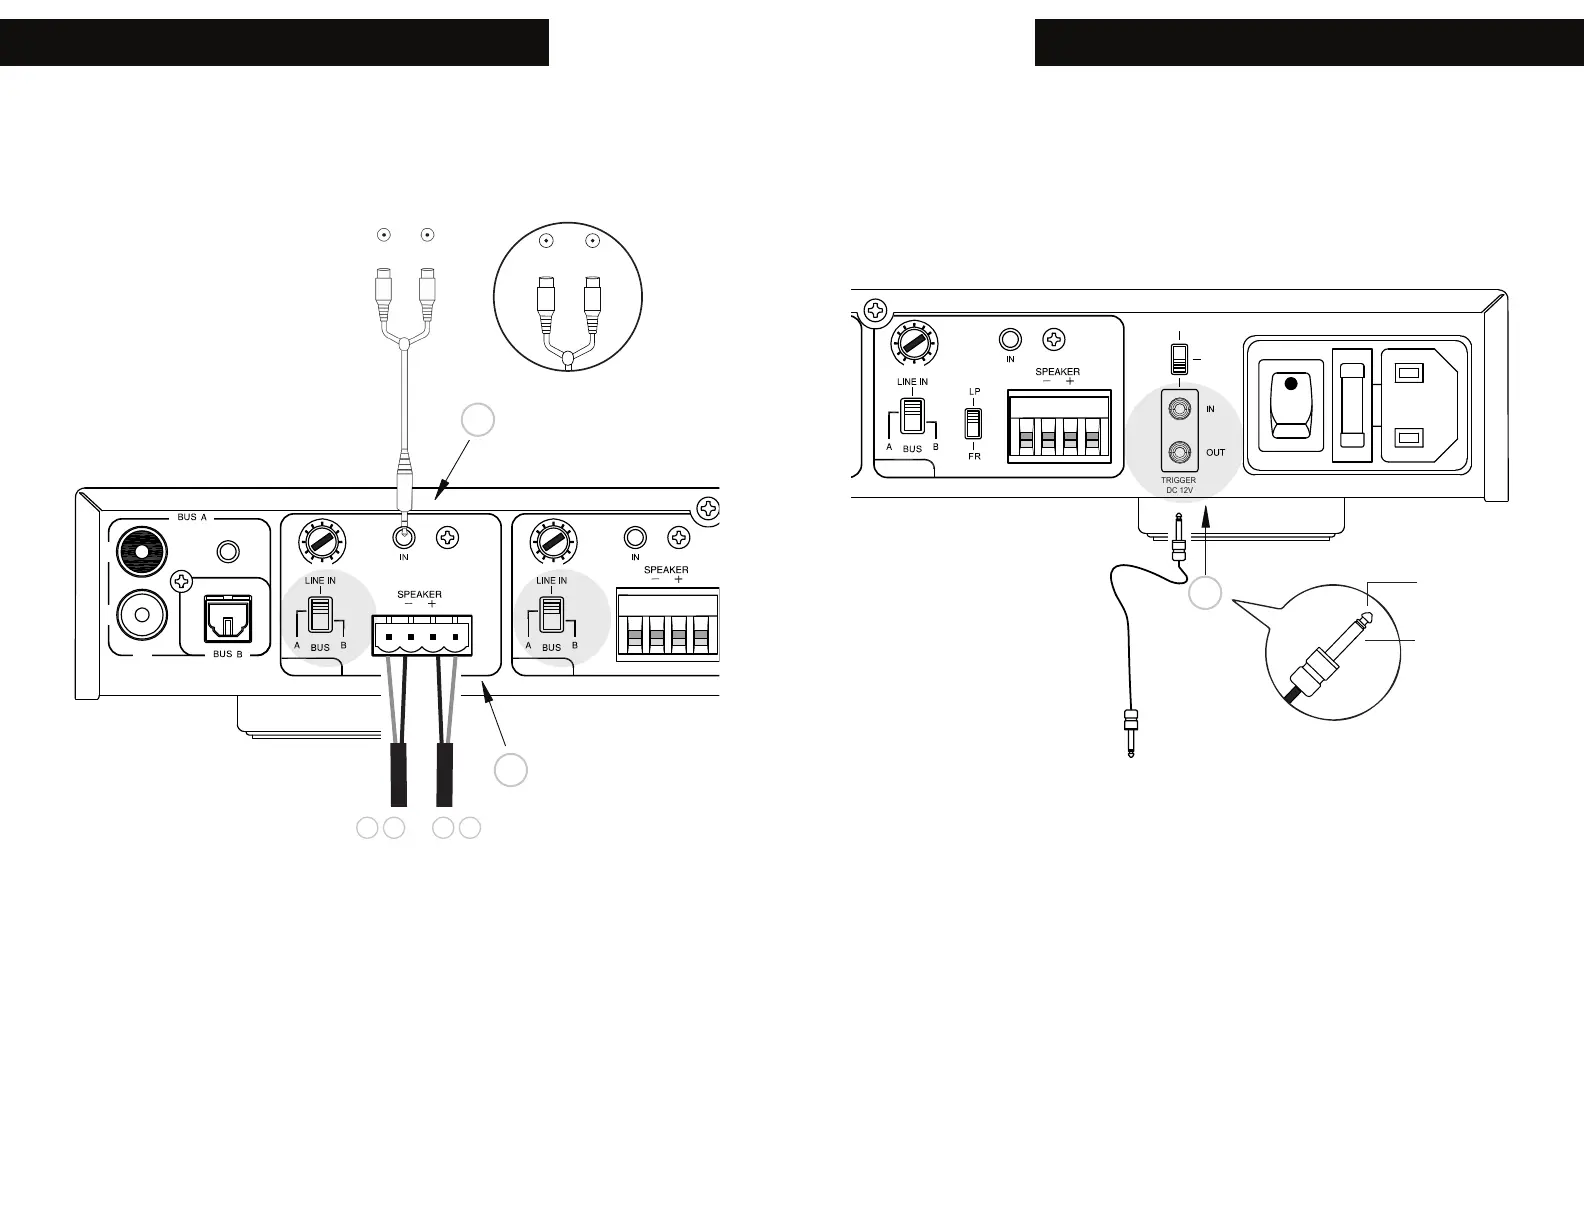
All RCA audio connections on the
amplifiers are gold-plated, for supe-
rior, non-corrosive, and long-last-
ing performance. The removable
speaker connectors offer easier
wiring, faster installation, and trou-
bleshooting. Speaker wire up to 14
AWG work best with these type of
connectors. A detachable fused
EIC grounded power cable defeats,
noise, simplifies troubleshooting and
adds protection needed.
Some stereo zones use 1/8” stereo
jacks instead of RCA connections.
The smaller space taken up by the
stereo connection offers an in and
out preamplifier connection for add-
ing additional amplifiers, speakers or
subwoofers in each zone.
The amplifiers offer a bus input
with a loop output as well as chan-
nel-specific inputs. Installers have
the option to expand the zone
amplifier beyond only two channels,
taking one stereo input signal and
distributing it to up to a max of 6 or
12 stereo zones of audio pending
the model. They also have the op-
tion of using each amplifier channel
independently for multi-zone / multi-
source or home theater applications.
Front Panel LEDs.
The Elura amplifiers have LEDs on
the front panel to indicate the ampli
-
fier’s power state and channel
status. The Power LED indicates
the amplifier is ON. There is a LED
indicating the channel state. The
LEDs can be used to identify and
trouble shoot channels that are
not working. If a channel is in fault
mode, power down the amp, identi
-
fy and fix the issue. When complete
power up the amp to recheck it has
been resolved.
Rack-mount ears and hardware are
included with every Elura amplifier.
This allows for table-top or 2U AV
rack-mount installation.
Placement / Installation.
Input Options.
Audio Modes.
Elura multi-channel amplifiers are
organized into stereo pairs and each
pair has the option of being bridged
into 1 higher wattage mono channel.
Being able to bridge channels allows
an installer to use more power in
larger rooms or in outdoor spaces
to provide the optimum sound levels
and or coverage. Note, when in
Bridged Mode the amplifier channel
must be used only with an 8 Ohm
speaker. The 100/6 Zone 3 ONLY
can be connected to a 4 Ohm Load,
BUT the Zone 3 multi sub switch
MUST be set to Bridged 4 Ohm.
BUS IN
L
A
B
LINE IN
LEVELLEVELLEVEL
NI ENI LNI ENI LNI ENI L
AAA BBB
SUBSUBSUB
3 ENOZ2 ENOZ1 ENOZ
Ω8/4Ω8/4Ω8/4
L AMRONL AMRONL AMRON
DEGD I RBDEGD I RBDEGD I RB
RFRF
PHPH
NINI
BRIDGED
IN
8 ONLY YL N O8Ω Y L N O8ΩΩ
REKAEPSREKAEPSREKAEPS
---
+++
+++
---
+++
---
FR
LP
HP
R
L
T UOT UO
R
(L)(L)(L) ( )( )( )
RRR
1 ELURA
SUBWOOFER
OR BRIDGED
8 ohm
ZONE 3
MULTI SUB SWITCH
12
When Bridging Zone 3 Only
1) Set the 4/8Ω Nominal Switch to Bridged 8Ω only
2) Set the Zone 3 Multi Sub Switch to either 8 ohm or 4 ohm.
If you are using 1 Elura architectural sub, choose 8 ohm;
if you are using 2 subs, choose 4 ohm.
2 ELURA
SUBWOOFERS
OR BRIDGED
4 ohm
shortcircuit, thermal, or
overload failures.
Channel fault conditions are
Power ON = Blue
Power OFF = Red
Channel Normal = Blue
Channel Fault = Red
Controls.
Each stereo zone of the amplifiers
can be adjusted allowing fine tuning
for the zone application. Each zone
offers an EQ switch. The EQ switch
changes the output to the speaker.
FR = Full Range, HP = High Pass
and LP = Low Pass. LP is only
available if RCA connections are
used on that zone. Each amplifier
zone with 1/8” stereo jacks in and
out has FR and HP. Plan your con-
nections by using the amplifier zone
that best fits the room requirement.
Example: If you plan on connecting
a Multisource preamplifier signal,
speakers and a powered subwoofer,
use a zone with 1/8” stereo jacks.
Use the 1/8” stereo out to connect
the subwoofer and select HP to
send only mid and high frequencies
to your speakers.
 Loading...