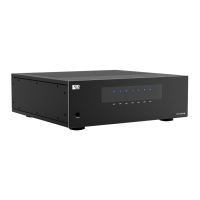
The NERO STREAM XD2 is a wireless hi-fi DAC power amplifier designed for high-quality audio streaming and amplification. This device supports multiple wireless technologies, including Wi-Fi and Bluetooth, and offers a range of input and output options for versatile connectivity.
Function Description:
The NERO STREAM XD2 acts as a central hub for your audio system, allowing you to stream music wirelessly from various sources and amplify it for your speakers. It integrates a Digital-to-Analog Converter (DAC) for superior sound quality and a power amplifier to drive your speakers. The device supports multi-device, multi-user, and multi-room functionalities, enabling a comprehensive whole-house audio system.
Important Technical Specifications:
- Amplifier: Class D
- Output Power: 100W @ 4 Ohm
- Max Output Power: 400W
- Frequency Response: 20Hz ~ 20KHz
- Impedance: 8 - 4 Ohm
- Inputs: Wi-Fi®, Bluetooth®, Optical, USB, AUX (RCA)
- Outputs: Speaker, Subwoofer, 3.5mm Headphone Jack
- DAC: Cirrus Logic CS8416 24 Bit/192kHz DAC
- Wi-Fi Frequency: 2.4 GHz
- Bluetooth Version: 4.2 w/ aptX™
- Dimensions: 9.5 x 8.5 x 2.5 inches
- Weight: 6.8 lbs
Usage Features:
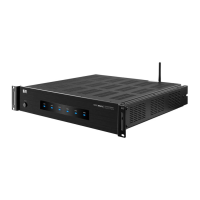
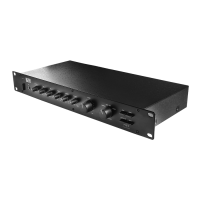
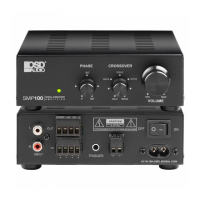
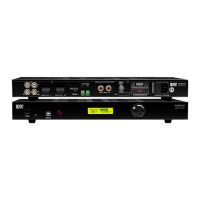
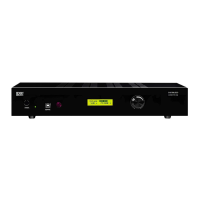
Amplifier Features (Front Panel):
- Power Indicator: Shows the power status of the device.
- Bluetooth® Indicator: Lights up when Bluetooth is active.
- OPT Indicator: Indicates when the Optical input is selected.
- USB Indicator: Lights up when the USB input is selected.
- Wi-Fi® Indicator: Shows Wi-Fi connectivity status.
- Line In Indicator: Indicates when the Line In input is selected.
- Volume Knob/Input Selector: Controls the volume and allows selection of input sources.
- Head Phone Jack: For connecting headphones.
Amplifier Features (Rear Panel):
- Antenna: For wireless signal reception (Wi-Fi and Bluetooth).
- WPS: Wi-Fi Protected Setup button for easy Wi-Fi connection.
- Line In: RCA input for connecting external audio sources.
- SUB Out: Output for connecting a subwoofer.
- USB In: USB input for connecting audio sources.
- Optical Input: Optical digital audio input.
- Speaker Outputs -L/R: Terminals for connecting left and right speakers.
- Voltage Switch: Allows selection between 110-120V and 220-240V power input.
- Power Input: AC power inlet.
- On/Off Switch: Main power switch for the device.
- Optional TV/Wall Mount Brackets: Points for mounting the device.
Remote Features:
- On/Off Button: Powers the device on or off.
- Optical Source: Selects the Optical input.
- Volume +/-: Adjusts the volume up or down.
- Previous/Next: Skips to the previous or next track.
- USB Source: Selects the USB input.
- Wi-Fi® Source: Selects the Wi-Fi input.
- Line Source: Selects the Line In input.
- Play/Pause: Plays or pauses the current track.
- Bluetooth Source: Selects the Bluetooth input.
Setup:
- Connect the power cord to the back of the amplifier and then to a wall outlet.
- Connect your devices to a suitable input (refer to the connection diagram).
- Turn the power button to the On position. After two seconds, the unit will enter working status, and the input indicator will light up.
- Press the Bluetooth®, OPT, LINE, or AUX button on the remote or use the volume knob to choose an audio source. Control the playback via the remote control by pressing the buttons.
Note: Always press the desired source button on the remote control for the audio source to work.
Bluetooth® Pairing:
- Press the Bluetooth® button on the remote to activate the Bluetooth source.
- Activate Bluetooth on your phone/tablet and start searching for new Bluetooth devices.
- When your phone/tablet finds NERO STREAM XD2, choose this unit and begin pairing.
- To unpair an existing source, press and hold the Bluetooth button on the remote for 3 seconds.
Wi-Fi® Connection:
- Download and install the OSD Audio App for your iOS or Android device.
- Press the Wi-Fi® button on the remote to activate the Wi-Fi source.
- Use WPS to link your device to the NERO STREAM and your Wi-Fi network by following the setup steps in the app.
Connect Your Device:
- Connect your subwoofer to SUB out.
- Connect your CD player via its RCA cable to the RCA L/R input. Make sure you connect the "L" plug to the left input channel and the "R" plug to the right input channel.
- Connect your phone/tablet/MP3 via an AUX cable to Line In.
- Connect your DVD player via its optical fiber cable to the Optical Input.
- Connect your speakers to the Speaker Output. Make sure you connect the -/+ and the L/R cables to the right input.
App Control / User Interface:
The OSD Audio app provides a user-friendly interface for controlling the NERO STREAM XD2.
- Enable Wi-Fi®: Ensure Wi-Fi is turned on on your phone or tablet.
- Wi-Fi Network: Set your phone or tablet to the same Wi-Fi network as the NERO.
- Set Up: In your devices Wi-Fi settings, look for NERO STREAM_XXXX and select to connect.
- Stream & Select: Swipe right to view and select a streaming service or source input device.
- Home Screen: Displays current song title, artist, and album art with playback controls.
- Device List: Allows you to choose which devices/zones are connected, set separate volume, and select input for each device/zone.
System Features:
- Multi-Device: Stream or play music from different source devices.
- Multi-User: Multiple users can control the audio source as well as the room or zone it's playing in.
- Multi-Room: Connect multiple NERO STREAMS to create a whole-house audio system.
Maintenance Features:
Safety Instructions:
- To reduce the risk of fire or electrical shock, do not expose the product to rain or moisture.
- The product should not be exposed to any dripping or splashing liquid.
- Objects filled with liquids, such as vases, should not be placed on the product.
- Keep the remote control battery away from children. Dispose of used battery promptly, replace only with a battery of the correct type.
- Protect the power cord from damage. Do not pull the power cord excessively, and take care not to let the power cord become pinched, particularly at or near the plug.
- Keep the product away from heat sources such as heat registers, stoves, or other appliances that produce heat.
- Avoid direct sunshine and covering vents. Do not operate in a sealed box and be sure to have enough room for heat exchange.
- Avoid opening the cover. Do not open the cover, or touch the inner parts, refer servicing to our customer service.
Troubleshooting:
- No Power:
- The power cord is disconnected.
- Poor connection at the wall socket or the wall socket is inactive.
- No Sound:
- The speakers are disconnected.
- Volume control at lowest level.
- Check if the signal cables are damaged.
- Check if the LEDs are blinking. If not, restart the amplifier and ensure that the LED displays are in standby. If it still doesn't work, contact customer service.
- Sudden Sound Loss:
- Poor Sound Quality:
- Audio source problem.
- Bad or incorrect speakers connections.
- Treble and bass control are too low.
- LED Off:
- Check if the amplifier is connected with the power outlet and confirm that the voltage regulator works.