Do you have a question about the Outback Charcoal Kettle CK575 and is the answer not in the manual?
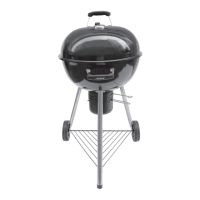
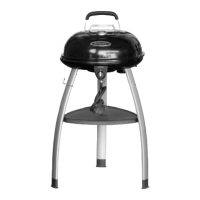
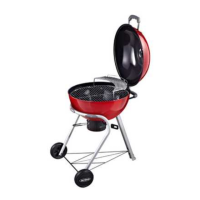
List of components for the barbecue hood, including handles and heat shields.
List of main body parts for the barbecue, such as the body, grills, and ash tray.
Components related to the barbecue's trolley and leg structure.
Detailed list of all bolts, washers, clips, and other hardware for assembly.
Attach Heatproof Spacer (B6) onto Barbecue Body (B1) using M6x50 Bolts, Spring Washers, Spacers and Washers.
Attach M6x50 bolts screwing into Bent Leg (C1) as shown.
Thread Leg Support Rack (C3) through bent leg, secure Legs (C2) with M6x15 Bolts.
Slide Wheels (C4) onto leg support rack, secure with Locknuts (D8). Place Hubcaps (C5) and fix with R-Clips (D7).
Turn trolley upright and check bolts of bent leg and barbecue body are firmly connected.
Place Hood (A1) onto barbecue body, align hinges, insert Hinge Pin (D6) and lock with R-Clip (D7).
Place Ash Tray/Vent Tool (B8) to insert Ash Tray (B7) underneath the barbecue body.
Place Charcoal Grill (B2) on lower brackets and Cooking Grill (B3) on upper brackets, ensuring they are level.
Place Warming Rack (B4) onto cooking grill, ensuring it lies level within the body.
Instructions on how to remove the cooking grill using the grill lifting handle.
Instructions on how to add charcoal using the grill lifting handle.
Key safety warnings for outdoor use, handling, and maintenance of the barbecue.
Guidance on choosing a safe and suitable outdoor location for the barbecue.
Specific precautions to take regarding ventilation and placement.
Critical warnings before operating the barbecue, including usage restrictions.
Steps to prepare the barbecue for cooking, including oiling the surface.
Instructions on lining the ash tray with foil for protection and easier cleaning.
Detailed steps for lighting charcoal using block or liquid starters and preparing it for cooking.
How to use adjustable vents in the hood and ash tray to control charcoal burning.
Explanation of how food is cooked by heat from charcoal and vaporised juices.
Using the hood for 'oven' style cooking for roasting or baking food.
Essential advice to prevent flare-ups, including trimming fat and using baking soda/salt.
Instructions on managing and preventing fat fires, including emergency procedures.
How to safely add more charcoal during cooking using the grill lifting handle.
Procedures for ash disposal and cooling the barbecue after use.
How to clean the barbecue body, hood, lid, and cooking surfaces with soapy water.
Guidance on cleaning the hood, lid, and trolley with non-abrasive cloths.
Check and tighten all screws and bolts regularly.
Advice on storing the barbecue in a cool, dry place to maintain its condition.
Details of the warranty for porcelain-enamelled parts and consumables, and conditions for replacement.
Contact information for customer service and details on obtaining spare parts.