EasyManua.ls Logo

Outback Trekker - User Manual

Outback Trekker
16 pages
Print Icon
To Next Page IconTo Next Page
Loading...
Photographs are not to scale.
Specifications subject to change
without prior notice.
Assembly and Operating Instructions for
Outback® Trekker gas with removable lid
0359
WARNING
 For outdoor use only. Not for commercial use.
 Read instructions before using the appliance. Failure to follow instructions could
result in death, serious bodily injury, and/or property loss.
 Warning: accessible parts may be very hot. Keep young children and pets away.
 Do not move the appliance during use.
 Turn off the gas supply at the gas bottle after use.
 Any modification of the appliance, misuse, or failure to follow the instructions may
be dangerous and will invalidate your warranty. This does not affect your statutory
rights.
 Retain these instructions for future reference.
 Leak test annually, and whenever the gas bottle is removed or replaced. Check that
the hose connections are tight and leak test each time you reconnect the gas bottle.
 For Flare-up control please refer to the ‘OPERATION’ section of this manual.
FOR YOUR SAFETY
If you smell gas:
1. Shut off gas to the appliance.
2. Extinguish any open flame.
3. Open barbecue lid or hood.
4. If odour continues, discontinue use and
contact your local dealer.
FOR YOUR SAFETY
1. Do not store or use petrol or other flammable
vapours or liquids in the vicinity of this or any
other appliance.
2. A gas bottle not connected for use must not be
stored in the vicinity of this or any other
appliance.
RG47D
Question and Answer IconNeed help?

Do you have a question about the Outback Trekker and is the answer not in the manual?

Summary

Assembly

Multiple Use

Grill Lifting Handle Usage Reference

Leak Test Diagram

Leak Testing

Detailed steps for performing a leak test on the barbecue.

Important Information

Installation

Selecting a Location

Guidance on choosing a safe and suitable outdoor location for the barbecue.

Operation

Lighting the Barbecue

Detailed instructions on how to safely light the barbecue burner.

Grill Cooking

Guidance on cooking food directly on the grill.

Care and Maintenance

Technical Specifications

Troubleshooting

Overview

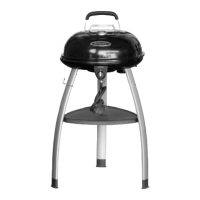
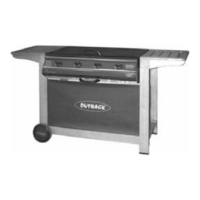
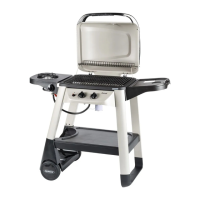
This document provides assembly and operating instructions for the Outback® Trekker gas barbecue with a removable lid, model RG47D. It is designed for outdoor use only and not for commercial purposes.

Function Description

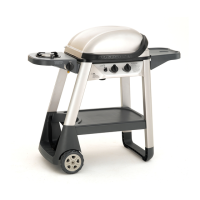
The Outback® Trekker is a portable gas barbecue designed for grilling, griddling, and roasting. It features a single burner and a removable lid, allowing for versatile cooking options. The barbecue operates on LPG bottled gas, requiring a suitable regulator for butane, propane, or mixes. It is equipped with an ignition system for easy lighting and includes a grease cup for collecting food debris. The design allows for multiple cooking configurations, including using a cooking grill, a cooking griddle, or a flame tamer. A grill lifting handle is provided to safely remove and replace cooking surfaces.

Important Technical Specifications

  • Model: RG47D
  • CE Approval: 0359 359BR665
  • Heat Input: 3.7 kW
  • Burners: 1
  • Injector Size: 0.94mm
  • Gas/Pressure: Butane: 28-30mbar, Propane: 37mbar
  • Gas Consumption: 269g/hr
  • Maximum Diameter/Breadth: 315mm
  • Maximum Height (regulator included): 580mm
  • Countries of Use: BE, CH, CY, CZ, ES, FR, GB, GR, IE, IT, LT, LU, LV, PT, SK, SI
  • Fuel Type: LPG bottled gas only.
  • Hose Length: Should not exceed 1.5 metres.
  • Regulator: Complies with EN16129.

Usage Features

Assembly: The barbecue requires assembly, starting with attaching the tool hooks and legs to the leg supports using wing bolts. The shelf is then attached to the legs by aligning snap hooks with shelf supports. The grease cup slides underneath the barbecue body. The hood handle, handle shield, and hood hook are attached to the hood using bolts, asbestos washers, washers, and wing nuts.

Multiple Use Options: The barbecue offers two primary cooking configurations:

  1. Option One (Cooking Grill and Flame Tamer): Place the cooking grill (B7) and flame tamer (B6) into the barbecue body, aligning the three locating grooves with the supporting blocks. Ensure the flame tamer lies underneath the grill. The "Arrow" mark on the griddle or flame tamer should align with the supporting block on the right for easy assembly.
  2. Option Two (Cooking Griddle): Place the cooking griddle (B8) into the barbecue body, aligning the three locating grooves with the supporting blocks. Ensure the "Arrow" mark on the griddle aligns with the supporting block on the right for easy assembly, and the drip hole in the griddle aligns with the drip funnel in the body. The hood assembly can then be placed onto the barbecue body.

Grill Lifting Handle: A grill lifting handle (B11) is provided to safely remove and replace the cooking griddle, cooking grill, and flame tamer.

Location and Safety:

  • For outdoor use only, in a well-ventilated, safe, and even area.
  • Never place below ground level or under any combustible surface.
  • Maintain a minimum distance of 1 meter from any flammable structure or surface.
  • Do not obstruct ventilation openings.
  • Position the gas bottle on level ground, next to the barbecue, and away from heat sources.
  • LP gas bottles should never be placed directly underneath the barbecue or stored/used on their side.
  • Open the barbecue hood or lid before lighting.
  • Do not move the appliance during use or when hot.
  • Accessible parts become very hot; keep children and pets away.
  • Use oven gloves and heat-resistant barbecue tools.
  • Exercise caution when opening the hood or lid due to hot steam.
  • Turn off the gas supply at the gas bottle after use.
  • Never cover a hot barbecue.
  • Use only on a stable, flat surface.

Connecting Gas Hose and Regulator:

  • Warm the hose end in hot water for 2 minutes, push it onto the gas valve outlet, and tighten the jubilee clip.
  • Connect the regulator to the gas bottle according to the dealer's instructions, ensuring all control knobs are in the off position.

Leak Testing:

  • Perform a leak test annually and whenever the gas bottle is removed or replaced.
  • In a well-ventilated area, brush a solution of ½ water and ½ liquid detergent/soap over all gas system joints (bottle valve, hose, regulator connections).
  • Bubbles indicate a leak. Turn off gas, retighten joints, and retest. If leaks persist, do not use and contact a local distributor.
  • NEVER use an open flame for leak testing.

Preparation Before Cooking:

  • Apply a light coat of cooking or vegetable oil to the cooking surface before each session to prevent sticking.

Lighting the Barbecue:

  • Ignition System: Open the hood/lid. Ensure the knob is in the off position. Open the gas control valve on the bottle/regulator. Push and turn the control knob anti-clockwise to the resistance point, pause 4 seconds, then continue turning until a click is heard and the burner lights. Repeat if necessary. If it fails, turn to off, close gas valve, wait 5 minutes, and reattempt.
  • Manual Ignition: Open the hood/lid. Ensure the knob is in the off position. Open the gas control valve. Insert a lit match through the match-lighting hole near the burner porthole. Push and turn the control knob anti-clockwise to the high position.
  • After ignition, pre-heat the barbecue for 3-5 minutes on low with the hood/lid open. Keep the burner on low for best cooking results.

Cooking Methods:

  • Grill Cooking: The burner heats the flame tamer, which then heats the grill. Vaporized food juices from the flame tamer baste the food, imparting a barbecued flavor.
  • Griddle Plate Cooking: The burner directly heats the griddle plate, suitable for cooking smaller items like seafood, vegetables, and fish, or for searing steaks and eggs.
  • Roasting Hood Cooking: With the hood down, the barbecue acts as an oven for roasting or baking. Avoid unnecessary lifting of the hood to maintain temperature. Turn the burner to the low position when cooking with the hood down.
  • DO NOT ALLOW YOUR BARBECUE TO OVERHEAT.

Flare-Up Control:

  • Trim excess fat from meat and poultry.
  • Use cooking sauces and marinades sparingly.
  • Avoid very cheap cuts of meat with high fat and water content.
  • Extinguish flare-ups by applying baking soda or salt directly onto the flame tamer.

Fat Fires:

  • Empty and clean the grease cup after each cooking session. For large gatherings or fatty foods, clean every two hours or more frequently.
  • In case of a fat fire: Turn all control knobs to 'off'. Turn off gas supply at the bottle. Keep everyone at a safe distance. Wait for the fire to burn out. DO NOT close the hood/lid. NEVER DOUSE WITH WATER (use powder extinguisher if needed). DO NOT REMOVE THE GREASE CUP. If the fire worsens, contact the Fire Brigade.

End of Cooking Session:

  • After cooking, turn the burner to "low" for 5 minutes with the hood/lid open to burn off residue and ease cleaning.

Turning Off:

  • Turn all control valves fully clockwise to "Off", then switch off the gas supply at the bottle.
  • Wait until cool before closing the hood/lid.

Maintenance Features

General Care:

  • Clean regularly between uses and after extended storage.
  • Ensure the barbecue and components are cool before cleaning.
  • Do not leave exposed to outside weather or store in damp areas.
  • Never handle hot parts with unprotected hands or douse with water.
  • Cover the unit when left outside, especially during winter months, to extend life.
  • Inspect regularly for dampness or condensation, which can cause damage or mold growth. Clean mold with hot soapy water.
  • Treat rust not in contact with food with rust inhibitor and barbecue paint.

Cooking Surfaces:

  • Clean with hot soapy water when cool.
  • Use a mild cream cleaner on a non-abrasive pad for food residue.
  • Do not use scouring pads or powders as they can damage the finish.
  • Rinse well and dry thoroughly.
  • Not recommended for dishwasher cleaning due to weight.
  • Surface rust is normal; clean with a soft brass wire brush, re-oil, and cure.

Burner:

  • Normal usage and burning off residue keep the burner clean.
  • Remove and clean annually, or if heavy build-up is found, to check for blockages (debris, insects) in portholes or primary air inlet. Use a pipe cleaner for obstructions.
  • When refitting, ensure the burner neck fits over the valve outlet.
  • Surface rust is normal; clean with a soft brass wire brush.

Flame Tamer:

  • Remove food residue with a plastic or wooden scraper or brass wire brush. Do not use steel scrapers.
  • Clean with hot soapy water and rinse well.

Grease Cup:

  • Empty and clean after every use using a plastic or wooden scraper.
  • Failure to keep clean can lead to fat fires, which are not covered by warranty.
  • Can be washed in hot soapy water.

Barbecue Body:

  • Regularly remove excess grease or fat with a cloth wrung out in hot soapy water.
  • Use a soft plastic or wooden scraper for internal food debris.
  • For full cleaning, use hot soapy water and a cloth or nylon-bristled brush.
  • Do not use abrasives.
  • Remove cooking surfaces and burner before full cleaning.
  • Do not immerse gas controls or manifold in water.
  • Check burner operation after refitting.

Fixings:

  • Check and tighten all screws and bolts regularly.

Storage:

  • Ensure the barbecue is properly cooled before covering or storing.
  • Store in a cool, dry place.
  • Cover the burner with aluminum foil to prevent insects or debris.
  • If stored indoors, disconnect the gas bottle and leave it outside in a dry, well-ventilated area, away from heat/ignition sources.
  • Do not let children tamper with the bottle.
  • Follow cleaning procedures after extended storage.

Warranty:

  • Porcelain coated roasting hoods and stainless steel roasting hoods: 2 years.
  • Stainless steel burners and cast iron burners: 2 years.
  • Other parts: 1 year.
  • Warranty covers defects in materials and workmanship, provided the product has not been used for trade/hire, misused, neglected (including fat fires, flare-ups, faulty regulator), damaged by foreign objects, or if care/maintenance instructions were followed.
  • Only defective parts/accessories are replaced.
  • Fat fires are not covered.
  • Improper use, non-approved fuels, discoloration, rusting, or slight deformation not impairing function will void warranty.
  • Does not warranty the gas cylinder.

Outback Trekker Specifications

General IconGeneral
BrandOutback
ModelTrekker
CategoryGrill
LanguageEnglish

Related product manuals