Do you have a question about the Ovislink Live-FSH16T and is the answer not in the manual?
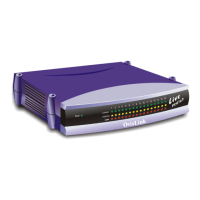
Details the 16-port auto-sensing, auto-negotiating Dual-speed Fast Ethernet Switch with Port Priority function.
Highlights the simple installation process, complying with IEEE802.3 and IEEE802.3u standards.
Explains the switch's value for upgrading from 10 Mbps to 100 Mbps networks.
Explains how fixed memory buffer allocation prevents packet loss under heavy traffic.
Details flow control mechanisms (IEEE 802.3x, Back Pressure) to minimize frame drops.
Describes LED indicators on the front panel for network status monitoring.
Explains the benefits of 10/100 Mbps switching for increased bandwidth and performance.
Defines Priority Queuing for efficient delivery of high-priority traffic like voice and video.
Lists the main features of the Live-FSH16T Fast Ethernet Switch, including port configuration and compatibility.
Details the steps for unpacking the switch and lists all included components for verification.
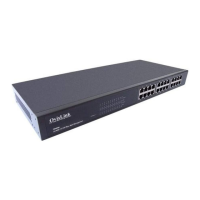
Describes the front panel layout, including LED indicators for monitoring switch status.
Details the rear panel components, including DC power jack and network ports.
Explains the 16 auto-sensing and auto-negotiating ports for connecting network devices.
Describes the Uplink port for connecting to another switch or network device.
Explains where to connect the DC power adapter for powering the switch.
Provides a three-step process for quickly setting up the network switch.
Lists requirements for choosing a suitable location, considering temperature, humidity, and ventilation.
Explains how to place the switch on a desk, utilizing rubber pads for stability and ventilation.
Details the procedure for mounting the switch on a wall using anchors and screws.
Explains cabling needs for connecting the switch in 10BASE-T and 100BASE-TX networks.
Specifies cable types (UTP/STP Category 3, 4, 5) and requirements for RJ-45 station ports.
Details cable requirements, including straight-through and crossover types for different connections.
Guides on connecting the external power adapter to the switch and a power outlet.
Outlines rules for 10 Mbps and 100 Mbps Ethernet network configurations and cable lengths.
Explains how to connect a hub to the switch using a straight-through cable via the Uplink port.
Covers connecting the switch to other switches or devices using straight or crossover cables.
Details when and how to use crossover cables for connecting station ports between devices.
Describes the function of RJ-45 station ports (MDI-X) and the Uplink port (MDI-II).
Explains auto-negotiation for determining transmission modes like 100Mbps/FDX and 10Mbps/HDX.
Highlights the use of priority ports (5, 6, 7, 8) for prioritizing traffic like voice and video.
Explains how microsegmentation improves network bandwidth and throughput by segmenting the network.
Guides on upgrading to 100 Mbps Fast Ethernet and leveraging existing hardware for workgroup computing.
Explains the Power LED's function in indicating the switch's power status (ON/OFF).
Introduces the station port LEDs: Link/Rx, FDX/Col, and 100M for port status monitoring.
Describes the Link/Rx LED for indicating connection status and data activity on a port.
Details the FDX/Col LED for showing transmission mode (full/half duplex) and collision detection.
Explains the 100 M LED's role in indicating 100 Mbps speed operation on a port.
Lists IEEE standards compliance (802.3, 802.3u, 802.1p) and network topology (Star).
Details protocol (CSMA/CD), port configuration (16+1 ports), and priority settings.
Specifies data rates (Ethernet, Fast Ethernet) and transmission methods (Store and Forward).
Defines cabling types (100BASE-TX, 10BASE-T) and maximum distances for connections.
Details the LED indicators and the physical dimensions of the switch.
Lists power requirements, consumption, operating temperature, and humidity.
Mentions safety and electromagnetic interference (EMI) certifications like FCC Class A and CE mark.
Provides steps to identify and solve common network connectivity issues with the switch.
Advises on when and how to contact a local dealer for technical support if problems persist.
| Switching Capacity | 3.2 Gbps |
|---|---|
| MAC Address Table Size | 8K |
| Forwarding Rate | 2.38 Mpps |
| Power Supply | External power adapter |
| Dimensions | 440 x 180 x 44 mm |
| Jumbo Frame Support | 9KB |
| Ports | 16 10/100Mbps RJ45 ports |