EasyManua.ls Logo

paasche H-1 - User Manual

paasche H-1
2 pages
Print Icon
To Next Page IconTo Next Page
Loading...
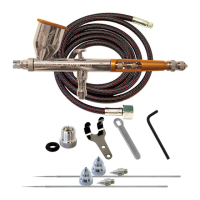
INSTRUCTIONS AND PARTS LIST H AIRBRUSH 8/06/2019
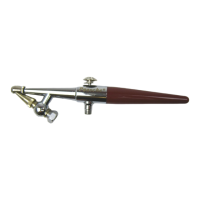
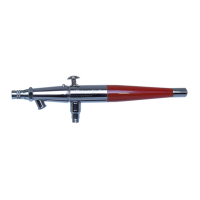
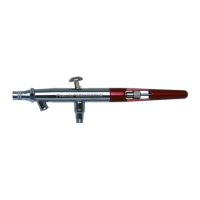
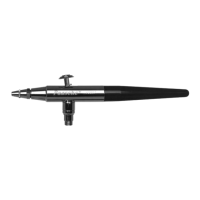
H Model Airbrush
Single Action–External Mix–Siphon Feed
Instruction Manual & Replacment Parts
OPERATING INSTRUCTIONS:
Approximate Working Pressures:
• 20lbs.orLess:Stippleandgranulatede󰀨ects,pressurewillvarywithviscosityofuid.
20to30lbs.:Mediumconsistencywatercolors,inks&dyes.
30 lbs. or More:Heavyuids,acrylics,reducedlacquers,varnishes,paintsorceramicglaze.
Sizes:
• H-1(.45mm)HeadandHC-1-3Aircapforlightuids.
• H-3(.64mm)HeadandHC-1-3Aircapformediumuids.
• H-5(1.06mm)HeadandHC-5Aircapforheavieruids.
1.Attachhosetoairsupplyand allowairto blowafew seconds.Shut o󰀨beforeattaching toAirbrush. Thisprocedurewill
removedirtfromairlineandhose.
Caution: Hold rmly and point away from face.
2. Attachhosecouplingtotheairbrush.
3.AttachColorCuporBottletoHN-1-3,or5Needlebyexertingarmtwistingmotiontottaperedtubesecurelyintotapered
Needleinlet.
4. FillColorCuporBottle1/2to3/4full.Useeyedropperorbrushforaddingsmallamountsofcolortometalcolorcup.Whenusing
ColorBottle,ventholemustbekeptopen.
5.ToSpray,holdAirbrushlikeapencilcomfortablybetweenthumbandforengerusingmiddlengerasaguideandsupport.
Likewriting,holdforengereasilyonH-155FingerButtonandPresstoopenairvalve.
6.Regulate volume of color and size of spray by rotating HT-1, 3 or 5 Tip clockwise to increase and counter clockwise to
decreaseowofcolor.
7.StippleAdjustment:Reducingtheairlinepressureistheeasiestmethodusedwhencreatingastipplede󰀨ectwiththeairbrush.
Pressurecanbereducedbyusinganyofthefollowingitems:3ANeedleValveinstalledontheH-128AValveCasingofthe
AirbrushorbyusingtheR-75AirRegulatorandreducingthepressure.
8.Toadjustforheavieruids,turntipwideopen,loosensetscrew,slideneedlebacktoobtainbetterow.
CARE AND CLEANING:
1.Pouranyremainingcolorbackintoitsoriginalcontainer.
2.WipeColorCuporBottleclean,usingclothmoistenedwithpropersolvent.
3.HoldAirbrushatadownwardangleandputafewdropsofsolventthroughColorAdjustingPartAssembly.Toushoutthe
remainingcolorintheHColorAdjustingPartAssembly,applypressuretothe H-155FingerButton.
4. ApplyatinydabofVaselinetotheHColorAdjustingPartandHC-Aircapthreadseverytwoorthreemonthstopreventcolor
buildupandconsequentfreezingoftheColorAdjustingPartAssemblyandAircap.
HOW TO OPEN CLOGGED FLUID PASSAGES:
1.AgitatecolorinBottleAssemblybyplacingngermomentarilyoverHC-AircapwhileairispassingthroughtheAirbrush.This
willblowcolorbackintobottlethusopeningcloggeduidpassages.Do not do this with open cup as color may blow out
of cup.
2.ShouldH-1,3or5ColorAdjustingPartAssemblybecomeclogged,loosenH-153SetScrew,unscrewHT-1,3or5Tipfrom
HNNeedle,gentlypullbackthroughball-shapedsupportandremoveTip.
3.CleanPartscarefully,usingnothingharderthanawoodentoothpick.
4. Toreassemble,reversethisprocedure,makingsuretheshoulderoftheNeedleseatsupagainstball-shapedsupport.
5.Iftheneedleandtiparecompletelyclogged,soakinaclosedbottleofpropersolventuntilclean.
INTRODUCTION:
Paasche® model H Airbrush features machined Brass Body and Nickel
SilverColorPart,simplicityofdesignandeaseinoperation.Theairand
colorfeeds areindependentand adjustabletogive axed line,shadeor
stipplee󰀨ect.
For Multi-Language Manuals Go To: www.paascheairbrush.com
Question and Answer IconNeed help?

Do you have a question about the paasche H-1 and is the answer not in the manual?

Summary

Introduction to H Model Airbrush

Operating Instructions

Working Pressures and Fluid Types

Details recommended air pressures and fluid types for stipple, medium, and heavy fluids.

Airbrush Sizes and Setup

Lists available nozzle/aircap sizes and initial setup steps for air supply and color cup.

Spraying Techniques and Adjustments

Guidance on holding, spraying, regulating color flow, and adjusting for stipple effects.

Care and Cleaning

Cleaning Procedures

Steps for cleaning the color cup, flushing the airbrush, and lubricating parts.

Opening Clogged Fluid Passages

Clogged Passage Clearing

Methods and steps for clearing blockages in the airbrush's fluid passages.

H - Airbrush Model Replacement Parts

H - Old Style Replacement Parts

Overview

The Paasche Model H Airbrush is a single-action, external-mix, siphon-feed airbrush designed for simplicity of use and ease of operation. It features a machined brass body and nickel-silver color parts, ensuring durability and a professional finish. The air and color feeds are independent and adjustable, allowing users to achieve a variety of effects, including fixed lines, shades, and stipples.

Function Description:

The airbrush operates by connecting to an air supply, which then atomizes and sprays fluid from an attached color cup or bottle. The independent air and color feeds provide precise control over the spray pattern and fluid volume. Users can adjust the flow of color by rotating the tip, allowing for fine-tuning of the spray size and intensity. The siphon-feed mechanism draws fluid from the container as air passes over the tip, making it suitable for a range of fluid viscosities.

Important Technical Specifications:

Approximate Working Pressures:

  • 20 lbs. or Less: Ideal for stipple and granulated effects. Pressure will vary depending on fluid viscosity.
  • 20 to 30 lbs.: Suitable for medium consistency water colors, inks, and dyes.
  • 30 lbs. or More: Recommended for heavy fluids, acrylics, reduced lacquers, varnishes, paints, or ceramic glazes.

Sizes (Head and Aircap Combinations):

  • H-1 (.45mm) Head and HC-1-3 Aircap: For light fluids.
  • H-3 (.64mm) Head and HC-1-3 Aircap: For medium fluids.
  • H-5 (1.06mm) Head and HC-5 Aircap: For heavier fluids.

Parts List (New Style):

  • HC-1-3,5: Aircap with O-ring (Select Size).
  • 3A-4: "O" Ring (Pack of 6).
  • H-1,3,5: Color Adjusting Part (Select Size).
  • HT-1,3,5: Tip (Select Size).
  • H-185: Packing.
  • H-184: Packing Nut.
  • HN-1-3,5: Needle (Select Size).
  • H-153: Set Screw.
  • H-150N: Shell (Includes H-128A).
  • H-155: Finger Button.
  • H-143: Handle (Nylon).
  • HVL-200: Metal Handle (Aluminum - optional).
  • H-128A: Valve Casing.
  • H-192A: Valve Plunger w/ A-53.
  • A-53: Valve Washer (Pack of 6).
  • A-22: Valve Spring.
  • A-23R: Air Valve Nut.
  • F-186: Wrench.
  • A-34: Hanger.

Parts List (Old Style):

  • H-175A: Air Valve Assembly.
  • A-23R: Air Valve Nut.
  • A-22: Valve Spring.
  • H-21A: Valve Plunger.
  • A-52: Valve Washer (Pack of 6).
  • H-128A: Valve Casing.
  • A-143: Needle Guide Spring.
  • H-156: Stipple Adjuster.
  • H-157: Finger Lever Assembly.

Bottle Assemblies:

  • H-1/4-OZ: 1/4oz Metal.
  • H-1-OZ: 1oz Glass.
  • H-3-OZ: 3oz Glass.
  • HP-3-OZ: 3oz Plastic.
  • H-2-OZ: 2oz Metal.
  • HP-8-OZ: 8oz Plastic.
  • BA-30-1P: 1oz Plastic (new cover configuration).
  • BA-30-3P: 3oz Plastic (new cover configuration).
  • BA-30-2P: 1oz Plastic (narrow neck).
  • BA-30-4P: 3oz Plastic (narrow neck).
    • Note: The BA bottle assemblies feature a new cover configuration and all use plastic bottles. The 2P and 4P are narrow neck and work with most airbrush paint bottles like Createx and Paasche.

Air Hoses:

  • A-1/8-4, 6, 8, 10, 15, 20, 25 or 50: Braided Air Hose with couplings (Select Length).
  • 3A-4: O-ring for airbrush coupling.

Usage Features:

  1. Initial Setup: Before attaching the airbrush, connect the hose to the air supply and allow air to blow for a few seconds to clear any dirt from the airline. Then, securely attach the hose coupling to the airbrush.
  2. Fluid Connection: Attach the color cup or bottle to the HN-1-3 or 5 Needle by twisting it firmly into the tapered needle inlet.
  3. Filling: Fill the color cup or bottle 1/2 to 3/4 full. An eyedropper or brush can be used for small amounts of color. When using a color bottle, ensure the vent hole remains open.
  4. Spraying Technique: Hold the airbrush like a pencil, comfortably between the thumb and forefinger, using the middle finger as a guide. Press the H-155 Finger Button with the forefinger to open the air valve.
  5. Color Volume and Spray Size Regulation: Rotate the HT-1, 3, or 5 Tip clockwise to increase color flow and counter-clockwise to decrease it.
  6. Stipple Adjustment: To create a stippled effect, reduce the airline pressure. This can be achieved using a 3A Needle Valve installed on the H-128A Valve Casing or by using an R-75 Air Regulator.
  7. Heavy Fluid Adjustment: For heavier fluids, turn the tip wide open, loosen the set screw, and slide the needle back to obtain better flow.

Maintenance Features:

  1. Post-Use Cleaning: Pour any remaining color back into its original container. Wipe the color cup or bottle clean with a cloth moistened with the appropriate solvent.
  2. Flushing: Hold the airbrush at a downward angle and put a few drops of solvent through the Color Adjusting Part Assembly. Apply pressure to the H-155 Finger Button to flush out any remaining color.
  3. Lubrication: Every two to three months, apply a tiny dab of Vaseline to the H Color Adjusting Part and HC- Aircap threads to prevent color buildup and freezing of these components.

How to Open Clogged Fluid Passages:

  1. Bottle Assembly Clogs: Agitate color in the Bottle Assembly by momentarily placing a finger over the HC- Aircap while air is passing through the airbrush. This will blow color back into the bottle, clearing clogged passages. Do not attempt this with an open cup, as color may blow out.
  2. Part Assembly Clogs (H-1, 3, or 5): If the Color Adjusting Part Assembly becomes clogged, loosen the H-153 Set Screw, unscrew the HT-1, 3, or 5 Tip from the HN Needle, gently pull it back through the ball-shaped support, and remove the Tip.
  3. Cleaning Parts: Carefully clean parts using nothing harder than a wooden toothpick.
  4. Reassembly: Reverse the disassembly procedure, ensuring the shoulder of the Needle seats against the ball-shaped support.
  5. Severe Clogs: If the needle and tip are completely clogged, soak them in a closed bottle of appropriate solvent until clean.

Safety Warnings:

  • WARNING: Spray materials may be harmful if inhaled or allowed to come into contact with the skin or eyes. Consult the product label and Material Safety Data Sheet supplied for the spray material. Follow all safety precautions.
  • CAUTION: A well-ventilated area is required to remove fumes, dust, or overspray.
  • Maximum Air Pressure: 75 P.S.I.

paasche H-1 Specifications

General IconGeneral
Brandpaasche
ModelH-1
CategoryAirbrushes
LanguageEnglish

Related product manuals