4
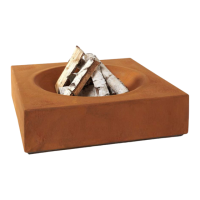
CALDERA E CORTEN FIRE PIT | Owner and Installation Manual
1. Please refer to ‘Clearances to Combustibles’ guide on page 6 of this guide for placement.
2. Ensure that the nal location for the re pit is as at and level as possible. Also provide adequate drainage
beneath the re pit.
3. Completely unpack the re pit. Some components may be packed inside the Caldera body.
4. Note where the control knob hole is to ensure that it will face in the desired direction. Carefully lift the re
pit and place it in its nal position. If there is a gas riser, re pit vessel should be placed so that the stub is
enclosed within the Caldera body (2).
5. If the Caldera does not sit level, shim appropriately so that it is level and evenly supported.
6. Use a blanket or other padding to protect re pit from damage. Carefully tilt and lift re pit so that it is resting
on its side. Make sure that the re pit is secure and supported before proceeding.
7. Connect ex hose to Natural Gas or Propane Source as per page 8 of this manual. Check connections for
leaks. (see page 8)
8. Ensure that power supply to outlet is o. Connect power supply to burner and to outlet.
9. Carefully lower re pit back into place.
10. Assemble and test burner as per instructions on page 7.
CAUTION:
HEAVY: Use care
when lifting and
placing to avoid
injury and damage
to property and the
re pit itself. Fire pits
will require 2 or more
people to lift.
ATTENTION: Cor-Ten Steel is designed to rust in order to form a protective layer that resists further
corrosion. This layer can take months to stabilize depending on climate and weather conditions.
Rust will bleed until it stabilizes. Do not place Cor-Ten re pits on surfaces that will be permanently
damaged or stained by rust bleed.
PLACEMENT AND ASSEMBLY