EasyManua.ls Logo

Panasonic AW-RP50 User Manual

Panasonic AW-RP50
14 pages
To Next Page IconTo Next Page
Page #1 background imageLoading...
Page #1 background image
1. Connect AW-RP50 LAN port and AW-XXXX LAN port using a LAN cable. (AW-XXXX can
automatically recognize whether it is a cross or straight cable.)
* LAN Cable: Category 5 or higher, Up to 100m (Category 5e or higher if connected via a PoE+ compatible hub)
* Connecting AW-RP50 and AW-XXXX via a hub: Straight cable, Category 5 or higher, Up to 100m
2. Operate AW-RP50 to set up the connection with AW-XXXX.
Press MENU button. - (Fig. 1-A)
Press [10] SYSTEM button. - (Fig. 1-B) * “[1] CAMERA CTL” will be displayed on the LCD screen. - (Fig. 2)
* If it is not displayed, turn F1 dial to make “[1] CAMERA CTL” appear.
While “[1] CAMERA CTL” is displayed on the LCD, press F1 dial. – (Fig. 1-C)
(“[1] CAM1” will be displayed on the upper half, and the connection method (default: [NoAsign]) on the
lower half of the LCD screen.)
* If it is not displayed, turn F1 dial to make [CAM1] appear.
Turn F2 dial to select [Network], then press F2 dial to determine the setting. – (Fig. 1-D)
After the setting-up is completed, LED button 1 (CAM1) in the picture below (AW-RP50 CAMERA STATUS /
SELECTION Area) lights up according to the camera’s power status. If the camera is in STANDBY mode (power
OFF: factory default), it lights up in orange. If in POWER ON mode (power ON), it lights up in green.
* When the camera is in STANBY mode, the Power-ON operation needs to be done. (Please see “3. Turn
AW-XXXX on” below.)
(AW-RP50: CAMERA STATUS/SELECTION Area)
1.CAM1
Network
1
CA
MERA
CTL
MENU ON
Select [10]
Press F1
Turn F2 to select
Press F2 to determine
Controlling (One) PTZ Camera via AW-RP50 Controller
After setting up, this lights up
a
ccording to the camera’s
power status.
* If it does not light up, please check the following points.
(Figure 1)
(Figure 2)
A
B
C
D
C
heck the connection state of LAN cable or whether you are using a cable that meets the specifications.

Other manuals for Panasonic AW-RP50

Question and Answer IconNeed help?

Do you have a question about the Panasonic AW-RP50 and is the answer not in the manual?

Panasonic AW-RP50 Specifications

General IconGeneral
Timer-
InterfaceWired
Product colorBlack
Suitable for smartphoneNo
Weight and Dimensions IconWeight and Dimensions
Depth177 mm
Width210 mm
Height67 mm
Weight1100 g

Summary

Controlling (One) PTZ Camera via AW-RP50 Controller

Connecting the AW-RP50 and AW-XXXX

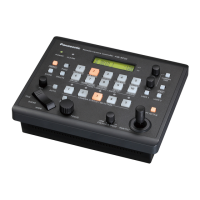
Describes connecting the AW-RP50 LAN port and AW-XXXX LAN port using a LAN cable.

Setting up the Connection on AW-RP50

Details the process of setting up the connection via the AW-RP50's menu and dials.

Turning on the AW-XXXX Camera

Details the procedure to switch the AW-XXXX camera to POWER ON mode using the AW-RP50.

Controlling Multiple AW-XXXX Cameras via AW-RP50 Controller

Connecting Multiple Cameras to AW-RP50

Explains connecting AW-RP50 and multiple AW-XXXX cameras via a hub.

Assigning Camera Numbers and IP Addresses

Details setting [No Asign] for cameras to enable automatic IP address assignment.

Executing Automatic IP Address Assignment

Describes using the AUTO SET IP function to automatically assign IP addresses to connected cameras.

Controlling AW-XXXX Camera via AW-RM50 Wireless Remote

Wireless Remote Control Setup and Operation

Explains IR ID setting and aiming the wireless remote for optimal control.

Basic Wireless Remote Operations

Details controlling camera power, displaying menus, and registering preset positions.

Controlling AW-XXXX Camera via PC

Connecting PC to AW-XXXX via LAN

Details connecting the PC and AW-XXXX using a LAN cable for control.

Accessing the AW-XXXX Web Screen

Explains setting PC IP address and accessing the camera's web interface.

EASY IP Setup Software for Camera Configuration

Changing Camera IP Addresses

Outlines the process of changing an AW-XXXX camera's IP address using the EASY IP Setup Software.

Accessing Web Screen via EASY IP Software

Describes how to display the AW-XXXX camera's web screen using EASY IP Setup Software.

How to Reverse Output Image

Reversing Image via AW-RP50 Controller

Explains how to reverse the camera's output image using the AW-RP50 controller's settings.

Reversing Image via PC Web Screen

Details the steps to reverse the camera's output image using the PC's web interface.

Booting Up Camera in Specified Position: POWER ON Preset Function

Configuring POWER ON Preset Function

Describes how to set the camera to boot up in a specific direction and zoom position.

Related product manuals