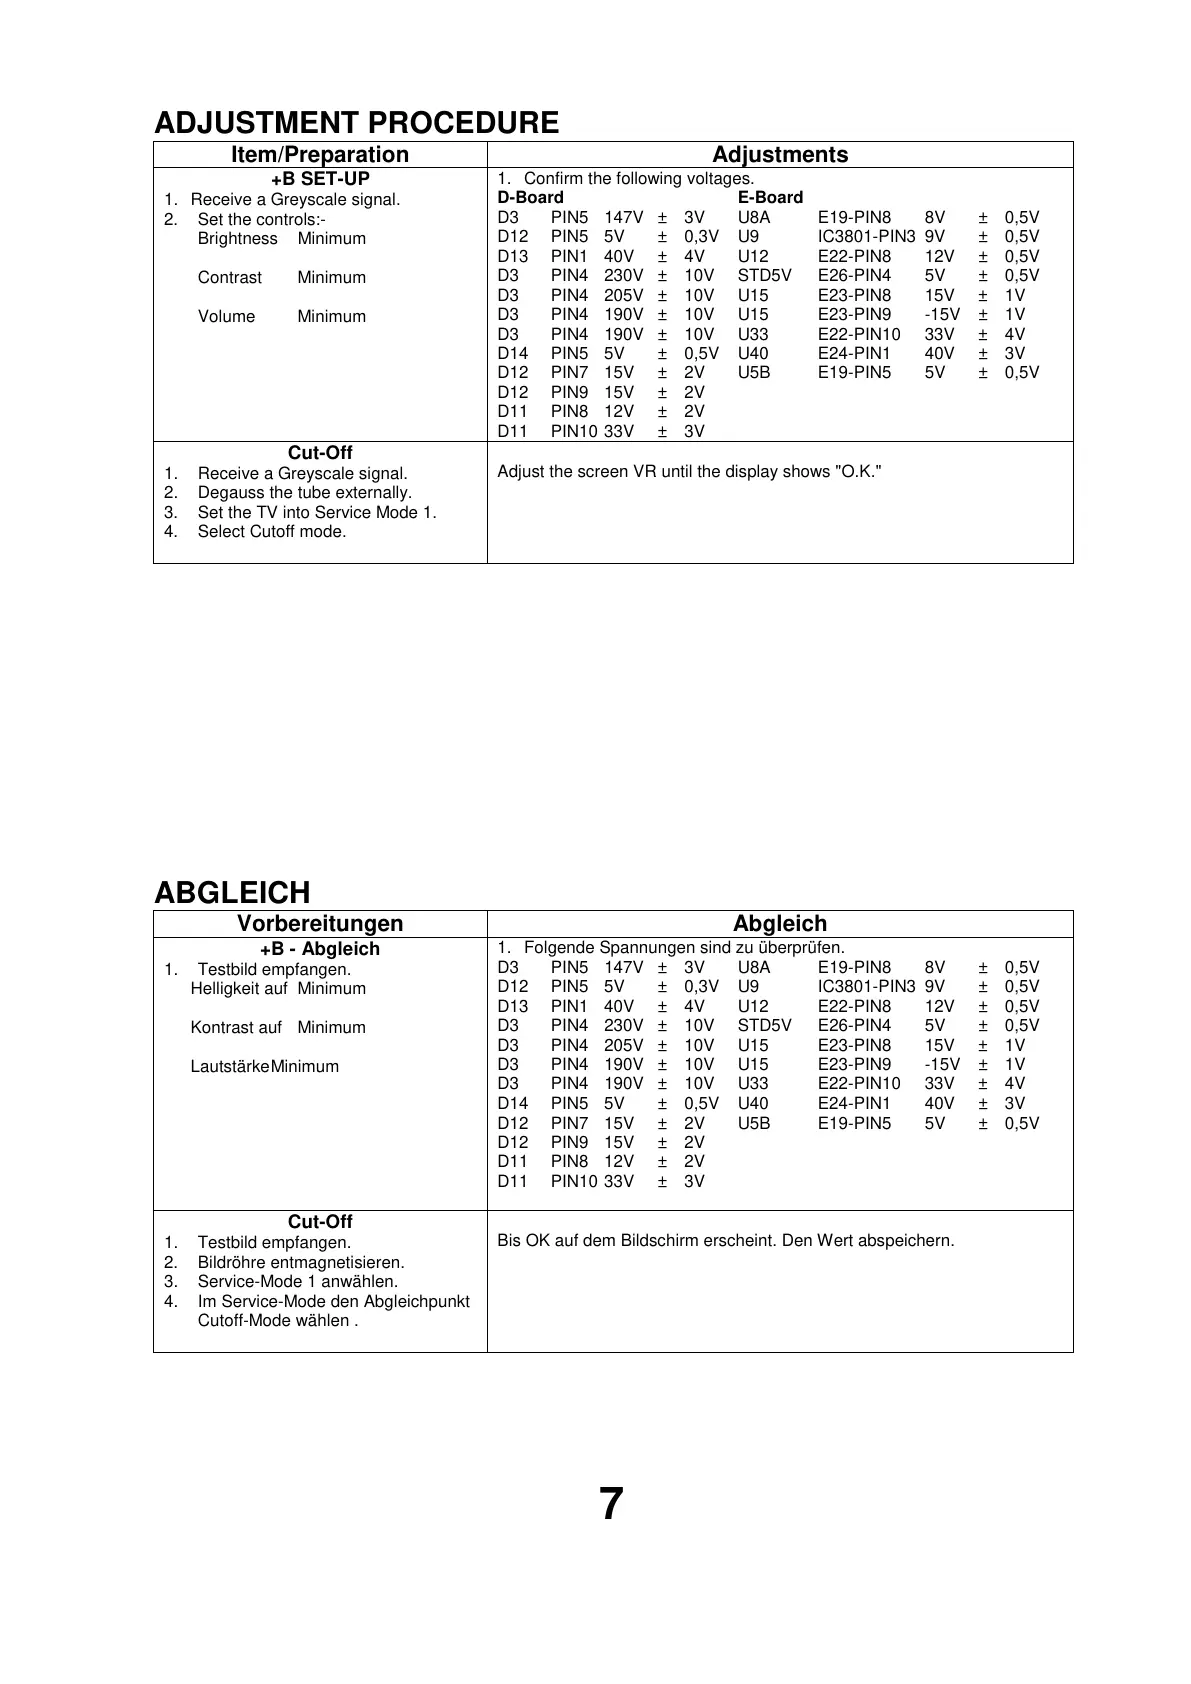
ADJUSTMENT PROCEDURE
Item/Preparation Adjustments
+B SET-UP
1. Receive a Greyscale signal.
2. Set the controls:-
Brightness Minimum
Contrast Minimum
Volume Minimum
1. Confirm the following voltages.
D-Board E-Board
D3 PIN5 147V ± 3V U8A E19-PIN8 8V ± 0,5V
D12 PIN5 5V ± 0,3V U9 IC3801-PIN3 9V ± 0,5V
D13 PIN1 40V ± 4V U12 E22-PIN8 12V ± 0,5V
D3 PIN4 230V ± 10V STD5V E26-PIN4 5V ± 0,5V
D3 PIN4 205V ± 10V U15 E23-PIN8 15V ± 1V
D3 PIN4 190V ± 10V U15 E23-PIN9 -15V ± 1V
D3 PIN4 190V ± 10V U33 E22-PIN10 33V ± 4V
D14 PIN5 5V ± 0,5V U40 E24-PIN1 40V ± 3V
D12 PIN7 15V ± 2V U5B E19-PIN5 5V ± 0,5V
D12 PIN9 15V ± 2V
D11 PIN8 12V ± 2V
D11 PIN10 33V ± 3V
Cut-Off
1. Receive a Greyscale signal.
2. Degauss the tube externally.
3. Set the TV into Service Mode 1.
4. Select Cutoff mode.
Adjust the screen VR until the display shows "O.K."
ABGLEICH
Vorbereitungen Abgleich
+B - Abgleich
1. Testbild empfangen.
Helligkeit auf Minimum
Kontrast auf Minimum
LautstärkeMinimum
1. Folgende Spannungen sind zu überprüfen.
D3 PIN5 147V ± 3V U8A E19-PIN8 8V ± 0,5V
D12 PIN5 5V ± 0,3V U9 IC3801-PIN3 9V ± 0,5V
D13 PIN1 40V ± 4V U12 E22-PIN8 12V ± 0,5V
D3 PIN4 230V ± 10V STD5V E26-PIN4 5V ± 0,5V
D3 PIN4 205V ± 10V U15 E23-PIN8 15V ± 1V
D3 PIN4 190V ± 10V U15 E23-PIN9 -15V ± 1V
D3 PIN4 190V ± 10V U33 E22-PIN10 33V ± 4V
D14 PIN5 5V ± 0,5V U40 E24-PIN1 40V ± 3V
D12 PIN7 15V ± 2V U5B E19-PIN5 5V ± 0,5V
D12 PIN9 15V ± 2V
D11 PIN8 12V ± 2V
D11 PIN10 33V ± 3V
Cut-Off
1. Testbild empfangen.
2. Bildröhre entmagnetisieren.
3. Service-Mode 1 anwählen.
4. Im Service-Mode den Abgleichpunkt
Cutoff-Mode wählen .
Bis OK auf dem Bildschirm erscheint. Den Wert abspeichern.
7