5
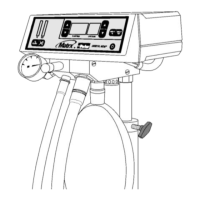
Figure 3. Digital MDM® Mixer Head Configurations.
If an oxygen outlet station is to be installed next to
the mixer head, it will be supplied assembled to the
bezel.
1. Position the installation template at the desired
location on the cabinet surface.
2. Mark the (4) mounting holes and the cutout area on
the cabinet surface.
3. Drill (4) 1/16” pilot holes for the cutout area, and cut
out the area for the mixer head.
4. Using a #20 drill, drill (4) 0.161” mounting holes.
5. From inside the cabinet, insert the (4) tee nuts into
the (4) mounting holes. See Figure 4.
6. While supporting the front of the cabinet, tap in the
tee nuts with a hammer. Alternately, a C clamp can
be used to squeeze the tee nuts into the cabinet
surface. Be certain to protect the front surface of
the cabinet with a clean piece of wood between the
C clamp and the finished surface.
7. Align and slide the mixer head and bezel assembly
into the mounting shelf.
Figure 4. Screw and Tee Nut Attachment.
8. Align the mounting shelf and bezel assembly with
the mounting holes, and slide it into the cutout area.
See Figure 5.
9. Connect the gas hoses and the power cord to the
rear of the mixer head. See Sections 1.7 and 1.9.
10. Slide a screw cap onto each of the (4) screws. See
Figure 4.
 Loading...