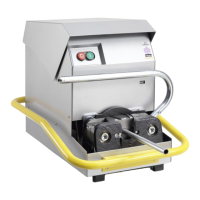
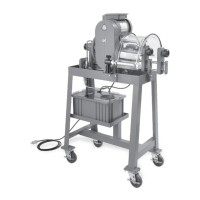
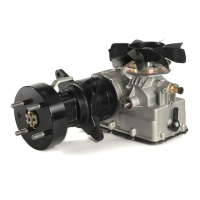
The document describes the Parker Phastite Assembly Tools, specifically the PH-8-HANDTOOL, PH-8-BENCHTOOL, and PH-16-BENCHTOOL, which are designed for the assembly of Phastite permanent connectors and termination sleeves. These tools are used in hydraulic systems to create reliable, leak-proof connections.
Function Description
The primary function of these tools is to facilitate the assembly of Parker Phastite Permanent Connectors and Termination Sleeves onto tubes. They operate by applying hydraulic pressure to close a moving jaw around the connector, pressing the Phastite Collar until it makes contact with the Abutment Shoulder of the Phastite Connector Body. This action ensures a secure and permanent connection. The tools are designed for specific tube O.D. sizes, both metric and inch, and for various connector styles including union straight, elbow, tee, and cross.
Important Technical Specifications
- Maximum Pressure: The Phastite Assembly Tools are designed for a maximum operating pressure of 700 bar (10,000 psi). It is critical not to exceed this rating, as overloading can cause equipment failure and personal injury.
- Tube O.D. Compatibility:
- PH-8-HANDTOOL / PH-8-BENCHTOOL:
- Metric: 6mm, 8mm, 10mm, 12mm O.D. tube.
- Inch: 1/4", 3/8", 1/2" O.D. tube.
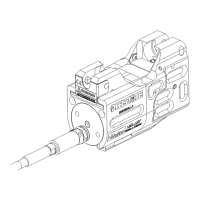
- PH-16-BENCHTOOL:
- Metric: 12mm, 14mm, 16mm, 18mm, 20mm, 22mm, 25mm O.D. tube.
- Inch: 1/2", 5/8", 3/4", 7/8", 1" O.D. tube.
- Jaw Inserts: Specific jaw inserts are required for different tube O.D. sizes and product styles (Straight, Elbow, Tee, Cross, Termination Sleeve). Incorrect jaw insert selection can lead to equipment damage and/or personal injury.
- Hydraulic Fluid: The tools are supplied pre-filled with hydraulic oil. Compatible hydraulic oil, such as Enerpac HF hydraulic oils, must be used with attached pumps.
- Temperature Range: Hydraulic equipment should be kept away from flames and excessive heat. Fluid and ambient temperatures, both steady and transient, must not exceed 60°C (140°F) or fall below -20°C (-4°F). Temperatures outside this range can degrade hose and seals, potentially leading to fluid release.
- Bench Mounting (PH-8-BENCHTOOL): The PH-8-HANDTOOL can be bench mounted using a Bench Mount Bracket with four Ø8.5mm mounting holes, spaced 65.0mm x 50.0mm.
Usage Features
- Jaw Insert Assembly/Disassembly:
- PH-8-HANDTOOL / PH-8-BENCHTOOL: Inserts slide into the jaw, retained by a self-energizing locking system. A guide flat ensures correct orientation. Disassembly is achieved by pulling the insert, with a step provided for smaller inserts.
- PH-16-BENCHTOOL: Inserts slide into the jaw, aligning with two location pins. A small socket cap screw retains the insert, tightened hand-tight only. Disassembly involves removing this screw.
- Hose Coupling: Only the coupling between the hose assembly and the pump should be disconnected. The hose assembly to tool connection must remain intact. An appropriate 3/8 NPT ported coupling is supplied, but users are responsible for selecting suitable replacements if needed.
- Tube Preparation: Tubes must be cut square, and all burrs removed without undue chamfering of the tube end to ensure proper insertion and connection integrity.
- Adequate Tube Insertion: A Phastite Tube Marker is used to ensure correct tube insertion. Two lines are marked on the tube; both must be hidden under the Phastite Collar before assembly. After assembly, only one line should be visible. If both lines are visible post-assembly, the connection is deemed slipped and should not be used.
- Assembly Process:
- Insert the tube into the Phastite Connector, ensuring adequate insertion.
- Align the connector in the tool with the appropriate jaw insert.
- Re-confirm tube insertion (both mark lines hidden).
- Apply hydraulic pressure (max 700 bar) until the Moving jaw closes and the Phastite Collar contacts the Abutment Shoulder.
- Release pressure; the Moving Jaw retracts automatically.
- Remove the assembly and check tube insertion.
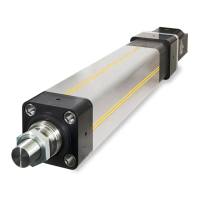
- PH-16-BENCHTOOL Removable Cylinder: For complex tube runs, the uppermost cylinder and arm can be removed. This requires activating the tool to compress all cylinders, moving the jaw by approximately 1/2" / 12mm, then releasing pressure. During the return stroke, the cylinder can be lifted out of its retaining counter bores. The upper cylinder must be reinstalled before use, as operating the tool without it will result in uneven loading.
- Termination Connectors (Disassembly/Retightening): Phastite Termination Connectors can be disconnected and re-tightened multiple times. Disassembly involves loosening the swivel nut. To retighten, the swivel nut is tightened until the collar fully abuts the connector body.
Maintenance Features
- Inspection: All components should be visually inspected for shipping damage upon receipt. Any damage found should be reported to the carrier immediately.
- Regular Checks: Read all instructions, warnings, and cautions carefully. Follow safety precautions to avoid personal injury or property damage.
- Part Replacement: Immediately replace worn or damaged parts with genuine Parker parts. Using standard grade parts will cause personal injury and property damage.
- Servicing: Phastite assembly equipment must only be serviced by a qualified Parker technician. Contact an Authorized Parker Service Centre for repair and service.
- Hose Care: Protect the tool assembly and hoses from wear, snagging, kinking, bending smaller than minimum bend radius, and cutting. Any hose that has been kinked, bent beyond its minimum radius, cut, or otherwise damaged, should be removed and discarded.
- Hydraulic System Inspection: Regularly inspect hydraulic hoses for signs of failure, such as leaks, abrasions, or damage. High-pressure fluids can be dangerous; never attempt to locate a leak by feeling with hands or any body part. If a hose fails, immediately shut down equipment and ensure pressure is completely released before inspection.
- Cleanliness: Ensure that jaw inserts and jaws are free from damage or foreign bodies before assembly.