2
Service Bulletin 33-00C
August 2005
through the adapter and down through the pilot port to
the top of the piston. This forces the piston downward and
pushes the main port plug open, thereby permitting flow
of the refrigerant through the valve. The closing spring
meanwhile is held in a compressed position.De-energizing
of the solenoid coil permits the spring-assisted plunger
to reseat, stopping the flow through the pilot port. Bleed-
off, through the bleed hole in the piston, decreases the
pressure above the piston and allows the closing spring
to force the main port plug upward into a closed position
to stop the flow. The pressure difference across the valve,
acting upon the area of the valve seat, plus the force of
the closing spring, holds the main port plug in a tightly
closed position.
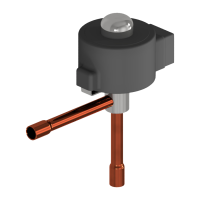
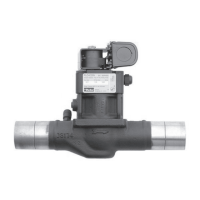
MANUAL OPENING STEM
The manual opening stem on the SC solenoid is for the
purpose of opening the valve without energizing the
solenoid coil. Refer to the exploded view and the parts
list for location of the stem and other related parts. For
access to the stem, the seal cap must be removed. This
must be done with caution as refrigerant may be trapped
inside the seal cap. Manual opening is accomplished
by turning the stem counter clockwise until stopped. To
reset for automatic operation turn stem clockwise until
seated.
INSTALLATION
The solenoid valve can be mounted in a horizontal or
vertical line with the flow in the direction of the arrow on
the valve body. Protect the inside of the solenoid valve
from moisture, dirt and chips during installation. These
valves may be soldered into the line without disassem-
bly. A wet cloth should be wrapped around the valve
and the soldering flame should be directed away from
the valve body.The SC solenoid valve must be installed
with the arrow on the valve body in the direction of flow
through the valve. If the valve is backwards, the flow will
not be stopped when the valve is electrically de-ener-
gized. Like all Solenoid Valves, the SC can stop flow only
in the direction from normal inlet to normal outlet (as
shown by the arrow on the body). If reversal of pressure
occurs in the system so the outlet pressure exceeds the
inlet pressure, the plug will be blown away from its seat
and reverse flow will occur. If a system has this type of
pressure reversal, a check valve such as Refrigerating
Specialties Division Type CK4A in series with the sole-
noid valve will prevent flow reversal. (The CK4A must be
installed downstream of the solenoid to avoid trapping
liquid when the solenoid is de-energized.)
ELECTRICAL
The Refrigerating Specialties Division molded water
resistant Class “F” solenoid coil,
which is standard
on the SC solenoid, is designed for long life and pow-
erful opening force. The standard coil housing meets
NEMA 3R and 4 requirements. This sealed construction
can withstand direct contact with moisture and ice.
The Class “F” solenoid coil and splice box housing
should be used on low side applications only. Due to
the lower temperature rating of the Class “F” coil, it
should not be used with solenoid valves applied to high
side duty. For those applications, the Class “H” coil and
the general purpose housing should be used which are
standard on Parker Refrigerating Specialties Division
S81 and S82 solenoid valves.
A solenoid coil should never be energized except when
mounted on its corresponding solenoid tube.
The molded Class “F” coil is available from stock with
most standard voltages. However, coils are available for
other voltages and frequencies.
The solenoid coil must be connected to electrical line
with volts and Hertz same as stamped on coil. The
supply circuits must be properly sized to give adequate
voltage at the coil leads even when other electrical
equipment is operating. The coil is designed to operate
with line voltage from 85% to 110% of rated coil voltage.
Operating with a coil voltage above or below these limits
may result in coil burnout. Also, operating with a coil
voltage below the limit will definitely result in lower-
ing the valve’s maximum opening pressure differential.
Power consumption during normal operation will be
10.2 watts or less.
The coil housing washer (item #40) should be installed
on the solenoid operator (#36), before the coil housing
(#39) and the coil cover clip (#41) are installed.
This “Stack-up” maintains the coil firmly in place and
prevents excessive vibration of the entire coil housing
assembly when the coil is energized.
SERVICE POINTERS
1. Failure to Open: (a) Coil is of incorrectly high
voltage. See “Electrical”. Check voltage printed on the
coil. (b) Line voltage is abnormally low. See “Electri-
cal”. Check line voltage at coil leads with a voltmeter. (c)
Failure to electrically energize. Check control circuit. (d)
Pressure difference across valve is too high. The SC will
open against a maximum pressure difference across
the valve of 21 bar (300 psig). (e) Solenoid Coil is burned
out. See “Electrical”, and replace with proper coil. (f)
Plunger Assembly is sticking. To disassemble the SC
for inspection of internal parts (after pumping out the
system as required): disconnect power source to Sole-
noid Coil, remove (#36) Solenoid Operator Assembly,
then Adapter. Remove every trace of dirt from Adapter
and Cartridge Assembly. Thoroughly clean all parts and
reassemble using a light film of refrigerant oil.
2. Failure to Close: (a) Electrical control circuit
is not opening properly. Check wiring and controls. (b)
There are chips or dirt on the Pilot Seat or the Piston
Plug Seat , preventing proper seating.
 Loading...