22 GB
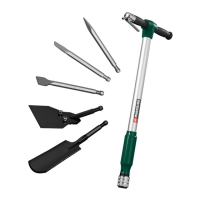
Attaching/removing the
accessory tool
(Fig. G)
m
CAUTION! RISK OF INJURY!
Accessory tools can be sharp and
may become hot during use. Always
wear protective gloves when handling
accessory tools!
m
WARNING!
Always switch the product off, remove
the battery pack
[2] and let the
product cool down before making any
adjustments!
m
CAUTION! RISK OF INJURY!
u Keep your hands away from the accessory
tool when the product is in operation.
NOTE
u To use the dust extractor
[], you will
need to connect it before attaching the
accessory tool (see “Connecting/removing
the dust extractor”).
Inserting the accessory tool
(Fig. G)
1. Fold the lever
[9] all the way upwards
(180°).
The clamping nut
[6] is lifted up and allows
access to the accessory tool holder
[7].
2. Inserting open end of accessory tools into
the accessory tool holder
[7].
NOTE
u You can attach the accessory tools into
the accessory tool holder
[7] in any lock-in
position (Fig. H).
Tightening the accessory tool
(Fig. G)
Push the tool release lever
[9] all the way
down to “LOCK” position.
Removing the accessory tool
(Fig. G)
Fold the insert tool release lever
[9] all the
way upwards (180°).
Pull the accessory tool out of the accessory
tool holder
[7].
After removing the accessory tool: Push the
tool release lever
[9] all the way down back
to “LOCK” position.
 Loading...