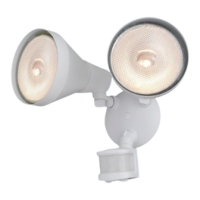
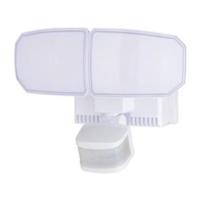
This document describes the Patriot Lighting 2-Light Outdoor Sensor Light, available under SKU numbers 356-9227 and 356-9228, with model numbers OW9227W and OW9228BZ.
Function Description:
The Patriot Lighting 2-Light Outdoor Sensor Light is designed for outdoor use, featuring a motion sensor that automatically turns the light ON when motion is detected and OFF when motion stops. A photocell ensures the light remains OFF during daylight hours, contributing to energy efficiency. The fixture can be either wall-mounted or eave-mounted, offering flexibility in installation. It provides adjustable light coverage and motion detection sensitivity to suit various needs and environments.
Important Technical Specifications:
- Power Source: 120 VAC, 60 Hz
- Maximum Wattage: 2-150W
- Work Temperature: -4°F to 113°F (-20°C to 45°C)
- Motion Detection Range: Up to 70 feet at 77°F (25°C)
- Detection Angle: 240 degrees
- Bulb Type: Max. 150W PAR 38 Bulb (not included)
- SKU Numbers: 356-9227, 356-9228
- Model Numbers: OW9227W, OW9228BZ
Usage Features:
Installation:
- Safety First: Always turn off electricity at the main fuse box or circuit breaker before beginning installation. Exercise caution to avoid damaging or cutting wire insulation, which could lead to electric shock. Ensure all electrical connections comply with local codes, ordinances, and the National Electric Code (NEC). Consult a qualified electrician if the dwelling was built before 1985 or if the lighting system lacks a grounding means.
- Mounting Strap: Install the mounting strap (BB) to the outlet box using two mounting screws (AA) that best fit, ensuring the backplate sits flush against the wall.
- Wiring: Pull source wires from the outlet box. Connect the fixture's black wire to the "hot" wire (usually black) from the power source, the fixture's white wire to the neutral wire (usually white) from the power source, and the fixture's grounding wire to the grounding wire (usually green/yellow insulation) from the power source using wire connectors (EE). Carefully tuck wires back into the outlet box.
- Backplate Attachment: Attach the backplate (A) to the mounting strap (BB) using the fixture mounting screw (DD). Push the decorative cover (CC) firmly into the fixture mounting screw (DD) hole on the light.
- Shell Installation: Align the three slots in the decorative shell (B) with the light head stoppers. Push the shell (B) in and twist clockwise to lock. Repeat for the other shell.
- Bulb Installation: Install bulbs (not included). Refer to the relamping label at the socket area or packaging for maximum wattage allowed.
- Sealing: Apply silicone caulking compound (not included) completely around where the backplate (A) meets the wall surface to prevent water seepage into the light fixture and/or outlet box.
Eave Mounting (Specific Rotation):
For eave-mounted installations, the sensor head (C) must be rotated towards the backplate (A), then clockwise 180° so the controls face down. This ensures proper operation and avoids electrical shock.
Adjusting the Sensor Head (C):
- Aiming: Aim the sensor head (C) toward the desired detection area, maintaining a 5° - 40° downward angle to allow moisture to drain. Ensure controls face the ground.
- Coverage Area: Move the sensor head (C) up and down to change the coverage area. Setting the range too high may increase false triggering.
Sensitivity of Motion Sensor:
Adjust the sensitivity using the “SENSITIVITY” selector on the right side of the sensor's bottom surface. This allows for desired performance, with an approximate range from 10ft to 70ft.
Adjusting the Light Head (D):
- Gently grasp and tilt the light heads (D) left or right to adjust the light coverage area. Maintain at least 1" (25mm) distance from the sensor.
- Keep the light heads (D) 30° below horizontal to avoid water damage and electrical shock.
Operating Modes (Selected via slide switch on sensor bottom):
- TEST MODE (daytime and nighttime operation): Rotate the "TIME" knob to the "TEST" position. When power is first applied, the light will turn on immediately; allow 30 seconds for the sensor to warm up.
- OFF MODE (nighttime operation only): Rotate the "Time" knob to the desired time setting (5 seconds to 3 minutes). At dusk, the light stays off, turning on when motion is detected and staying on as long as motion continues. After motion ceases, it remains on for the predetermined time, then turns off. The light turns off automatically at dawn.
- 3 HOUR MODE (nighttime operation only): Slide the switch to "3H" and rotate the "Time" knob to the desired time setting (5 seconds to 3 minutes). At dusk, the light turns to low-level brightness for 3 hours. During this period, motion detection triggers high-level brightness, which reverts to low-level after the predetermined time. After 3 hours, the light turns off. Subsequent motion detection will trigger high-level brightness, turning off after the predetermined time. The light turns off automatically at dawn.
- 6 HOUR MODE (nighttime operation only): Similar to 3 Hour Mode, but maintains low-level brightness for 6 hours.
- D2D MODE (nighttime operation only): Slide the switch to "D2D" and rotate the "Time" knob to the desired time setting (5 seconds to 3 minutes). At dusk, the light turns to low-level brightness. Motion detection triggers high-level brightness, which reverts to low-level after the predetermined time. The light turns off automatically at dawn.
Shut-off Delay:
Adjust the length of time the light stays at brightness after motion is detected by rotating the “TIME” knob. Clockwise increases the delay (up to 3 minutes), counter-clockwise decreases it (down to 5 seconds).
Important Notes for Operation:
- Always keep the wall switch in the “ON” position (including daytime) for proper function.
- The sensitivity of the motion sensor increases as environmental temperature cools.
- Install the fixture at least 8 feet above the ground for optimal detection performance.
- The sensor detects movement across its path more sensitively than motion directly towards it.
- Avoid mounting the fixture near heat sources (e.g., air conditioners, vents, furnace exhausts) or reflective objects to reduce false triggering.
Maintenance Features:
- Cleaning: Clean glass and coated metal surfaces with a non-abrasive cleaner. Do not use chemicals, solvents, or harsh abrasives.
- Sensor Lens Care: The motion-detecting lens has a specially painted finish. Use only a soft, dry cloth to dust or wipe the lens area. Gently clean the lens with a soft cloth every 1 or 2 months to ensure maximum sensitivity.
Troubleshooting:
- Light does not come on: Check wall switch and circuit breaker, wiring, and cover the sensor with a dark cloth to verify ambient light level is not too high.
- Light comes on for no apparent reason: Re-aim the motion sensor, decrease sensitivity, and ensure a dimmer or timer is not controlling the fixture.
- Light flashes on and off: Reposition the bulb and/or motion sensor, or check if the sensor is in "TEST" mode and warming up.
- If issues persist, consult a certified electrician.
Warranty:
The product comes with a FIVE-YEAR LIMITED WARRANTY. If the fixture breaks or fails due to a defect in material workmanship within five years of purchase, it can be returned to a Menards retail store with the original sales receipt for repair or replacement. The warranty excludes expendable parts (like light bulbs), damage from abuse or misuse, and associated losses, labor, injuries, or costs.