EasyManua.ls Logo

PEACOCK IBIS - User Manual

PEACOCK IBIS
6 pages
Print Icon
To Next Page IconTo Next Page
Loading...
Before you begin, read these instructions completely and carefully.
Be certain electrical power is OFF before and during installation, maintenance and removal.
Fan wiring must be properly grounded in accordance with the NEC and any applicable local code requirements.
Use only UL or IEC approved wire for input/output connections.
Verify that supply voltage matches voltage on fan label. Installation to any other connection may void the warranty.
Wear gloves during installation to prevent injury and do not expose wiring to metal or sharp edges.
IMPORTANT SAFETY PRECAUTIONS
WARNING: To reduce the risk of fire, electrical shock, or personal injury, mount this fan to an outlet box marked "Acceptable for Fan Support of
22.7kg (50lbs)" or less and use Mounting Screws provided with the outlet box. CAUTION: Install the primary mounting means and use only the
hardware provided with the fan.
To reduce the risk of personal injury, do not bend the blade brackets when installing the brackets, balancing the blades or clearing the fan. Be
careful not to insert foreign objects in between rotating fan blades.
To reduce the risk of fire or electrical shock, do not use this fan with any solid-state speed control device.
The important safeguards and instructions appearing in this manual are not meant to cover all possible conditions and situations that may occur.
It must be understood that common sense, caution and careful attention to detail are factors which cannot be built into this product. These
factors must be supplied by the person or persons installing, caring for, and operating the unit.
This product should be installed, inspected and maintained by a qualified and licensed electrician. Installation of luminaire must be in accordance
with NEC and local code requirements.
ELECTRIC SHOCK FALLING PARTS
ABRASIONS BURNS
IBIS CEILING FAN LED
Installation Manual
REV 2022 1115
SPECIFICATIONS AND DETAILS ARE SUBJECT TO CHANGE WITHOUT NOTIFICATION. CONTACT PEACOCK FAN COMPANY FOR UP TO DATE DETAILS.
PEACOCK FAN COMPANYPEACOCKFAN.COM
SAVE THESE INSTRUCTIONS
1
Question and Answer IconNeed help?

Do you have a question about the PEACOCK IBIS and is the answer not in the manual?

Summary

Important Safety Precautions

Warning: Fire, Electrical Shock, Personal Injury

Risk reduction for fire, electrical shock, or personal injury during fan installation.

Dimensions

Package Contents

Ceiling Mounting Bracket

Component for mounting the fan to the ceiling structure.

Ball;Downrod Assembly

Part of the fan assembly connecting the motor to the mounting bracket.

Canopy

Covers the ceiling mounting bracket and wiring.

Fan Motor Assembly

The main component housing the fan motor and electronics.

Fan Blades

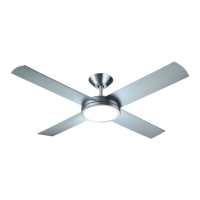
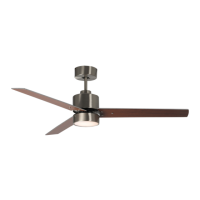
The air-moving components of the ceiling fan.

Controllers

Remote control units for operating the fan.

Fasteners Package

Includes all necessary hardware for fan assembly.

Mount Hardware Details

Various screws, washers, and gaskets for installation.

Balance Kit

Used to correct fan wobbling for smoother operation.

Tools and Materials Required

Specifications

Ceiling Mount Installation

Disconnect Power

Turn off power at the circuit breaker before installation.

Secure Junction Box

Ensure junction box is securely mounted to support fan weight.

Mounting Examples & Sloped Ceiling

Examples of junction box mounting and sloped ceiling limitations.

Bracket Installation

Whole Machine Installation Diagram

Canopy Installation

Steps for installing the fan canopy and securing it.

Installing Fan Blades

Procedure for attaching fan blades to the motor assembly.

Electric Connections

Receiver Installation

Placing the receiver in the mounting bracket for optimal signal.

Motor to Receiver Wiring

Connecting fan motor wires to the receiver unit.

Receiver to Supply Wires

Connecting receiver wires to house supply wiring.

Ground Wire Connection

Connecting ground wires from junction box, bracket, and fan.

Wire Separation & Distance

Separating wires and noting remote transmission distance.

Troubleshooting

Fan Will Not Start

Steps to diagnose and resolve issues when the fan fails to start.

Noisy Operation

Guidance on identifying and fixing common fan operational noises.

Excessive Wobbling

Methods to correct fan blade wobbling and ensure smooth operation.

Wiring Schematic Diagram for Receiver

Overview

This document is an installation and user manual for the Peacock Fan Company's IBIS Ceiling Fan LED.

Function Description

The IBIS Ceiling Fan LED is a ceiling-mounted fan with integrated LED lighting, designed for residential use. It provides air circulation and illumination, controlled by a handheld remote transmitter. The fan features a memory function, allowing it to resume its previous light and direction settings after being powered off and on.

Important Technical Specifications

The IBIS Ceiling Fan LED has the following specifications:

  • Fan Size: 52 inches
  • Voltage: 120V
  • Max Fan Power: 35W
  • Max Speed: 180 RPM ± 10%
  • Gross Weight: 11.3 lbs
  • Net Weight: 10.9 lbs
  • Lamp (MAX): 36W
  • Motor Warranty: 10 years
  • General Warranty: 2 years
  • Location Rating: Dry Location
  • Mounting: Designed for an outlet box marked "Acceptable for Fan Support of 22.7kg (50lbs)" or less. Not suitable for sloped ceilings with a pitch greater than 30°.

The fan includes a ceiling mounting bracket, ball/downrod assembly, canopy, joint cover, fan motor assembly, decorative covers, four fan blades, a set of controllers (remote transmitter and receiver), and a fasteners package. The fasteners package includes flat washers, wood screws, spring pads, star washers, screws, fan blade set screws, and a red gasket, along with a balance kit.

Usage Features

The fan is operated via a handheld remote control.

  • Remote Control: The receiver can be controlled from any angle in the space with the included remote, without directional restrictions.
  • Memory Function: The remote control can save the fan's light and direction status. When the fan is powered OFF and then ON, it will resume its previous settings.
  • Pairing Method: To pair the remote, turn on the power switch. After hearing a beep, immediately press the power button in the upper left corner of the remote control. A long beep indicates successful pairing. This process must be completed within 30 seconds of powering on. If pairing fails, power off the fan for 10 seconds and retry.

Maintenance Features

The manual provides troubleshooting steps for common issues:

  • Fan Will Not Start:
    • Check circuit fuses or breakers.
    • Verify all electrical connections for proper contact.
    • CAUTION: Ensure main power is OFF before checking electrical connections.
  • Noisy Operation:
    • Ensure all motor housing screws are snug.
    • Confirm screws attaching fan blade brackets to the motor are tight.
    • Verify that the upper and lower sides of the fan blades do not touch the motor cover.
    • Allow a 24-hour "breaking-in" period, as most noise from new fans dissipates during this time.
    • If an optional light kit is used, ensure screws securing glassware are tight and the light bulb is secure.
    • If using a solid-state variable speed control and noise occurs, consider installing a different type of control.
    • Ensure the upper canopy is a short distance from the ceiling and not touching it.
  • Excessive Wobbling:
    • Check that all blade and blade arm screws are secure.
    • Verify blade levels by measuring the distance from the ceiling to the tip of each blade; this distance should be within 1/8".
    • Use the enclosed Blade Balancing Kit if wobble persists.
    • Interchanging two adjacent blades may redistribute weight and improve operation.
    • WARNING: Do not bend blade arms during installation, balancing, or cleaning. Do not insert foreign objects between rotating blades.

Important Safety Precautions

  • Electrical power must be OFF before and during installation, maintenance, and removal.
  • Fan wiring must be properly grounded according to NEC and local code requirements.
  • Use only UL or IEC approved wire for input/output connections.
  • Verify supply voltage matches the fan label.
  • Wear gloves during installation to prevent injury and avoid exposing wiring to metal or sharp edges.
  • Mount the fan to an outlet box marked "Acceptable for Fan Support of 22.7kg (50lbs)" or less, using provided mounting screws.
  • Do not bend blade brackets during installation, balancing, or cleaning.
  • Do not insert foreign objects between rotating fan blades.
  • Do not use this fan with any solid-state speed control device.
  • Installation, inspection, and maintenance should be performed by a qualified and licensed electrician in accordance with NEC and local code requirements.
  • The fan power wires and grounding wires should be placed separately on both sides of the junction box.
  • The fan must be installed at a maximum distance of 30 feet from the Hand Held Remote Transmitter for optimal signal transmission.
  • The parts provided with the fan must be used for proper installation and safety.

PEACOCK IBIS Specifications

General IconGeneral
BrandPEACOCK
ModelIBIS
CategoryFan
LanguageEnglish

Related product manuals