3
FNS
®
PLUS Vertical Grid D.E. Filter Installation and User’s Guide
Filter Clamp Installation
Follow these instructions exactly to prevent the lid from
separating during system startup or operation.
1. Turn off the pump and any automatic controls.
2. Open the High Flow™ Manual Air Relief Valve and
turn counterclockwise until it snaps into the full open
position. Wait until all pressure is relieved before
assembly, disassembly, or servicing.
3. Be sure the O-ring is clean and in position on the lower
tank half. Place the FNS
®
Plus Vertical Grid D.E. Filter
lid onto the lower tank half so the O-ring fits in between
the tank halves.
4. Hold the ends of the filter clamp apart and place over
both upper and lower tank flanges. Bring the ends of
the filter clamp together.
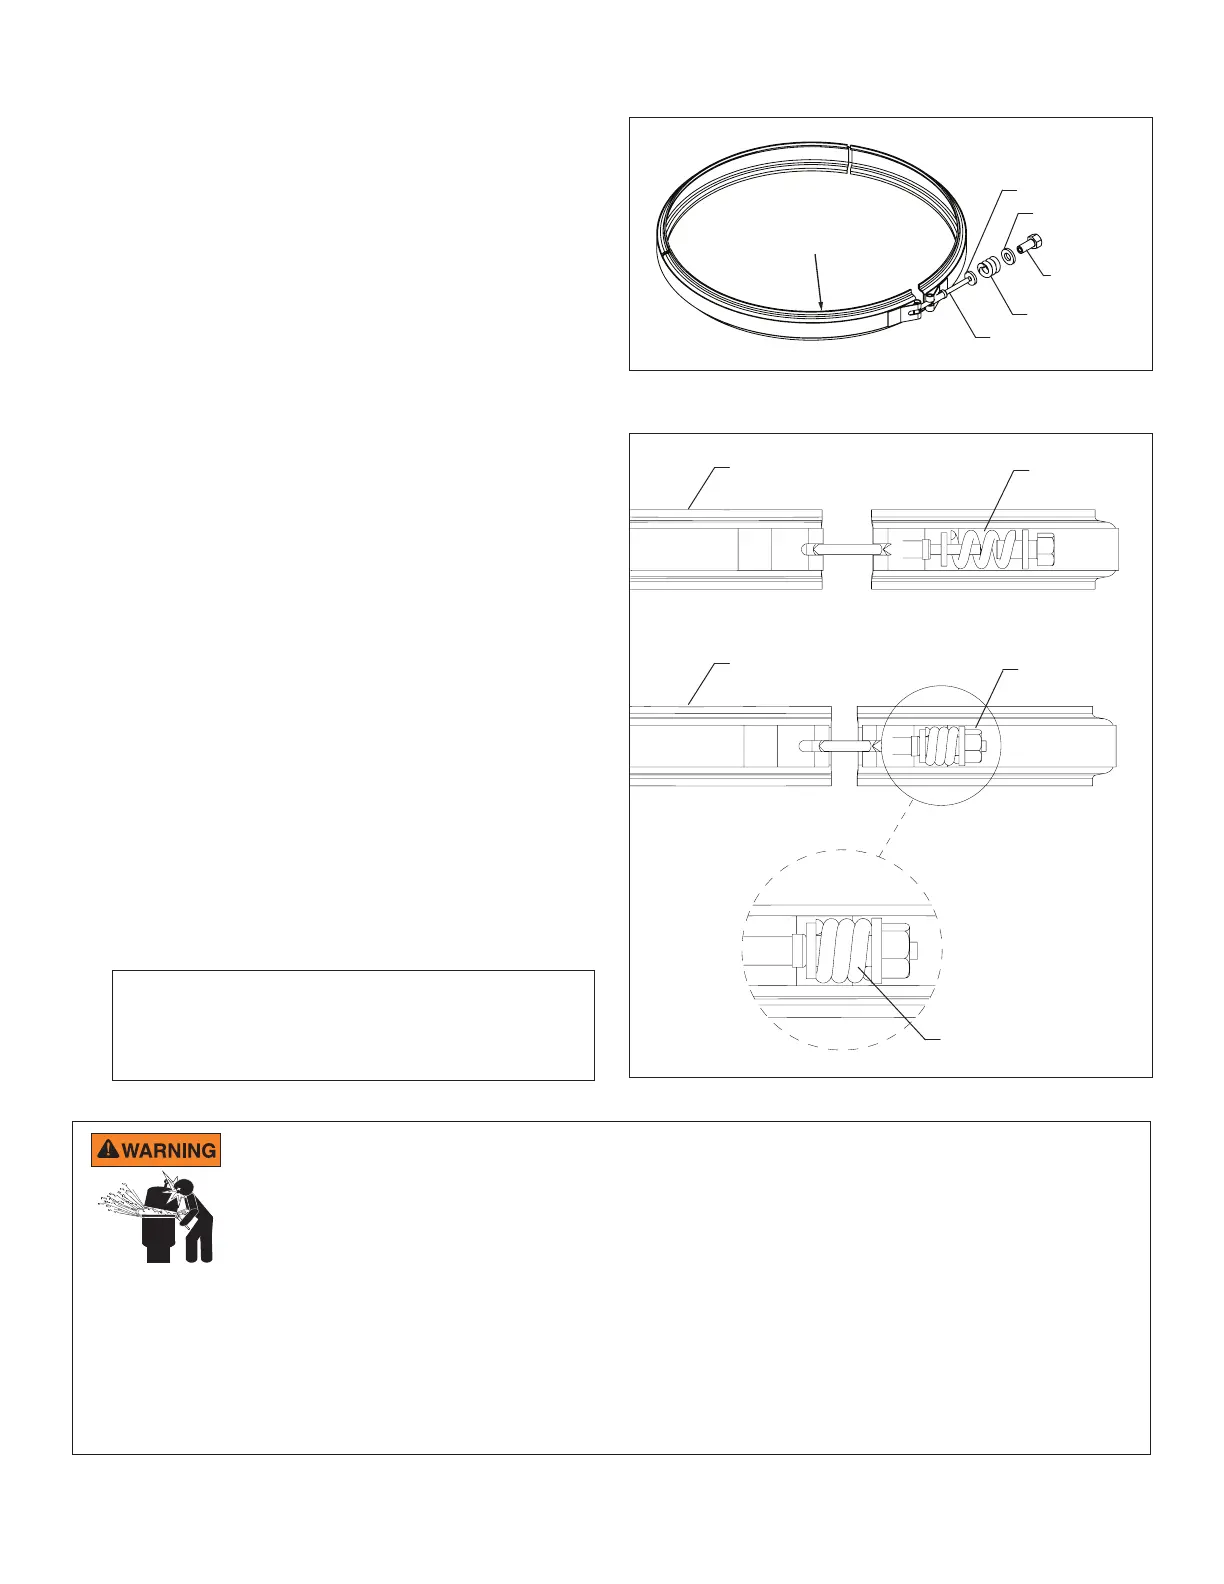
5. Insert the T-bolt through the other side of the clamp
and hold together.
6. Place the small washer onto the T-bolt.
7. Place the larger washer and spring onto the barrel nut
then place onto T -bolt and tighten the nut by hand. Be
sure filter clamp is fully engaging both tank flanges.
8. First tighten the nut using a 7/8 in. wrench and then
tap around the outside of filter clamp with a rubber
mallet (or similar tool) multiple times around the entire
clamp to fit the clamp properly. Continue to tighten only
until the spring coils touch.
Note: The clamp is installed correctly only when the
spring coils remain touching after tapping the clamp
(see Figure 3). If the clamp spring coils do not touch
after tapping then continue to tighten the nut as
instructed above in Step 8.
9. Continue on to System Startup Instructions on page 5.
Note: Check the spring coils at least once a month
to ensure proper tension. If spring coils do not
touch, turn the system off to tighten the nut and tap
filter clamp until the coils touch, and restart.
Spring
Barrel Nut
Sm. Washer
T-Bolt
Clamp
Lrg. Washer
Figure 2
FILTER OPERATES UNDER HIGH PRESSURE. When any part of the circulating system, (e.g., clamp, pump, filter,
valve(s), etc.), is serviced, air can enter the system and become pressurized. Pressurized air can cause the lid to separate
which can result in severe injury, death, or property damage.
To avoid this potential hazard, follow these instructions:
1. Before repositioning valve(s) and before beginning the assembly, disassembly, or adjustment of the clamp or any other
service of the circulating system: (A) Turn the pump OFF and shut OFF any automatic controls to ensure the system
is NOT inadvertently started during the servicing; (B) open the manual air relief valve; (C) stand clear of the filter; (D)
wait until all pressure is relieved.
2. Whenever installing the filter clamp FOLLOW THE FILTER CLAMP INSTALLATION INSTRUCTIONS EXACTLY.
3. Once service on the circulating system is complete FOLLOW SYSTEM RESTART INSTRUCTIONS EXACTLY.
4. Maintain circulation system properly. Replace worn or damaged parts immediately, (e.g., clamp, pressure gauge,
valve(s), o-rings, etc).
5. Be sure that the filter is properly mounted and positioned according to instructions provided.
Clamp Ring,
Closed
Clamp Ring,
Open Position
Tighten with
7/8 wrench
Hand Tighten
onto T-Bolt
Spring Coils
Touching
Figure 3