13800A862 11/06/12
3
ASSEMBLING PIPING TO PUMP
Pump grinder plate and pump discharge piping is
supplied with other rail parts.
1. Attach guide plate and piping to pump. Be sure
piping is plumb, then tighten all set screws. Attach
lifting chain to lifting eye with clevis supplied.
Pumps can now be lowered into position with
lifting chain. Retain power and control cords at
surface as pump is lowered.
When pumps are in place, attach cords to
connection box. Remove slack from wires so that
they will hang vertical without tangling.
2. Connect level control cords to connection box as
shown on wiring diagrams.
3. Install control box on cover and connect to cover
with 2" conduit as shown.
4. Run wires to control box and connect to cords
coming into connection box. Mark or trace each
incoming wire so that it can be connected to
proper cord.
5. Do not pour sealing compound into fitting
until pumps have been run, to be sure all
connections are correct.
NOTE – If control box is to be installed, off-set from
basin. The CF-200 conduit flange must be installed in
basin and connection box to be connected to flange
before installing cover.
6. Install hold-down guides and 1/2" galv. hold-
down pipe. Screw pipe into lower guide. Upper
guides fasten to rails and hold-down pipe with
set screws. The hold-down pipe is necessary to
prevent hydraulic pressure from lifting pump from
base seal casting. The hydraulic pressure keeps
the pumps suspended when in operation so there
is no side load on the rails and removal is easier
when required.
7. Valve adapter and shut-off handles are connected
with 1/2" galv. pipe and held with set screws.
These shut-off stems are installed in 1-1/2" plastic
pipe guides attached to valves.
STARTING SYSTEM
1. Open 1-1/4" bronze gate valves; turn counter-
clockwise to open.
2. Set pump switches on Auto position and run water
into sump until level controls starts one pump.
Allow pump to operate until sump level drops,
stopping pump.
IMPORTANT – Lower level control or weight should
be set so that sump level drops to within 1" or 2" from
bottom of pump before stopping pump.
3. Turn both pump switches to Off and fill sump until
level is to override control, then turn both pump
switches to Auto position. Both pumps should
come on and operate until sump level drops to the
Off position.
4. Leave both pump switches to Off and fill sump
until level is to override control, then turn both
pump switches to Auto position. Both pumps
should come on and operate until sump level
drops to the Off position.
5. Leave both pump switches to Auto position and
system is now ready for automatic operation.
IN CASE OF TROUBLE CHECK
THE FOLLOWING:
Pumps will run but not deliver water.
1. Probably air lock. Start and stop pump several
times. If this does not clear air turn both pumps
to Off and run more water into sump 6" to 12"
higher. If air still does not clear it may be necessary
to raise hold-down pipe and lift pump so that
lower seal fitting is out of the discharge case to
release air.
2. Be sure shut-off valve is open in discharge line.
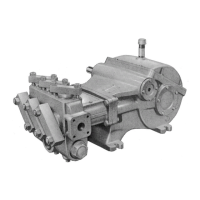
3. If pump is 3 phase be sure rotation is correct.
Grinder impeller must rotate counterclockwise
when looking at pump inlet. Do not put fingers
near grinder impeller.
Pump seal fitting does not hold tight.
1. Probably cut or broken O-ring. Replace if
necessary. Trash may be caught in seal flange.
Lift pump and open shut-off valve to back flush
discharge casting.
On installation where discharge line is not
filled it may be necessary to lift pump until seal
flange is out of discharge case, then run pump
to flush casting.
For all other trouble problems with pump or control
box refer to pump and control box instructions
included with these items.
CAUTION – Never work on pumps or controls
unless power is turned off. If pump is remote from
control box, disconnect wires to pumps to be
certain power cannot be turned on when working
on pumps. Never put fingers near grinder impeller
when pump cord is connected.

 Loading...