EasyManua.ls Logo

PERGO EXTREME - User Manual

PERGO EXTREME
6 pages
Print Icon
To Next Page IconTo Next Page
Loading...
0166ES | 03/2019 | 1 of 6MOHAWK TECHNICAL SERVICES DEPARTMENT | 508 EAST MORRIS STREET, DALTON, GA. 30721 | 888.387.9881
Pergo Extreme Installation Instructions
Pergo Extreme
Preparation
We recommend placing a single order for all cartons required for a commercial flooring project.
1. Always store and transport Pergo Extreme Luxury Vinyl Flooring on a flat surface in neat stacks
to prevent warping. Never store the boxes upright or in moist, dusty rooms or in places with
extreme temperatures. Pergo Extreme Luxury Vinyl Flooring must be acclimated in the room of
installation between 55-85°F (13-30°C) for a period of at least 48 hours before installation. This
temperature range should be maintained during installation and for at least 24 hours after the
installation is complete.
2. The type of subfloor, its quality and its preparation will greatly aect the results of the final
installation. If the subfloor is not suitable for the installation of Pergo Extreme Flooring,
then necessary corrections must be made. Contact your Pergo Extreme Flooring dealer
for assistance as needed. Be aware that unevenness and imperfections in the subfloor may
translate through the planks, negatively aecting the final appearance of the installation.
It is possible to install Pergo Extreme Flooring over many existing floor coverings, providing
it is stable and firmly fixed. Existing flooring cannot be soft, damaged or loosely laid. Please
remove carpet, needle felt, cushion vinyl, floating laminate and floating hardwood. You may
install directly over ceramic tiles, PVC, VCT, glued laminate, glued hardwood and fixed wooden
boards, provided they are installed over a wooden subfloor.
3. When installing over a wooden subfloor, first remove any existing floor covering. Ensure the
subfloor is free of mold and mildew. Ensure the subfloor is level and nail down any loose
boards. Repair the wooden subfloor as needed by applying an appropriate underlayment
board or leveling compound. The underlayment boards must be stapled according to
manufacturer’s recommendations. The crawl space under the plank floor must be suciently
ventilated. Remove any obstacles and make sure there is sucient ventilation—the crawl
space should have perimeter venting 1.5 sq. ft. per 100 sq. ft. of crawl space, except where local
builder codes dier. The moisture content of the wood subfloor must not exceed 12%. A 6 mil
vapor barrier covering all exposed soil in a crawl space must be used.
4. Make sure the subfloor is completely flat. Any joints of more than 1/8 inch (3 mm) in depth and
1/4 inch (6 mm) in width should be leveled using an appropriate primer and leveling compound.
5. The moisture content of the concrete subfloor must be less than 90% relative humidity (RH
test, ASTM F2170) or less than 8 lbs moisture vapor emission rate (MVER test, ASTM F1896).
Always measure, record and keep moisture content results.
www.Pergo.com
55–85ºF
(13–30ºC)
<8 lbs MVER
or <90% RH
Question and Answer IconNeed help?

Do you have a question about the PERGO EXTREME and is the answer not in the manual?

Summary

Preparation and Subfloor Requirements

Acclimation and Environmental Conditions

Acclimate flooring 48 hrs (55-85°F). Maintain temp during/after install.

Subfloor Suitability and General Condition

Subfloor must be flat, stable, dry, clean. Remove unsuitable coverings.

Wooden Subfloor Specifics

Check mold, nail boards, level, ventilate, <12% moisture, 6 mil vapor barrier.

Concrete Subfloor Moisture Control

Moisture <90% RH or <8 lbs MVER. Measure & record results.

Subfloor Flatness and Joint Leveling

Ensure flatness. Level joints >1/8" deep or 1/4" wide.

Tools and Plank Inspection

Lists required tools and emphasizes visual plank inspection before installation.

Installation Process

Plank Blending and Layout

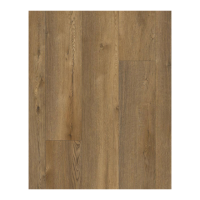
Blend planks from multiple cartons for natural look. Avoid patterns.

Starting the Installation Row

Begin in the left corner of the room with a full plank.

Connecting Planks

Connect planks by holding hand underneath, pushing down gently, and clicking.

Expansion Space and Alignment

Ensure 1/4" (6 mm) expansion space. Align planks straight.

Finishing and Obstacle Installation

Final Surface Inspection

Inspect the final surface. Install base molding.

Undercutting Door Jambs

Undercut door jambs to fit planks. Use a tool bar to secure.

Installing Around Pipes and Radiators

Install around pipes by drilling holes, or tilt planks for radiators.

Maintenance and Floor Protection

Routine Cleaning

Use vacuum cleaner suitable for hard floors. Remove spills promptly.

Furniture Protection

Use felt pads/coasters. Ensure chairs have soft rubber wheels.

Temperature and Mat Placement

Maintain 0-140°F. Use non-rubber backed mats at entrances.

Overview

The Pergo Extreme flooring system is a luxury vinyl flooring solution designed for both residential and commercial applications, offering durability and ease of installation. It is suitable for various indoor environments, including three-season rooms, sunrooms, and solariums, with a wide operating temperature range.

Function Description:

Pergo Extreme flooring is designed for floating installations, meaning the planks are not directly attached to the subfloor but rather interlock to form a continuous surface. This system allows for natural expansion and contraction of the flooring due to temperature changes. The interlocking mechanism ensures joint integrity and a stable floor. The product is engineered to be installed over a variety of existing floor coverings and subfloor types, provided they are stable, flat, and dry.

Important Technical Specifications:

  • Acclimation Temperature: 55-85°F (13-30°C) for at least 48 hours before installation. This temperature range must be maintained during installation and for at least 24 hours after completion.
  • Operating Temperature Range: 0-140°F (-17-40°C) for the installed floor.
  • Radiant Floor Heating Compatibility: Compatible with hydronic or electric systems built into cement subfloors. A constant room and floor temperature of 65-85°F (18-30°C) must be maintained during acclimation and installation, and for 48 hours after installation. The maximum floor surface temperature should not exceed 82°F (27°C).
  • Subfloor Flatness: Any unevenness greater than 3/16" in a 10' radius (5mm in 3m) must be leveled. Joints deeper than 1/8 inch (3 mm) and wider than 1/4 inch (6 mm) should be leveled.
  • Moisture Content (Concrete Subfloor): Less than 90% relative humidity (RH test, ASTM F2170) or less than 8 lbs moisture vapor emission rate (MVER test, ASTM F1896).
  • Moisture Content (Wood Subfloor): Must not exceed 12%. A 6 mil vapor barrier is required over exposed soil in crawl spaces.
  • Expansion Gap: A 1/4 inch (6 mm) expansion space is required around the perimeter of the room. For areas exposed to temperatures greater than 85°F (30°C), a 5/8 inch (16mm) expansion gap is necessary. This gap should also be maintained when using transition moldings.
  • Plank Stagger: A random stagger of at least 8 inches (20 cm) is recommended to avoid a "brick" method of staggering.
  • Last Row Width: The last row of planks must be at least 3 inches (7.6 cm) wide.
  • Underlayment: Pergo Extreme products with attached pads cannot be installed over separate underlayment. Mohawk ActiveSound underlayment is recommended for products without attached pads.

Usage Features:

  • Installation over Existing Floors: Can be installed over stable and firmly fixed ceramic tiles, PVC, VCT, glued laminate, glued hardwood, and fixed wooden boards. Carpet, needle felt, cushion vinyl, floating laminate, and floating hardwood must be removed.
  • Acclimation: Planks must be acclimated in the installation room for at least 48 hours to prevent warping.
  • Subfloor Preparation: Requires a dry, flat, stable, clean subfloor free from debris, grease, and chemical substances. Loose boards on wooden subfloors must be nailed down, and underlayment boards stapled according to manufacturer recommendations.
  • Tool Requirements: Standard tools include a utility knife, tape measure, safety glasses, chalk line, speed square, tapping block, circular saw, gloves, and a pencil. A pull bar and carpenter's square are also recommended.
  • Plank Blending: Planks from multiple cartons should be blended during installation to avoid noticeable variations in color or shade.
  • Direction of Installation: Best to fit panels in the direction of the longest wall and parallel to the light source.
  • Radiant Heat Considerations: For rooms with radiant heat or different temperature controllers, a transition profile (Mohawk RevoFit™ moldings) is recommended.
  • Molding Usage: Only Pergo Extreme accessories, such as RevoFit™ moldings, should be used to maintain warranty validity. Transition strips or moldings should not be glued directly to the floor.
  • Visual Inspection: All planks should be visually inspected before and during installation for defects.
  • Cutting: Planks can be cut using a circular saw or reciprocating jigsaw.
  • Door Jambs and Pipes: Specific instructions are provided for undercutting door jambs and drilling holes for pipes to ensure a neat finish.

Maintenance Features:

  • Immediate Use: The floor can be walked on immediately after installation.
  • Cleaning: Use a vacuum cleaner suitable for hard surface flooring (without moving parts or rotary beater bars). A damp or wet mop can also be used.
  • Steam Cleaners: Never use a steam cleaner on Pergo Extreme flooring.
  • Spill Management: Spills should be removed from the floor immediately.
  • Furniture Protection: Use felt pads and coaster protectors on furniture legs. Chairs with castors should have suitable soft rubber wheels, or a desk mat should be used.
  • Heavy Items: Always lift heavy furniture items; do not drag them. Furniture feet should have a large surface area and non-staining floor protectors.
  • Temperature Stability: Maintain indoor room temperature between 0 and 140°F (-17 and 40°C).
  • Dirt Prevention: Place non-rubber backed mats at outside entrances to prevent dirt, grit, and soil from being tracked onto the floor.
  • Heat and Rubber Contact: Avoid contact with cigarettes, matches, or other very hot items to prevent permanent damage. Prolonged contact with rubber items can cause permanent stains.

PERGO EXTREME Specifications

General IconGeneral
BrandPERGO
ModelEXTREME
CategoryHousehold Appliance
LanguageEnglish